Whirlpool SF216LXSQ Owners Manual
Whirlpool SF216LXSQ Manual
 |
UPC - 883049035079
View all Whirlpool SF216LXSQ manuals
Add to My Manuals
Save this manual to your list of manuals |
Whirlpool SF216LXSQ manual content summary:
- Whirlpool SF216LXSQ | Owners Manual - Page 1
® STANDARD CLEANING GAS RANGE Use & Care Guide For questions about features, operation/performance, parts, accessories or service, call: 1-800-253-1301 or visit our website at... www.whirlpool.com ESTUFA A GAS DE LIMPIEZA ESTÁNDAR Manual de uso y cuidado Para consultas respecto a características, - Whirlpool SF216LXSQ | Owners Manual - Page 2
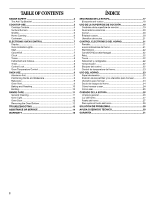
Racks and Bakeware 9 Bakeware 9 Oven Vent 9 Baking and Roasting 10 Broiling 10 RANGE CARE 11 General Cleaning 11 Oven Light 12 Oven Door 12 Removing the Oven Bottom 12 TROUBLESHOOTING 13 ASSISTANCE OR SERVICE 14 WARRANTY 15 ÍNDICE SEGURIDAD DE LA ESTUFA 17 El soporte anti-vuelco 18 - Whirlpool SF216LXSQ | Owners Manual - Page 3
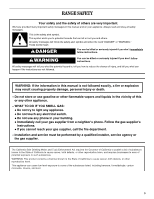
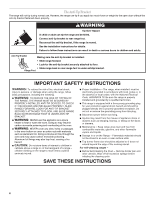
. • Immediately call your gas supplier from a neighbor's phone. Follow the gas supplier's instructions. • If you cannot reach your gas supplier, call the fire department. - Installation and service must be performed by a qualified installer, service agency or the gas supplier. The California Safe - Whirlpool SF216LXSQ | Owners Manual - Page 4
Tip Over Hazard A child or adult can tip the range and be killed. Connect anti-tip bracket to rear range foot. Reconnect the anti-tip bracket, if the range is moved. See the installation instructions for details. Failure to follow these instructions can result in death or serious burns to children - Whirlpool SF216LXSQ | Owners Manual - Page 5
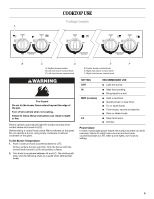
when not cooking. Failure to follow these instructions can result in death or fire. Electric LO. The clicking will stop. Use the following chart as a guide when setting heat levels. SETTING LITE HI MED (medium) LO , the surface burners can be lit manually. Hold a lit match near a burner and turn knob - Whirlpool SF216LXSQ | Owners Manual - Page 6
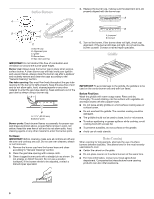
burner base and clean according to "General Cleaning" section. 2. Clean the gas tube opening with a damp cloth. 3. Clean clogged burner ports with check cap alignment. If the burner still does not light, do not service the burner yourself. Contact a trained repair specialist. Griddle IMPORTANT: To - Whirlpool SF216LXSQ | Owners Manual - Page 7
used under the broiler. Use the following chart as a guide for cookware material characteristics. COOKWARE CHARACTERISTICS Aluminum ■ Heats quickly heat for slow cooking. Ceramic or Ceramic glass ■ Follow manufacturer's instructions. ■ Heats slowly, but unevenly. ■ Ideal results on low to - Whirlpool SF216LXSQ | Owners Manual - Page 8
. The absence of a minus sign means the oven will be warmer by the displayed amount. Use the following chart as a guide. ADJUSTMENT °F (ADJUSTMENT °C) COOKS FOOD 10°F (5°C) ...a little more 20°F (10°C) ...moderately more 30°F (15°C) ...much more -10°F (-5°C) ...a little less -20°F (-10 - Whirlpool SF216LXSQ | Owners Manual - Page 9
type of foil, liners or cookware. ■ On those models with bottom vents, do not block or cover the walls. Use the following chart as a guide. Bakeware The bakeware material affects cooking results stone ■ Crisp crusts ■ Follow manufacturer's instructions. Ovenproof glassware, ceramic glass or ceramic - Whirlpool SF216LXSQ | Owners Manual - Page 10
. To Bake or Roast: 1. Touch BAKE. Touch TEMP "up" or "down" arrow pads to set a temperature other than 350°F (177°C) in 5°F (3°C) amounts. The bake range can be set between 170°F and 500°F (77°C and 260°C). 2. Touch START. The temperature can be changed at any time after this step by touching - Whirlpool SF216LXSQ | Owners Manual - Page 11
RANGE CARE General Cleaning IMPORTANT: Before cleaning, make sure all controls are off and the oven and cooktop are cool. Always follow label instructions before going into a dishwasher. Gas Grate and Drip Pan Cleaner Part Number 31617: See "Assistance or Service" section to order. Soap, water - Whirlpool SF216LXSQ | Owners Manual - Page 12
door. However, if removal is necessary, make sure the oven is off and cool. Then, follow these instructions. The oven door is heavy. To Remove: 1. Open the oven door. Insert hinge pins, included with your range, into both hinge hangers. Do not remove the pins while the door is removed from the - Whirlpool SF216LXSQ | Owners Manual - Page 13
TROUBLESHOOTING Try the solutions suggested here first in order to avoid the cost of an unnecessary service call. problem continues, call an electrician. ■ Is the main or regulator gas shutoff valve in the off position? See Installation Instructions. ■ Is the range properly connected to the gas - Whirlpool SF216LXSQ | Owners Manual - Page 14
reset the circuit breaker. If the problem continues, call an electrician. ASSISTANCE OR SERVICE Before calling for assistance or service, please check "Troubleshooting." It may save you the cost of a service call. If you still need help, follow the instructions below. When calling, please know the - Whirlpool SF216LXSQ | Owners Manual - Page 15
the 50 United States and Canada, contact your authorized Whirlpool dealer to determine if another warranty applies. If you need service, first see the "Troubleshooting" section of the Use & Care Guide. After checking "Troubleshooting," you may find additional help by checking the "Assistance - Whirlpool SF216LXSQ | Owners Manual - Page 16
Notes 16 - Whirlpool SF216LXSQ | Owners Manual - Page 17
es muy importante. Hemos incluido muchos mensajes importantes de seguridad en este manual y en su electrodoméstico. Lea y obedezca siempre todos los un instalador calificado, una agencia de servicio o por el proveedor de gas. La California Safe Drinking Water and Toxic Enforcement Act (La ley - Whirlpool SF216LXSQ | Owners Manual - Page 18
horno. ADVERTENCIA: NUNCA cubra ranuras, orificios o pasajes en la parte inferior del horno ni cubra una rejilla entera con materiales tales se extienda más allá de los bordes del utensilio de estufa. Para estufas de gas de limpieza automática - Antes de efectuar la limpieza automática del horno - Whirlpool SF216LXSQ | Owners Manual - Page 19
USO DE LA SUPERFICIE DE COCCIÓN Controles de la superficie de cocción A B C D A. Localizador del quemador exterior B. Perilla de control del quemador posterior izquierdo C. Perilla de control del quemador delantero izquierdo E F D. Perilla de control del quemador central E. Perilla de control - Whirlpool SF216LXSQ | Owners Manual - Page 20
. 1. Quite la tapa del quemador de la base del mismo y limpie de acuerdo con la sección "Limpieza general". 2. Limpie la abertura del tubo de gas con un paño húmedo. 3. Limpie los orificios obstruidos del quemador con un alfiler recto tal como se ilustra. No agrande ni distorsione el orificio. No - Whirlpool SF216LXSQ | Owners Manual - Page 21
■ Centre el envasador en la parrilla. ■ No coloque el envasador sobre 2 áreas de quemadores exteriores a la vez. ■ Para obtener más información, póngase en contacto con el departamento de agricultura de su localidad. También pueden ofrecer ayuda las compañías que fabrican productos para enlatado - Whirlpool SF216LXSQ | Owners Manual - Page 22
Start (Inicio) El botón START (Inicio) iniciará cualquier función del horno. Si no se presiona el botón de inicio dentro de los 5 segundos después de presionar un botón de función, la luz indicadora "PSH" (Empuje para poner en marcha) destellará y se escuchará el tono de empuje para poner en marcha, - Whirlpool SF216LXSQ | Owners Manual - Page 23
. Cerciórese de que las parrillas estén niveladas. Para un mejor resultado, hornee sobre una parrilla. Coloque la parrilla de tal manera que la parte más alta del alimento a hornear quede en el centro del horno. Para mover una parrilla, jálela hasta la posición de tope, levante el borde delantero - Whirlpool SF216LXSQ | Owners Manual - Page 24
Utensilios para hornear El material de los utensilios para hornear afecta los resultados de cocción. Siga las recomendaciones del fabricante y emplee el tamaño de utensilio para hornear recomendado en la receta de cocina. Use el siguiente cuadro como guía. UTENSILIO PARA HORNEAR/ RESULTADOS - Whirlpool SF216LXSQ | Owners Manual - Page 25
Cómo asar ASADOR El asador está ubicado debajo de la puerta del horno. La charola y la rejilla del asador se deslizan hacia fuera, lo cual facilita el acceso a las mismas. Para asar siempre tenga las puertas del asador y del horno cerradas. ■ Para evitar daños en el asador, no se apoye en la puerta - Whirlpool SF216LXSQ | Owners Manual - Page 26
remojo o fregarse antes de ponerlos en una lavavajillas. Limpiador para rejilla a gas y bandeja de goteo, pieza número 31617: Vea la sección "Ayuda Limpie con un paño suave seco o toallas de papel suaves para quitar las partículas de alimentos. Agua y jabón u otro limpiador que sea seguro para - Whirlpool SF216LXSQ | Owners Manual - Page 27
en la estufa. Para volver a colocarla: 1. Sujete ambos lados de la parte delantera de la puerta con sus dedos y use sus pulgares en la superficie la bisagra de la puerta en las ranuras de la bisagra. 3. Incline la parte superior de la puerta hacia la estufa. Inserte la bisagra inferior de la puerta - Whirlpool SF216LXSQ | Owners Manual - Page 28
esté completamente frío. 3. Levante la parte posterior del panel hacia arriba y hacia atrás. El borde de la parte delantera del panel deberá liberarse del los quemadores exteriores para liberar el aire proveniente de la tubería del gas. ■ ¿Se ha fijado correctamente la perilla de control? Oprima - Whirlpool SF216LXSQ | Owners Manual - Page 29
ésta la primera vez que usa el horno? Encienda cualquiera de las perillas del quemador exterior para liberar el aire proveniente de la tubería de gas. ■ ¿Se ha fijado debidamente el control electrónico del horno? Vea la sección "Control electrónico del horno". ■ ¿En algunos modelos, se ha fijado el - Whirlpool SF216LXSQ | Owners Manual - Page 30
locales, compañías que dan servicio y distribuidores de partes para reparación. Los técnicos de servicio designados por Whirlpool están entrenados para cumplir con la garantía del producto la pieza número 31662 Limpiador de parrilla para estufa a gas y bandeja de goteo Pida la pieza número 31617 30 - Whirlpool SF216LXSQ | Owners Manual - Page 31
Estados Unidos y Canadá, póngase en contacto con su distribuidor autorizado de Whirlpool para determinar si corresponde otra garantía. Si necesita servicio, consulte primero la sección "Solución de problemas" del Manual de uso y cuidado. Después de consultar la sección "Solución de problemas - Whirlpool SF216LXSQ | Owners Manual - Page 32
W10203463A © 2008 Whirlpool Corporation. All rights reserved. Todos los derechos reservados. ® Registered Trademark/TM Trademark of Whirlpool, U.S.A. ® Marca registrada/TM Marca de comercio de Whirlpool, U.S.A. 6/08 Printed in Mexico Impreso en México
-
 1
1 -
 2
2 -
 3
3 -
 4
4 -
 5
5 -
 6
6 -
 7
7 -
8
-
9
-
10
-
11
-
12
-
13
-
14
-
15
-
16
-
17
-
18
-
19
-
20
-
21
-
22
-
23
-
24
-
25
-
26
-
27
-
28
-
29
-
30
-
31
-
32
 |
 |
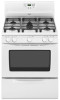
STANDARD CLEANING
GAS RANGE
Use & Care Guide
For questions about features, operation/performance,
parts, accessories or service, call:
1-800-253-1301
or visit our website at...
www.whirlpool.com
ESTUFA A GAS DE
LIMPIEZA ESTÁNDAR
Manual de uso y cuidado
Para consultas respecto a características, funcionamiento, rendimiento,
piezas, accesorios o servicio técnico, llame al:
1-800-253-1301
o visite nuestro sitio web en:
www.whirlpool.com
Table of Contents/Índice
......................................
2
W10203463A
®