Whirlpool WEG760H0DS Use & Care Guide - Page 10
Surface Grates, IMPORTANT - installation
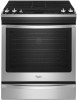 |
View all Whirlpool WEG760H0DS manuals
Add to My Manuals
Save this manual to your list of manuals |
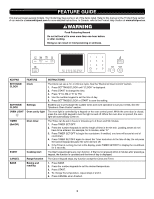
Page 10 highlights
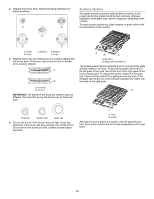
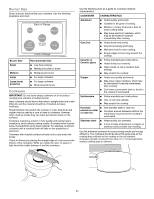
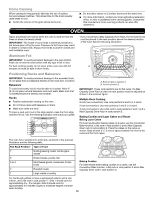
4. Replace the burner base. See the following illustration for burner positions. A D C Surface Grates The grates must be properly positioned before cooking. In the proper position the grates should be flush and level. Improper installation of the gates may result in chipping or scratching of the cooktop. To ensure proper positioning, align bumpers on grate bottom with the indentations in the cooktop. B E A. Small B. Large C. Medium D. Medium E. Large 5. Replace the burner cap, making sure it is properly aligned with the burner base. The burner cap should not rock or wobble when properly aligned. A B A. Incorrect B. Correct IMPORTANT: The bottom of the small and medium caps are different. Do not put the wrong size burner cap on the burner base. A B A A. Bumpers B. Alignment indentations The surface grates interlock using the hook on one end of the grate and the indent on the other. To remove the grates, lift the rear of the left grate off the hook, then lift the front of the right grate off the hook and pull apart. To replace the grates, replace the left grate first. Place the front indent of the right grate over the hook of the left grate, then lift the rear of the left grate and place the indent over the hook on the right grate. B Small cap Medium cap Large cap 6. Turn on the burner. If the burner does not light, check cap alignment. If the burner still does not light, turn off the burner. Do not service the burner yourself. Contact a trained repair specialist. A A. Hook B. Indent Although the burner grates are durable, they will gradually lose their shine and/or discolor due to the high temperatures of the gas flame. 10
-
 1
1 -
2
-
3
-
4
-
 5
5 -
 6
6 -
 7
7 -
 8
8 -
 9
9 -
 10
10 -
 11
11 -
 12
12 -
 13
13 -
 14
14 -
 15
15 -
16
-
17
-
18
-
19
-
20
-
21
-
22
-
23
-
24
-
25
-
26
-
27
-
28
-
29
-
30
-
31
-
32
-
33
-
34
-
35
-
36
-
37
-
38
-
39
-
40
-
41
-
42
-
43
-
44
-
45
-
46
-
47
-
48
 |
 |
