Whirlpool WFG975H0H Owners Manual - Page 6
Cooktop Use
 |
View all Whirlpool WFG975H0H manuals
Add to My Manuals
Save this manual to your list of manuals |
Page 6 highlights
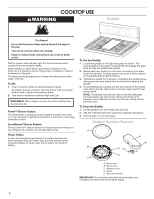
COOKTOP USE WARNING Griddle Fire Hazard Do not let the burner flame extend beyond the edge of the pan. Turn off all controls when not cooking. Failure to follow these instructions can result in death or fire. Electric igniters automatically light the surface burners when control knobs are turned to Ignite. Before setting a control knob, place filled cookware on the grate. Do not operate a burner using empty cookware or without cookware on the grate. The flame should be adjusted so it does not extend beyond the edge of the pan. To Set: 1. Push in and turn knob counterclockwise to Ignite. All surface burners will click. Only the burner with the control knob turned to Ignite will produce a flame. 2. Turn knob to anywhere between High and Low. REMEMBER: When range is in use, the entire cooktop area may become hot. Power™ Burner Feature The front burner is designed to give maximum power when fully on. It can be used to rapidly bring liquid to a boil and to cook large quantities of food. AccuSimmer® Burner Feature The AccuSimmer® feature allows for more precise simmering and low temperature cooking. It is the right rear burner. Power Failure In case of prolonged power failure, the surface burners can be lit manually. Hold a lit match near a burner and turn knob counterclockwise to Ignite. After burner lights, turn knob to setting. To Use the Griddle: 1. Locate the griddle on the right side grate as shown. The locating feet on the bottom of the griddle will engage the grate tines to keep the griddle from sliding. 2. Before each use, brush on a thin layer of cooking oil to keep food from sticking. Cooking sprays may leave a sticky residue on the griddle that is hard to remove. 3. Preheat the griddle for 5 minutes. Preheating the griddle slowly will ensure even heat distribution and will avoid warping the griddle. 4. For preheating and cooking, set the front burner to the lowest heat setting and the rear burner to medium-high heat for best performance. NOTE: The griddle may also be used on the left side grate. For best results, the rear burner setting should be set to Medium-Low or Medium and the front burner setting should be set to Low. To Clean the Griddle: 1. Let the griddle cool, then empty the drip tray. 2. See the "General Cleaning" section for cleaning instructions. 3. Store griddle in a cool dry place. Sealed Surface Burners A A B B ED E D C A. Burner cap B. Burner base C. Alignment pins D. Igniter E. Gas tube opening IMPORTANT: Do not obstruct the flow of combustion and ventilation air around the burner grate edges. 6
-
 1
1 -
 2
2 -
 3
3 -
 4
4 -
 5
5 -
 6
6 -
 7
7 -
 8
8 -
 9
9 -
 10
10 -
 11
11 -
 12
12 -
13
-
14
-
15
-
16
-
17
-
18
-
19
-
20
-
21
-
22
-
23
-
24
-
25
-
26
-
27
-
28
-
29
-
30
-
31
-
32
-
33
-
34
-
35
-
36
-
37
-
38
-
39
-
40
-
41
-
42
-
43
-
44
-
45
-
46
-
47
-
48
-
49
-
50
-
51
-
52
-
53
-
54
-
55
-
56
-
57
-
58
-
59
-
60
-
61
-
62
-
63
-
64
 |
 |
