Yamaha CBX-D5 Owner's Manual 1 - Page 3
Cubase Audio & Atari ST/STE System - software
 |
View all Yamaha CBX-D5 manuals
Add to My Manuals
Save this manual to your list of manuals |
Page 3 highlights
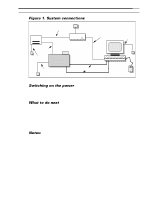
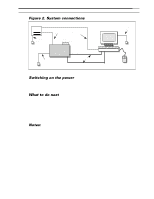
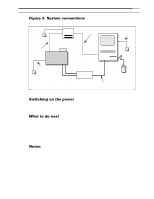
2 2 ChaCphtearp2te:r C2u:bCausebaAsuedAioud&ioA&taAritSaTri/ST/ESTSyEsSteymstem 2 Cubase Audio & Atari ST/STE System An overview In this system the CBX-D5 is used with an Atari ST/STE computer and the supporting software is Cubase Audio by Steinberg. What you will need 1) The CBX-D5, a power cable, two MIDI cables, a 50-way SCSI cable, and a SCSI terminator (all these except for one MIDI cable are provided with the CBX-D5). 2) An Atari ST computer and an Atari video monitor. 3) Steinberg's Cubase Audio software (Atari version). 4) A SCSI hard disk and a 25-pin D-SUB to 50-way SCSI cable. 5) A Steinberg DMA to SCSI Converter II, its power supply, and a 19-pin D-SUB to 19-pin D-SUB cable. Making the connections 1) Connect the Atari computer's "MIDI OUT" connector to the CBX-D5's "MIDI IN" connector, and the computer's "MIDI IN" connector to the CBX-D5's "MIDI OUT" connector using the MIDI cables. 2) Connect the Atari computer's "HARD DISK" connector to the SCSI adaptor's "DMA IN" connector using the 19-pin D-SUB to 19-pin D-SUB cable. 3) Connect the SCSI adaptor's "SCSI" connector to one of the hard disk's SCSI connectors using the 25-pin D-SUB to 50-way SCSI cable. 4) Connect the other hard disk SCSI connector to one of the CBX-D5's SCSI connectors using the 50-way SCSI cable. 5) Insert the CBX-D5's SCSI terminator into the CBX-D5's unused SCSI connector. 6) Connect the CBX-D5 to an AC receptacle using the supplied power cable. 7) Connect the Atari computer and its video monitor to an AC receptacle. 8) Connect the SCSI adaptor's power supply (refer to its Operating Manual for details). NOTE: Clinch the SCSI connector's spring retaining clips and tighten the 25-pin D-SUB connector's locking screws for secure connections. Settings 1) Set the CBX-D5 to SCSI ID "5 or 6" using the thumb wheel switch on the rear of the CBX-D5. 2) Set the CBX-D5's "TO HOST" switch to "MIDI". 3) Set the hard disk to SCSI ID "0" (refer to its Operating Manual for details). NOTE: 1. Hard disks must be set with continuous SCSI IDs starting from 0 (0, 1, 2, 3...). 2. Do not set the ID number of the CBX-D5 so that it is consecutive to the ID number of the "HARD DISK". 4) Set the SCSI adaptor as specified in its Operating Manual.
-
 1
1 -
 2
2 -
 3
3 -
 4
4 -
 5
5 -
 6
6 -
 7
7 -
 8
8
 |
 |