Yamaha CBX-D5 Owner's Manual 1 - Page 5
Cubase Audio & Atari TT System - support
 |
View all Yamaha CBX-D5 manuals
Add to My Manuals
Save this manual to your list of manuals |
Page 5 highlights
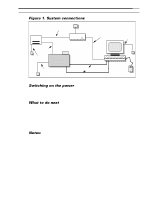
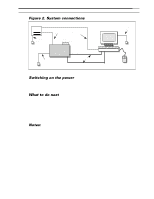
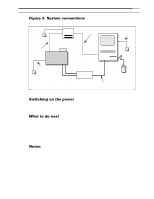
4 4 ChaCphtearp3te:r C3u:bCausebaAsuedAioud&ioA&taAritTarTi TSyTsSteymstem 3 Cubase Audio & Atari TT System An overview In this system the CBX-D5 is used with an Atari TT computer and the supporting software is Cubase Audio by Steinberg. What you will need 1) The CBX-D5, a power cable, two MIDI cables, a 50-way SCSI cable, and a SCSI terminator (all these except for one MIDI cable are provided with the CBX-D5). 2) An Atari TT computer and an Atari video monitor. 3) Steinberg's Cubase Audio software (Atari version). 4) A SCSI hard disk and a 25-pin D-SUB to 50-way SCSI cable. Making the connections 1) Connect the Atari computer's "MIDI OUT" connector to the CBX-D5's "MIDI IN" connector, and the computer's "MIDI IN" connector to the CBX-D5's "MIDI OUT" connector using the MIDI cables. 2) Connect the Atari computer's "SCSI" connector to the hard disk's SCSI connector using the 25-pin D-SUB to 50-way SCSI cable. 3) Connect the other hard disk SCSI connector to one of the CBX-D5's SCSI connectors using the 50-way SCSI cable. 4) Insert the CBX-D5's SCSI terminator into the CBX-D5's unused SCSI connector. 5) Connect the CBX-D5 to an AC receptacle using the supplied power cable. 6) Connect the Atari computer and its video monitor to an AC receptacle. NOTE: Clinch the SCSI connector's spring retaining clips and tighten the 25-pin D-SUB connector's locking screws for secure connections. Settings 1) Set the CBX-D5 to SCSI ID "5 or 6" using the thumb wheel switch on the rear of the CBX-D5. 2) Set the CBX-D5's "TO HOST" switch to "MIDI". 3) Set the hard disk to SCSI ID "1" (refer to its Operating Manual for details). NOTE: 1. External hard disks must be set with continuous SCSI IDs starting from 1 (1, 2, 3, 4...). The TT's internal hard disk is set to ID 0. 2. Do not set the ID number of the CBX-D5 so that it is consecutive to the ID number of the "HARD DISK".
-
 1
1 -
 2
2 -
 3
3 -
 4
4 -
 5
5 -
 6
6 -
 7
7 -
 8
8
 |
 |
