Yamaha DG-1000 Owner's Manual - Page 6
How to use the DG-1000, Connecting the DG-1000 - presets
 |
View all Yamaha DG-1000 manuals
Add to My Manuals
Save this manual to your list of manuals |
Page 6 highlights
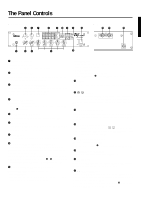
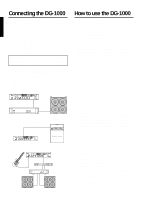
Connecting the DG-1000 How to use the DG-1000 To set up a guitar amp system, connect the DG-1000 to a power amp and speaker. As you know, power amps and speakers all have their own special characteristics. So the sound's character will change according to the type of devices used. The combined result of each device's character, room temperature, room humidity, and a variety of other factors, determines the guitar's sound. The purpose of the DG-1000 is to create sound by faithfully reproducing the dynamic range and tone nuance of the guitar as well as preserving the characteristics of the power amp, speakers, etc. The DG-1000 will surely provide you with the means to create your own personal sound. s Connecting Procedure Make sure that the power is switched OFF on the DG1000 and the power amp (guitar amp) before making any connections. 1. Connect the OUTPUT jack on the rear panel of the DG-1000 to the INPUT jack on the power amp using a cable. * Choose a cable that matches the required jack standard. The DG1000's OUTPUT jack is monaural. 2. Connect the power amp's speaker output (SPEAKER, etc.) to a speaker. * Use a speaker that matches the power characteristics of the amp (power capacity, system impedance). DG-1000 Speaker GAIN OUTPUT Power Amp INPUT SPEAKER q Connecting the DG-1000 to a guitar amp is also possible OUTPUT RETURN or INPUT (RETURN is better) Guitar Amp GAIN DG-1000 q Add a stereo effector to the system GAIN INPUT DG-1000 OUTPUT Stereo Effect 2 CH Power Amp Speaker Speaker Once the amp and speaker has been properly set up, try getting some sound out of the system. s First, acquire sound 1. With the DG-1000 and power amp (guitar amp) power switched OFF, connect the guitar to the INPUT jack on the front panel. 2. With the OUTPUT knob set to "0", switch the power ON. 3. A short time after the power has been switched ON, the DG1000's internal relay will produce a small "Click" sound. Once the sound is heard, set the power amp's (guitar amp's) volume to "0" and switch the power ON on the power amp (guitar amp). 4. At first, set the DG-1000's TRIM and OUTPUT levels to "5" and strum the guitar. Then adjust the power amp's volume level. 5. Once you have sound, set the TRIM and OUTPUT levels as described in the following procedures. s Set the TRIM level The TRIM level is used to set the output level of the guitar to an optimum level for the DG-1000's INPUT jack. Depending on the TRIM level subtle picking nuances and the attack of a strong strum can be realized. An improperly adjusted trim level will result in noise, feedback and a cut up sound. * Output levels vary according to the type of guitar used. If a different guitar is used, adjust the trim level to match the guitar. * Even to create distortion, make sure that the TRIM level is properly adjusted, and use the GAIN control to create distortion. 1. Set the guitar's volume to its maximum level and strum it pow- erfully. Begin to adjust the TRIM level. An optimum level is achieved when the Green LED is lit. 2. Continue adjusting the TRIM knob until the Red LED lights. Set the TRIM level to 10 if the Red LED does not light. If the Red LED lights, lower the TRIM level until the Green LED lights. s Set the OUTPUT level Use the OUTPUT knob to set the DG-1000's required OUTPUT level. s Sound Setting Choose one of the DG-1000's 8 preset amp types, then use the GAIN+MASTER, and Tone Controls to shape the sound. 1. With one of the AMP SELECT buttons choose an amp type.The LED will light on the selected amp type button. 2. Use the GAIN, MASTER, and the 5 Tone Controls to shape the sound. * When an AMP SELECT button is pressed, all knobs (Except TRIM and GAIN) will return to their preset positions (GAIN & MASTER = 7, Tone Controls all = 5). To save edited settings, refer to "Store Settings" on the next page. 4
-
 1
1 -
 2
2 -
 3
3 -
 4
4 -
 5
5 -
 6
6 -
 7
7 -
 8
8 -
 9
9 -
 10
10 -
 11
11 -
 12
12 -
13
-
14
-
15
-
16
-
17
-
18
-
19
-
20
 |
 |
