Yamaha DG-1000 Owner's Manual - Page 7
Store and Recall - performance
 |
View all Yamaha DG-1000 manuals
Add to My Manuals
Save this manual to your list of manuals |
Page 7 highlights
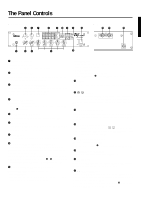
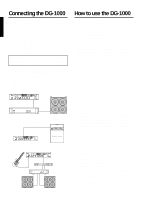
Store and Recall The DG-1000 has an internal memory that can hold up to 128 amp type and settings. Each memory can be recalled at any time. Motor drives in the knobs will automatically set them to the proper positions. Try storing a sound you created to memory. s Store Settings 1. Create a sound using the 8 preset amp types, GAIN, MASTER, and the 5 Tone Controls. The EDIT lamp lights on the MODE display. * If MODE display's MIDI lamp is lit, press the the EDIT lamp lights. button so that 2. Use the / buttons to select the memory number to which the settings will be saved.The memory number will flash in the display. * Press and hold one of the / buttons to make memory num- bers cycle rapidly. * The third digit of the memory number (100 - 128) is represented by a dot between the two digits. Sample) 128 is displayed as → 3. Hold the button, for about one second, until "8.8". ap- pears on the display. Release the button, the flashing memory number will then light indicating the setting is saved to memory. * TRIM and OUTPUT settings are not stored in memory. Use the MASTER knob to set backing and solo levels. Store Execute Lights The memory number to be stored. Select the memory Flashing → 8.8. → Lights number Data stored in memory (1 - 128) can be saved to an external MIDI storage device. Refer to the next page for details. s Recall Memory (Recall) The settings stored in memory can easily be recalled by selecting a memory number. 1. Check the Mode Display lamp. → If PLAY is lit: Go to the next step. → If EDIT is lit: The current settings are not stored in memory. If you want to save those settings, use the "Store Settings" procedure on the left page, then proceed to the next step. → If MIDI is lit: Press the button to return to the PLAY or EDIT mode. 2. Use the / buttons to select the memory number to be recalled. The memory number appears on the display (flashing). 3. Press the button. The flashing memory number will then light. Each of the knobs, and the Amp Select Display will change according to the data recalled from memory. * Settings do not change until the button is pushed. * TRIM and OUTPUT knob settings will not change with the Recall operation. * It takes anywhere from 1 - 10 seconds for the knob settings to change however, internal settings (sound) will change instantly. * "E1" will appear on the display if the volume knob does not go to its assigned position, or the device does not recognize the recall com- mand after 20 seconds from the start of the operation. Continued use of the device in this condition may result in fire or electrical shock. Take the unit to the music dealer where you purchased it, or to the nearest Yamaha Service Center for repair. PLAY or EDIT Lights The memory number to be recalled goes from flashing display → lit display HINT Some hints on storing memory numbers When storing memory, divide the memory numbers 1 - 128 into several groups. Recalling memory from these groups is convenient. For example, • Create groups according to the amp type (LEAD1, DRIVE 1, etc.). → For example, memory numbers 1 - 10 are LEAD 1 sounds. • Create groups based on sound type (Distortion, Clean, etc.) • Create groups based on live performance song lists. • Create groups based on the type of guitar used (humbucker, etc.). It's also a good idea to keep a chart listing what types of sounds are stored in memory numbers. Select the memory Recall Execute number to be recalled. A MIDI foot controller or other external MIDI device can be used to select and recall memory. Refer to the following page for details. Initialize the memory Use the following operation to restore all of the internal memory (No. 1 - 128) to its original initialized condition (GAIN & MASTER = 7, All tone controls = 5). Anything that you have saved to memory will be lost so please use caution. [Operation] While holding both the switch the POWER ON. button and the button, 5
-
 1
1 -
 2
2 -
 3
3 -
 4
4 -
 5
5 -
 6
6 -
 7
7 -
 8
8 -
 9
9 -
 10
10 -
 11
11 -
 12
12 -
13
-
14
-
15
-
16
-
17
-
18
-
19
-
20
 |
 |
