Yamaha EMX312SC Owner's Manual
Yamaha EMX312SC Manual
 |
UPC - 086792831336
View all Yamaha EMX312SC manuals
Add to My Manuals
Save this manual to your list of manuals |
Yamaha EMX312SC manual content summary:
- Yamaha EMX312SC | Owner's Manual - Page 1
PPOOWWEERREEDD MMIIXXEERR Owner's Manual Quick Guide Pages 6 to 12 Making the Most of Your Mixer Pages 13 to 19 EN - Yamaha EMX312SC | Owner's Manual - Page 2
RISK OF ELECTRIC SHOCK DO NOT OPEN CAUTION: TO REDUCE THE RISK OF ELECTRIC SHOCK, DO NOT REMOVE COVER (OR BACK). NO USER-SERVICEABLE PARTS INSIDE. REFER SERVICING TO QUALIFIED SERVICE PERSONNEL. The above warning is located on the rear of the unit. Explanation of Graphical Symbols The lightning - Yamaha EMX312SC | Owner's Manual - Page 3
• Before connecting the device to other devices, turn off the power for all devices. Before turning the power on or off for all devices, set all volume levels to minimum. • Use only speaker cables for connecting speakers to the speaker jacks. Use of other types of cables may result in fire. Handling - Yamaha EMX312SC | Owner's Manual - Page 4
try to eliminate the problem by using one of the following measures: Relocate either this product or the device that is being affected by the interference. Utilize power outlets that are on different branch (circuit breaker or fuse) circuits or install AC line filter/s. In the case of radio or TV - Yamaha EMX312SC | Owner's Manual - Page 5
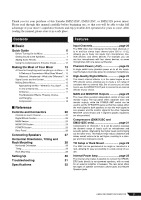
Section 23 MONITOR Section 24 POWER Section 25 Rear Panel 26 Connecting Speakers 27 Horizontal Orientation, Tilting and Rack Mounting 28 Horizontal Orientation 28 Tilting 29 Rack Mounting 29 Setting Up 30 Troubleshooting 31 Specifications 32 Features Input Channels page 20 - Yamaha EMX312SC | Owner's Manual - Page 6
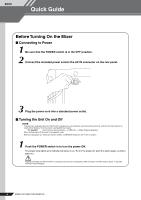
external device) → EMX unit → Amps (Powered speakers) When turning power off, proceed in the opposite order. • Before turning power on, make sure that the LEVEL and MASTER knobs are set to the "0" position. 1 Push the POWER switch in to turn the power ON. The power lamp lights up to indicate that - Yamaha EMX312SC | Owner's Manual - Page 7
the speakers and your input devices (microphones, instruments, etc.) Use non-powered speakers and dedicated speaker cable. Connect one speaker to SPEAKERS jack A (A1 or A2), and the other to jack B (B1 or B2). Then connect your input devices (microphones, guitar, etc.) to the appropriate input jacks - Yamaha EMX312SC | Owner's Manual - Page 8
BASIC Quick Guide 2 Turn the LEVEL knobs and the MASTER knobs to 0. This position This position 3 Set the POWER AMP switch to its upper position (to MAIN L-R). For information about this switch, see page 25. 8 EMX512SC/EMX312SC/EMX212S - Yamaha EMX312SC | Owner's Manual - Page 9
Guide 5 If you are using one or more condenser microphones for your inputs, set the PHANTOM switch to the ON position ( ). 6 Turn on the power. First turn on the power to all connected devices other than powered speakers and amp, and then turn on the EMX itself. If using powered speakers or amps - Yamaha EMX312SC | Owner's Manual - Page 10
again as necessary to adjust the overall output level. It is acceptable for the LIMITER lamps to flash on briefly at times, but if they remain lit continuously then there is risk of damage to your speakers or to the internal amp. Reduce the MASTER knob setting so that these lamps do not stay - Yamaha EMX312SC | Owner's Manual - Page 11
some reverb to your input. The reverb effects let , you can use a separately sold FC5 foot switch to toggle the effector on and off. BASIC Quick Guide 2 Turn the DRUM AMBIENCE F DISTORTION 3 Use the channel EFFECT knobs to adjust the effect depth for each channel. EMX512SC/EMX312SC/EMX212S 11 - Yamaha EMX312SC | Owner's Manual - Page 12
are easier to hear. 1 1 Adjust the COMP knobs on the relevant channels. Turn the knob clockwise to increase the compression. Avoid setting the value too high, as too much compression may lead to howling. For more information about the compressors, see pages 18 and 21. 12 EMX512SC/EMX312SC/EMX212S - Yamaha EMX312SC | Owner's Manual - Page 13
use this type of connector when connecting a CD player or other home audio type source to your mixer, or when connecting the output of your mixer to a cassette recorder , as will the owner's manual (you do keep your manuals in a safe place, don't you?). A phone jack that is set up to handle balanced - Yamaha EMX312SC | Owner's Manual - Page 14
BASIC Making the Most of Your Mixer type connectors will also handle unbalanced signals with no problem. Microphone cables usually have this type of connector, as do the inputs and outputs of most professional audio gear. Balanced, Unbalanced-What's the Difference? In a word: "noise." The whole - Yamaha EMX312SC | Owner's Manual - Page 15
signals at a wide range of levels, and it is necessary match input and output levels as closely as possible. In most cases the "nominal" level for a mixer's input and outputs is marked on the panel or listed in the owner's manual. Making Better Mixes Approaching the Mix-Where Do You Start? Mixing - Yamaha EMX312SC | Owner's Manual - Page 16
the vocal/piano relationship just right, then bring in the bass and drums to support the overall sound. Example2: Funky R&B Groove The approach will be totally different if you're mixing a funky R&B number that centers on the groove. In this case most engineers will start with the drums, and then - Yamaha EMX312SC | Owner's Manual - Page 17
of Your Mixer has an incredibly powerful low end that can benefit from a bit of low-frequency roll-off to let other instruments-notably drums and bass-do their jobs more effectively. Naturally you won't want to do this if the piano is playing solo. The reverse applies to kick drums and bass guitars - Yamaha EMX312SC | Owner's Manual - Page 18
Mixer recordings sound so different from your own? There are numerous reasons, of course, but one important factor is the judicious use used, produce a smooth, unified sound with no excessive peaks or distortion. Compression can also OUTPUT be used is set a single INPUT 18 EMX512SC/EMX312SC/EMX212S - Yamaha EMX312SC | Owner's Manual - Page 19
bass sound that stays solid through the tune. Compression can also be applied to guitar tracks to add extra sustain. Too much compression can be a cause of feedback, however, so use it sparingly. Music First-Then Mix In any case, the music comes first. Think about the music and let it guide the - Yamaha EMX312SC | Owner's Manual - Page 20
. If input is from a stereo channel pair (5/6, 7/8, 9/10, or 11/12), the signals from the L and R channels are mixed before moving into the bus. The MONITOR bus signal is output at the MONITOR OUT jack O, and may also be output from the SPEAKERS A jacks V (depending on the setting of the POWER AMP - Yamaha EMX312SC | Owner's Manual - Page 21
power amplifiers and power speakers before setting this switch to LINE or MIC. We also recommend that you turn all output controls (LEVEL knobs, MASTER knobs, etc.) to minimum settings before operating the switch, to avoid risk of loud noises that could cause hearing loss or device damage. 8 INPUT - Yamaha EMX312SC | Owner's Manual - Page 22
mixer's power. C EFFECT OUT jack This unbalanced phone output jack outputs the signal from the EFFECT bus. You can use this jack to output the signal to an external effector. You can then return the signal by connecting the external effector to any of the LINE jacks on channel pairs 5/6 to 11/12 - Yamaha EMX312SC | Owner's Manual - Page 23
jacks to a power amp or powered speakers. The signal sent to these jacks is adjusted by the MAIN section's MASTER knob G and graphic equalizer E. J REC OUT L and R jacks These RCA pin-type unbalanced output jacks can be used to send the main stereo signal to an external DAT recorder or cassette - Yamaha EMX312SC | Owner's Manual - Page 24
B jacks V. N LEVEL meters The L and R meters show the level of the signal output from the MONITOR OUT jack O. If the POWER AMP switch is down, the MONITOR OUT signal also passes through the internal power amp and is then output at SPEAKERS jacks B1 and B2 V. Keep an eye on the LIMITER lamps Q to - Yamaha EMX312SC | Owner's Manual - Page 25
This switch toggles +15V phantom power on and off. If you set the switch on, the mixer supplies power to the XLR mic input jacks on all channels (the INPUT B jacks on channels 1 to 4, and the MIC jacks on channel pairs 5/6 to 11/12). Set this switch on when using one or more condenser microphones - Yamaha EMX312SC | Owner's Manual - Page 26
Controls and Connectors Rear Panel W V X V SPEAKERS jacks Use these jacks to connect to speakers. Note that the output directed to these jacks varies according to the setting of the POWER AMP switch R. A1, B1: Neutrik NL4 Speakon outputs. Polarities are as shown below. 1- 1+ Neutrik Plug A1 - Yamaha EMX312SC | Owner's Manual - Page 27
, be sure that your cables have the appropriate ratings and the correct plugs. Be sure to use dedicated speaker cables when connecting speakers to the SPEAKERS jacks. ■ 2-channel connection When connecting by 2-channel connection, use speakers with impedance of 4 ohms to 8 ohms. 4Ω to 8Ω 4Ω to - Yamaha EMX312SC | Owner's Manual - Page 28
Horizontal Orientation, Tilting and Rack Mounting Horizontal Orientation, Tilting and Rack Mounting Horizontal Orientation If you are going to position the EMX unit horizontally, be sure to attach the included rubber stabilizers before use. The stabilizers prevent the unit from tipping over. NOTE - Yamaha EMX312SC | Owner's Manual - Page 29
sealed rack. NOTE The EMX unit requires 7U of rack space. RK512 Rack mount Kit 2 Using the kit's 4 screws, attach the kit's 2 metal fittings as shown below. Screws Fittings ■ How to install the rack-mount hardware 1 Turn the EMX unit upside down. 3 Turn the EMX right-side up. EMX512SC/EMX312SC - Yamaha EMX312SC | Owner's Manual - Page 30
ELEMENT/PERF. PART/ZONE 9 10 11 12 13 14 15 16 MUTE SOLO NUMBER DI Bass NOTE In most cases it is sufficient to connect speakers to the SPEAKERS jacks on the unit's rear panel. But if you want even more output, you can get it by connecting a power amp to the MAIN OUT or MONITOR OUT jack - Yamaha EMX312SC | Owner's Manual - Page 31
signal by adjusting the channel MONITOR knobs and the MONITOR section's MASTER knob. ❑ If you want to send the monitor signal to SPEAKERS jacks B1 and B2, set the POWER AMP switch to the down position (to MAIN(L+R) / MON). Note that in this case the B jacks will output the monitor signal, and the - Yamaha EMX312SC | Owner's Manual - Page 32
meter [MONITOR] +6, +3, 0, -5, -10 [dB] FCL Sensitivity Protection Input signal level => -75dBu: LED on, CH1-4 MIC/LINE:MIC B Input, CH 5/6-11/12 MIC Input Power Amplifier POWER switch on/off mute DC-fault :power supply shutdown /manual reset Thermal /heatsink temp => 90˚C:output mute /auto - Yamaha EMX312SC | Owner's Manual - Page 33
Consumption AC Cord Dimensions Net Weight EMX512SC EMX312SC EMX212S Length Height Depth Width MIN 2450 TYP 500 450 300 2500 284 264 442.5 8 MAX 2550 UNIT W mm mm kg Included Accessories Power cord, Rubber stabilizers × 2, Owner's Manual Options RACK MOUNT KIT (RK512), FOOT SW (FC5) Note - Yamaha EMX312SC | Owner's Manual - Page 34
Specifications Dimensional Diagrams 264 284 286 2 442.5 2.5 440 66.1 307.8 66.1 71 298 71 Unit: mm 54 108 34 EMX512SC/EMX312SC/EMX212S - Yamaha EMX312SC | Owner's Manual - Page 35
Block Diagram and Level Diagram Specifications EMX512SC/EMX312SC/EMX212S 35 - Yamaha EMX312SC | Owner's Manual - Page 36
PT. Yamaha Music Indonesia (Distributor) PT. Nusantik Gedung Yamaha Music Center, Jalan Yamaha Pro Audio global web site http://www.yamahaproaudio.com/ Yamaha Manual Library http://www.yamaha.co.jp/manual/ U.R.G., Pro Audio & Digital Musical Instrument Division, Yamaha Corporation © 2005 Yamaha
-
 1
1 -
 2
2 -
 3
3 -
 4
4 -
 5
5 -
 6
6 -
 7
7 -
8
-
9
-
10
-
11
-
12
-
13
-
14
-
15
-
16
-
17
-
18
-
19
-
20
-
21
-
22
-
23
-
24
-
25
-
26
-
27
-
28
-
29
-
30
-
31
-
32
-
33
-
34
-
35
-
36
 |
 |
POWERED MIXER
POWERED MIXER
Owner’s Manual
Owner’s Manual
Making the Most of Your Mixer
Pages 13 to 19
Quick Guide
Pages 6 to 12
EN