Yamaha MLC-200 MLC-200 Installation Guide - Page 13
Setting up the audio network - continued
 |
View all Yamaha MLC-200 manuals
Add to My Manuals
Save this manual to your list of manuals |
Page 13 highlights
5. Setting up the audio network - continued Connection diagram showing 16 students. NOTE • Before making connections, be sure to complete the procedure in "3. Setting up MLA-200s" (Page 6). The changes to the DIP switch settings are applied when the Ethernet cable is connected and the MLA-200 is turned on. Before changing the settings, unplug the Ethernet cable from the MLA-200. MLC-200 Installation Guide - 13
-
 1
1 -
2
-
3
-
4
-
5
-
6
-
7
-
 8
8 -
 9
9 -
 10
10 -
 11
11 -
 12
12 -
 13
13 -
 14
14 -
 15
15 -
 16
16 -
 17
17 -
 18
18 -
19
-
20
-
21
-
22
-
23
-
24
 |
 |

MLC-200 Installation Guide
–
13
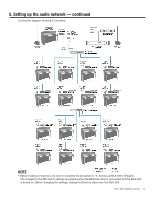
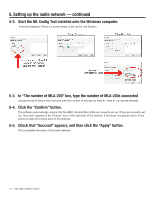
5. Setting up the audio network — continued
Connection diagram showing 16 students.
NOTE
• Before making connections, be sure to complete the procedure in “3. Setting up MLA-200s” (Page 6).
The changes to the DIP switch settings are applied when the Ethernet cable is connected and the MLA-200
is turned on. Before changing the settings, unplug the Ethernet cable from the MLA-200.