Yamaha MLC-200 MLC-200 Installation Guide - Page 19
Installing onto an instrument optional - continued
 |
View all Yamaha MLC-200 manuals
Add to My Manuals
Save this manual to your list of manuals |
Page 19 highlights
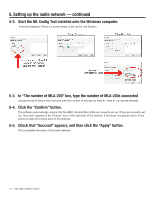
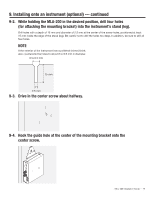
9. Installing onto an instrument (optional) - continued 9-2. While holding the MLA-200 in the desired position, drill four holes (for attaching the mounting bracket) into the instrument's stand (leg). Drill holes with a depth of 15 mm and diameter of 2.5 mm at the center of the screw holes, positioned at least 15 mm inside the edge of the stand (leg). Be careful not to drill the holes too deep. In addition, be sure to drill all four holes. NOTE If the exterior of the instrument has a polished (mirror) finish, also countersink the holes to about 6 to 6.5 mm in diameter. 6 to 6.5 mm 15 mm 2.5 mm 9-3. Drive in the center screw about halfway. 9-4. Hook the guide hole at the center of the mounting bracket onto the center screw. MLC-200 Installation Guide - 19
-
 1
1 -
2
-
3
-
4
-
5
-
6
-
7
-
8
-
9
-
10
-
11
-
12
-
13
-
 14
14 -
 15
15 -
 16
16 -
 17
17 -
 18
18 -
 19
19 -
 20
20 -
 21
21 -
 22
22 -
 23
23 -
 24
24
 |
 |
