Yamaha MLC-200 MLC-200 Installation Guide - Page 21
Installing onto an instrument - continued
 |
View all Yamaha MLC-200 manuals
Add to My Manuals
Save this manual to your list of manuals |
Page 21 highlights
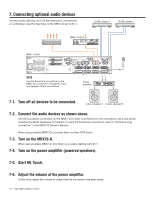
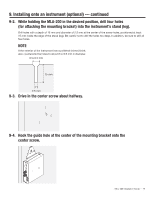
9. Installing onto an instrument - continued Mounted with screws on the side 15 mm or more Use this installation method when the instrument stand is toward the back of the keyboard. As described in "Installation precautions (attaching to the instrument with included screws)" (Page 20), maintain a distance of 15 mm or more between the center screw and the edge of the stand, and install by using all four screws. Mounted with screws at the bottom 15 mm or more If the instrument has a thin stand, mount the MLA-200 with the screws at the top, or at the bottom using this installation method. With this method, also maintain a distance of 15 mm or more between the center screw and the edge of the stand, and install by using all four screws, as described in "Installation precautions (attaching to the instrument with included screws)" (Page 20). MLC-200 Installation Guide - 21
-
 1
1 -
2
-
3
-
4
-
5
-
6
-
7
-
8
-
9
-
10
-
11
-
12
-
13
-
14
-
15
-
 16
16 -
 17
17 -
 18
18 -
 19
19 -
 20
20 -
 21
21 -
 22
22 -
 23
23 -
 24
24
 |
 |
