Yamaha MLC-200 MLC-200 Installation Guide - Page 18
Installing onto an instrument optional
 |
View all Yamaha MLC-200 manuals
Add to My Manuals
Save this manual to your list of manuals |
Page 18 highlights
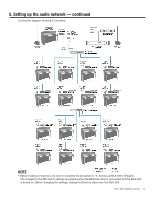
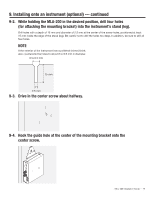
9. Installing onto an instrument (optional) After performing the operation check, unplug all cables connected to the MLA-200s, and then install the MLA-200 onto the instrument. The MLA-200 can be installed in the following two ways: • Attaching to the instrument with the included mounting screws • Placing on a flat surface of the instrument with the included rubber feet Installation precautions (attaching to the instrument with included screws) • Install so that the cables on the side panel face downward • Install so that there is no interference with headphones or connectors on the instrument • Install so that the knobs of the MLA-200 and connected cables do not extend past the body of the instrument • Be careful not to trip over connected cables while performing operations • Be sure to use the included screws for the installation • In order to prevent wood parts of the instrument from cracking, install the screws at least 15 mm inside the edge of the leg or stand of the instrument onto which the MLA-200 is mounted Installation procedure 9-1. Attach the mounting bracket to the MLA-200. Use the included mounting screws for installing the product. Mounting bracket Mounting bracket 18 - MLC-200 Installation Guide
-
 1
1 -
2
-
3
-
4
-
5
-
6
-
7
-
8
-
9
-
10
-
11
-
12
-
 13
13 -
 14
14 -
 15
15 -
 16
16 -
 17
17 -
 18
18 -
 19
19 -
 20
20 -
 21
21 -
 22
22 -
 23
23 -
24
 |
 |
