Yamaha MO6 Owner's Manual - Page 24
Modes - for recording use
 |
UPC - 086792837703
View all Yamaha MO6 manuals
Add to My Manuals
Save this manual to your list of manuals |
Page 24 highlights
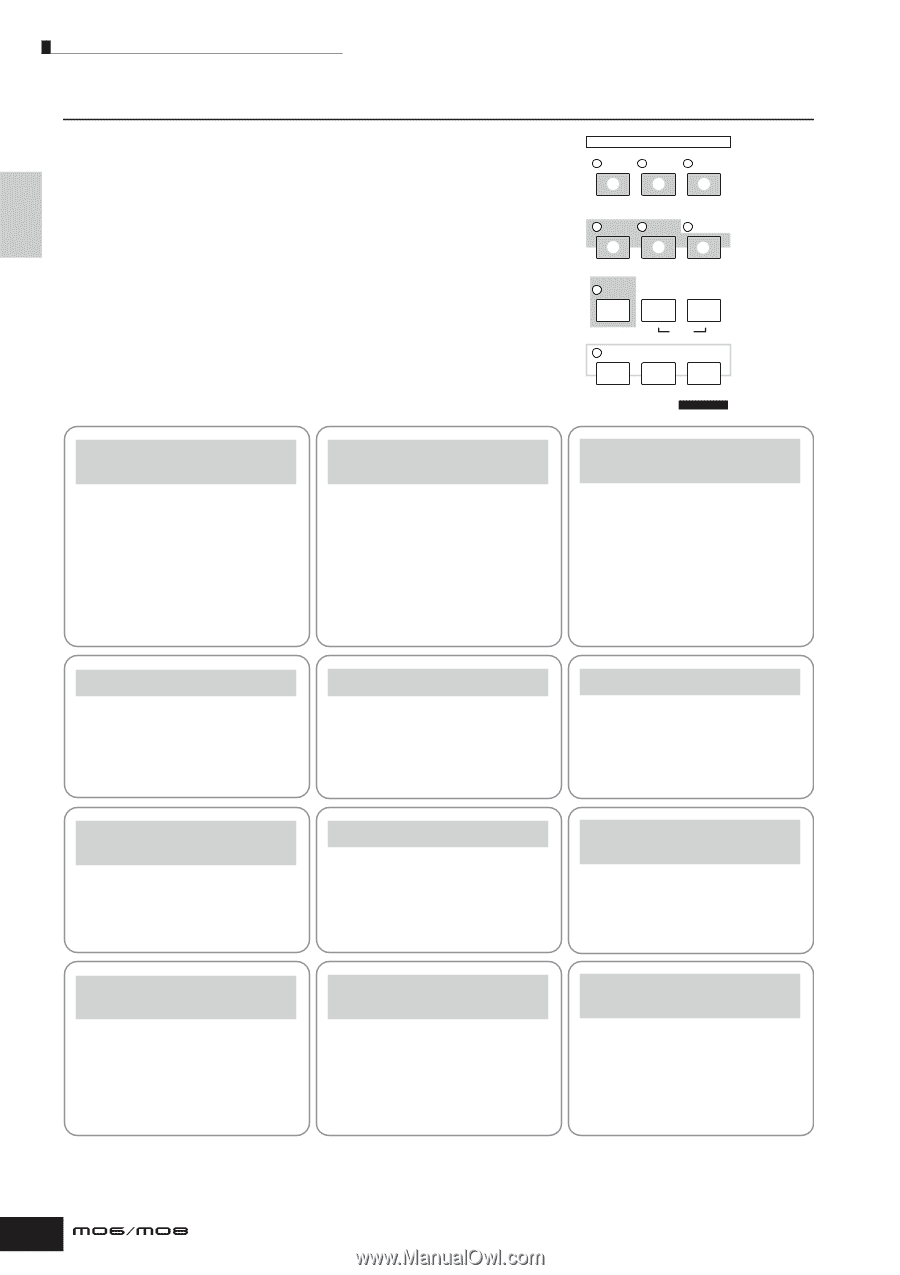
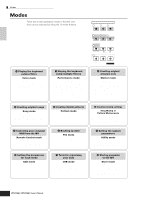
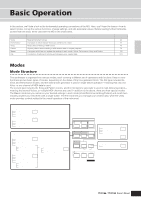
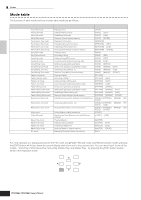
Setting up and Playing Modes Modes There are several operation modes in the MO, and they can be selected by using the 12 mode buttons. VOICE 1 MODE PERFORM MASTER 2 3 SONG 4 PATTERN 5 MIXING 6 DAW REMOTE FILE 7 8 UTILITY 9 DEMO EDIT ) COMPARE JOB STORE ! @ SCENE STORE SET LOCATE 1 Playing the keyboard using a Voice Voice mode [VOICE] button The MO has a wealth of high-quality, dynamic sounds-also referred to as "Voices." You can play these Voices-one Voice at a time-from the keyboard in the Voice mode. The MO also lets you create your own original Voices. 2 Playing the keyboard using multiple Voices Performance mode [PERFORM] button In the Performance mode, you can play several Voices together in a layer, or play different Voices from separate ranges of the keyboard. You can also trigger automatic rhythms and Arpeggios, over which you can play melody, chord or bass lines of your own. Each of these combinations of Voices is called a "Performance." This mode lets you create richly textured, layered sounds or play two or more different parts simultaneously-for example, piano and bass guitar-and is particularly useful when performing solo. 3 Creating original program sets Master mode [MASTER] button The Master mode can be used in two ways: • Storing your favorite settings that you often use in the Voice, Performance, Song, or Pattern mode, and instantly recall the mode and custom settings together in a single button press. • Dividing the keyboard into four separate sections- just as if you were playing four different MIDI keyboards. 4 Creating original songs Song mode [SONG] button The Song mode lets you create your own original songs by recording your performance using Voices created in the Voice mode or by combining preset rhythmic Patterns. 5 Creating rhythm patterns Pattern mode [PATTERN] button In this mode, you can separately create the various "building blocks" of a song-rhythms and patterns for the intro, verse, main melody, chorus, etc. 6 Creating mixing settings Song Mixing or Pattern Mixing mode [MIXING] button Here, you can make various mixing settings, adjusting the level balance among the parts of the Song or Pattern, as well as each pan position and the effects applied to the Song/Pattern. 7 Controlling your computer DAW from the MO Remote Control mode [DAW REMOTE] button The Remote Control mode lets you control your computer's sequencer software or DAW (digital audio workstation) by using the buttons or controllers on the MO. 8 Backing up data File mode [FILE] button The File mode lets you save your MO data to a USB storage device, and allows you to load data from the USB device to the MO. 9 Setting the system parameters Utility mode [UTILITY] button The Utility mode lets you set parameters that apply to the entire system of the MO. These parameter settings are applied to all Voices, Performances, Songs and Patterns. ) Setting the parameters for each mode Edit mode [EDIT] button The Edit mode lets you set parameters that apply to each Voice, Performance, Song or Pattern. ! Tools for organizing your data JOB mode [JOB] button This mode provides various operations and functions (called "jobs") that help in organizing and controlling your important data, including initializing the settings and copying data. @ Storing programs to the MO Store mode [STORE] button In this mode, you can store your edited programs to the internal memory of the MO. Keep in mind, however, that certain data, such as Songs and Patterns, are deleted when the power is turned off. For this reason, you should also store this important data to a USB memory device in the File mode. 24 Owner's Manual
-
 1
1 -
2
-
3
-
4
-
5
-
6
-
7
-
8
-
9
-
10
-
11
-
12
-
13
-
14
-
15
-
16
-
17
-
18
-
 19
19 -
 20
20 -
 21
21 -
 22
22 -
 23
23 -
 24
24 -
 25
25 -
 26
26 -
 27
27 -
 28
28 -
 29
29 -
30
-
31
-
32
-
33
-
34
-
35
-
36
-
37
-
38
-
39
-
40
-
41
-
42
-
43
-
44
-
45
-
46
-
47
-
48
-
49
-
50
-
51
-
52
-
53
-
54
-
55
-
56
-
57
-
58
-
59
-
60
-
61
-
62
-
63
-
64
-
65
-
66
-
67
-
68
-
69
-
70
-
71
-
72
-
73
-
74
-
75
-
76
-
77
-
78
-
79
-
80
-
81
-
82
-
83
-
84
-
85
-
86
-
87
-
88
-
89
-
90
-
91
-
92
-
93
-
94
-
95
-
96
-
97
-
98
-
99
-
100
-
101
-
102
-
103
-
104
-
105
-
106
-
107
-
108
-
109
-
110
-
111
-
112
-
113
-
114
-
115
-
116
-
117
-
118
-
119
-
120
-
121
-
122
-
123
-
124
-
125
-
126
-
127
-
128
-
129
-
130
-
131
-
132
-
133
-
134
-
135
-
136
-
137
-
138
-
139
-
140
-
141
-
142
-
143
-
144
-
145
-
146
-
147
-
148
-
149
-
150
-
151
-
152
-
153
-
154
-
155
-
156
-
157
-
158
-
159
-
160
-
161
-
162
-
163
-
164
-
165
-
166
-
167
-
168
-
169
-
170
-
171
-
172
-
173
-
174
-
175
-
176
-
177
-
178
-
179
-
180
-
181
-
182
-
183
-
184
-
185
-
186
-
187
-
188
-
189
-
190
-
191
-
192
-
193
-
194
-
195
-
196
-
197
-
198
-
199
-
200
-
201
-
202
-
203
-
204
-
205
-
206
-
207
-
208
-
209
-
210
-
211
-
212
-
213
-
214
-
215
-
216
-
217
-
218
-
219
-
220
-
221
-
222
-
223
-
224
-
225
-
226
-
227
-
228
-
229
-
230
-
231
-
232
-
233
-
234
-
235
-
236
-
237
-
238
-
239
-
240
 |
 |