Yamaha PSR-340 Owner's Manual - Page 96
Load
 |
View all Yamaha PSR-340 manuals
Add to My Manuals
Save this manual to your list of manuals |
Page 96 highlights
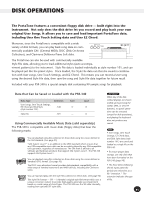
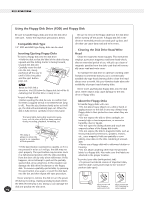
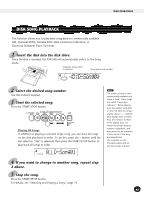
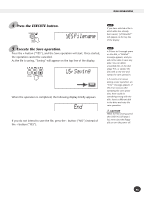
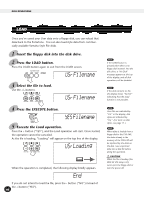
DISK OPERATIONS LOAD Once you've saved your User data onto a floppy disk, you can reload that data back to the PortaTone. You can also load style data from commercially available Yamaha Style File disks. 1 Insert the floppy disk into the disk drive. 2 Press the LOAD button. Press the LOAD button again to exit from the LOAD screen. USrFilename 3 Select the file to load. Use the +/- buttons. USrFilename If the LOAD button is pressed when there is no floppy disk inserted into the disk drive, a "No Disk" message appears at the top of the display, and all disk operations will be disabled. If the disk contains no file, the display shows "No File" indicating that the Load function is not possible. 4 Press the EXECUTE button. YESFilename 5 Execute the Load operation. Press the + button ("YES"), and the Load operation will start. Once started, the operation cannot be canceled. As the file is loading, "Loading" will appear on the top line of the display. USrLoading When the operation is completed, the following display briefly appears. End If you do not intend to load the file, press the - button ("NO") instead of the + button ("YES"). 96 User files are indicated by "USr" in the display; disk styles are indicated by "Sty." (For more on disk styles, see page 11.) When data is loaded from a floppy disk to the PSR-340, the data already in the memory of the PSR-340 will be replaced by the data on the disk. Save important data into a disk file before doing the operation. CAUTION While the file is loading (the DISK IN USE lamp is lit), never eject the floppy disk or turn the power off. 94
-
 1
1 -
2
-
3
-
4
-
5
-
6
-
7
-
8
-
9
-
10
-
11
-
12
-
13
-
14
-
15
-
16
-
17
-
18
-
19
-
20
-
21
-
22
-
23
-
24
-
25
-
26
-
27
-
28
-
29
-
30
-
31
-
32
-
33
-
34
-
35
-
36
-
37
-
38
-
39
-
40
-
41
-
42
-
43
-
44
-
45
-
46
-
47
-
48
-
49
-
50
-
51
-
52
-
53
-
54
-
55
-
56
-
57
-
58
-
59
-
60
-
61
-
62
-
63
-
64
-
65
-
66
-
67
-
68
-
69
-
70
-
71
-
72
-
73
-
74
-
75
-
76
-
77
-
78
-
79
-
80
-
81
-
82
-
83
-
84
-
85
-
86
-
87
-
88
-
89
-
90
-
 91
91 -
 92
92 -
 93
93 -
 94
94 -
 95
95 -
 96
96 -
 97
97 -
 98
98 -
 99
99 -
 100
100 -
 101
101 -
102
-
103
-
104
-
105
-
106
-
107
-
108
-
109
-
110
-
111
-
112
-
113
-
114
-
115
-
116
-
117
-
118
-
119
-
120
-
121
-
122
-
123
-
124
-
125
-
126
-
127
-
128
 |
 |
