ZyXEL ES1100-16P User Guide - Page 14
Rear Panel Power Connection, 2.2 Front Panel, 2.2.1 RJ-45 Auto-negotiating Ports - 16 port
 |
View all ZyXEL ES1100-16P manuals
Add to My Manuals
Save this manual to your list of manuals |
Page 14 highlights
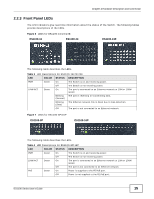
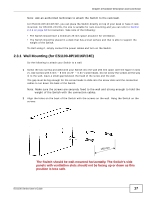
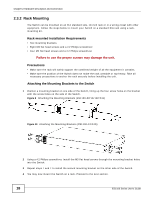
Chapter 2 Hardware Description and Connection 2.1.1 Rear Panel Power Connection Connect one end of the supplied power cord to the power receptacle on the back of the Switch and the other end to the appropriate power source. For ES1100-16/24E, use the ON/OFF switch to have the Switch power on or off. 2.2 Front Panel The front panel of the Switch includes the auto-negotiating 10 Base-T/100 Base-TX RJ-45 ports and the LEDs. Only the ES1100-24G's front panel provides the 10 Base-T/100 Base-TX/1000 Base-T RJ45 ports with shared 100M/1G mini-GBIC open slots. 2.2.1 RJ-45 Auto-negotiating Ports All the RJ-45 ports in the ES1100 series are auto-negotiating and auto-crossover. An auto-negotiating port can detect and adjust to the optimum Ethernet speed (10/100/1000 Mbps) and duplex mode (full duplex or half duplex) of the connected device. An auto-crossover (auto-MDI/MDI-X) port automatically works with a straight-through or crossover Ethernet cable. 2.2.2 Front Panel Connections You can use unshielded twisted pair (UTP) or shielded twisted-pair (STP) Ethernet cables for RJ-45 ports. The following table describes the types of network cable used for the different connection speeds. Table 2 Network Cable Types SPEED NETWORK CABLE TYPE 10 Mbps Category 3, 4 or 5 UTP/STP 100 Mbps Category 5 UTP/STP 1000 Mbps Category 5e UTP/STP You can use either crossover or straight-through cables for all the ports. 14 ES1100 Series User's Guide
-
 1
1 -
2
-
3
-
4
-
5
-
6
-
7
-
8
-
 9
9 -
 10
10 -
 11
11 -
 12
12 -
 13
13 -
 14
14 -
 15
15 -
 16
16 -
 17
17 -
 18
18 -
 19
19 -
20
-
21
-
22
-
23
-
24
-
25
-
26
-
27
-
28
-
29
-
30
 |
 |
