1995 Honda Civic Owner's Manual - Page 22
1995 Honda Civic Manual
Page 22 highlights
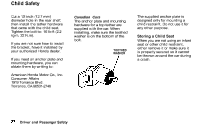
Child Safety A locking clip is usually included with the child seat. If you need a clip, contact the seat's manufacturer or a store that sells child restraints. To install a locking clip, do this: 1. Place the child restraint in the desired position. Route the lap/shoulder belt through the restraint according to the seat manufacturer's instructions. 2. Insert the latch plate into the buckle. Pull on the shoulder part of the belt to make sure there is no slack in the lap portion. 3. Tightly grasp the belt near the latch plate. Pinch both parts of the belt together so they won't slip through the latch plate. Unbuckle the seat belt. 4. Install the locking clip as shown. Position the clip as close as possible to the latch plate. Using Child Restraints With Tethers 4.2 in. (106.0 mm) 3.3 in. (85.0 mm) 10.4 in. (264.0 mm) 4.2 in. (106.0 mm) 5. Insert the latch plate into the buckle. Push and pull on the child seat to verify that it is held firmly in place. If it is not, repeat these steps until the restraint is secure. Your Honda has three attachment points for tether-style child seats. Use the dimensions in the above illustration to locate the attachment point you want to use. Driver and Passenger Safety
-
 1
1 -
2
-
3
-
4
-
5
-
6
-
7
-
8
-
9
-
10
-
11
-
12
-
13
-
14
-
15
-
16
-
 17
17 -
 18
18 -
 19
19 -
 20
20 -
 21
21 -
 22
22 -
 23
23 -
 24
24 -
 25
25 -
 26
26 -
 27
27 -
28
-
29
-
30
-
31
-
32
-
33
-
34
-
35
-
36
-
37
-
38
-
39
-
40
-
41
-
42
-
43
-
44
-
45
-
46
-
47
-
48
-
49
-
50
-
51
-
52
-
53
-
54
-
55
-
56
-
57
-
58
-
59
-
60
-
61
-
62
-
63
-
64
-
65
-
66
-
67
-
68
-
69
-
70
-
71
-
72
-
73
-
74
-
75
-
76
-
77
-
78
-
79
-
80
-
81
-
82
-
83
-
84
-
85
-
86
-
87
-
88
-
89
-
90
-
91
-
92
-
93
-
94
-
95
-
96
-
97
-
98
-
99
-
100
-
101
-
102
-
103
-
104
-
105
-
106
-
107
-
108
-
109
-
110
-
111
-
112
-
113
-
114
-
115
-
116
-
117
-
118
-
119
-
120
-
121
-
122
-
123
-
124
-
125
-
126
-
127
-
128
-
129
-
130
-
131
-
132
-
133
-
134
-
135
-
136
-
137
-
138
-
139
-
140
-
141
-
142
-
143
-
144
-
145
-
146
-
147
-
148
-
149
-
150
-
151
-
152
-
153
-
154
-
155
-
156
-
157
-
158
-
159
-
160
-
161
-
162
-
163
-
164
-
165
-
166
-
167
-
168
-
169
-
170
-
171
-
172
-
173
-
174
-
175
-
176
-
177
-
178
-
179
-
180
-
181
-
182
-
183
-
184
 |
 |
