2014 Jeep Grand Cherokee User Guide - Page 25
2014 Jeep Grand Cherokee Manual

Page 25 highlights
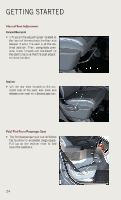
GETTING STARTED Power Lumbar • Push the switch forward to increase the lumbar support. Push the switch rearward to decrease the lumbar support. • Pushing upward or downward on the switch will raise and lower the position of the support. Memory Seat • The memory seat feature allows you to save two different driver seating positions (excluding lumbar position), driver's outside mirror, tilt/telescoping steering column position, and radio station preset settings. The memory seat buttons are located on the driver's door panel. • Adjust all memory profile settings, press the SET button then press 1 or 2 within five seconds. • To program a Key Fob to the memory position, place the ignition switch in the LOCK position, press and release the LOCK button on the Key Fob to be programmed within five seconds of pressing button 1 or 2. • Place the ignition switch in the ON/RUN position, select "Remote to Memory" in the Uconnect® system screen and enter "Yes". • Press 1 or 2 to recall the saved positions, or press UNLOCK on the programmed Key Fob. • Refer to the Owner's Manual on the DVD for further details. 23
-
 1
1 -
2
-
3
-
4
-
5
-
6
-
7
-
8
-
9
-
10
-
11
-
12
-
13
-
14
-
15
-
16
-
17
-
18
-
19
-
 20
20 -
 21
21 -
 22
22 -
 23
23 -
 24
24 -
 25
25 -
 26
26 -
 27
27 -
 28
28 -
 29
29 -
 30
30 -
31
-
32
-
33
-
34
-
35
-
36
-
37
-
38
-
39
-
40
-
41
-
42
-
43
-
44
-
45
-
46
-
47
-
48
-
49
-
50
-
51
-
52
-
53
-
54
-
55
-
56
-
57
-
58
-
59
-
60
-
61
-
62
-
63
-
64
-
65
-
66
-
67
-
68
-
69
-
70
-
71
-
72
-
73
-
74
-
75
-
76
-
77
-
78
-
79
-
80
-
81
-
82
-
83
-
84
-
85
-
86
-
87
-
88
-
89
-
90
-
91
-
92
-
93
-
94
-
95
-
96
-
97
-
98
-
99
-
100
-
101
-
102
-
103
-
104
-
105
-
106
-
107
-
108
-
109
-
110
-
111
-
112
-
113
-
114
-
115
-
116
-
117
-
118
-
119
-
120
-
121
-
122
-
123
-
124
-
125
-
126
-
127
-
128
-
129
-
130
-
131
-
132
-
133
-
134
-
135
-
136
-
137
-
138
-
139
-
140
-
141
-
142
-
143
-
144
-
145
-
146
-
147
-
148
-
149
-
150
-
151
-
152
-
153
-
154
-
155
-
156
-
157
-
158
-
159
-
160
-
161
-
162
-
163
-
164
-
165
-
166
-
167
-
168
-
169
-
170
-
171
-
172
-
173
-
174
-
175
-
176
-
177
-
178
-
179
-
180
-
181
-
182
-
183
-
184
-
185
-
186
-
187
-
188
-
189
-
190
-
191
-
192
-
193
-
194
-
195
-
196
-
197
-
198
-
199
-
200
-
201
-
202
-
203
-
204
-
205
-
206
-
207
-
208
-
209
-
210
-
211
-
212
 |
 |
