2000 Lincoln Navigator Owner Guide 1st Printing - Page 100
2000 Lincoln Navigator Manual
Page 100 highlights
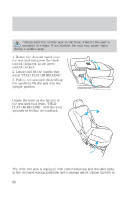
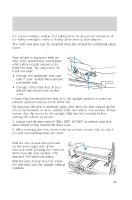
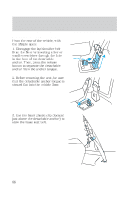
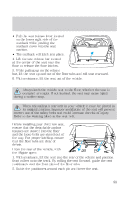
Seating and safety restraints • When the rear of the seat is 10-13 cm (4-5 in) above the rear pins, let the seat drop. This will ensure that the seat will properly latch into the floor. 3. Locate the seat belt anchor tongue in the plastic housing on the floor. 4. Disconnect the detachable anchor from its stowage location and connect it to the anchor tongue (making sure that the label on the detachable anchor is pointing toward the outside of the vehicle (left side) and that the belts are not twisted or jammed). 5. Insert the seat detachable anchor into detachable anchor tongue until you hear a "click" and feel the latch engage. 6. Push up on the seat to verify that it is latched into the floor. 7. Verify that the safety belts can move freely on either side of the seat. 3rd row tip/stow feature The 3rd row seat has a tip/stow feature to increase cargo space without removing the seat from the vehicle. To put seat in tip/stow position: 1. Pull the seat release lever located on the lower right side of the seatback while pushing the seatback down into the seat cushion. 2. The seatback will latch into place. 3. To release the rear floor latches of the 3rd row seat, lift the seat release bar located at the center of the seat near the floor to release the floor latches. 4. Lift back of seat up and hold. 100
-
 1
1 -
2
-
3
-
4
-
5
-
6
-
7
-
8
-
9
-
10
-
11
-
12
-
13
-
14
-
15
-
16
-
17
-
18
-
19
-
20
-
21
-
22
-
23
-
24
-
25
-
26
-
27
-
28
-
29
-
30
-
31
-
32
-
33
-
34
-
35
-
36
-
37
-
38
-
39
-
40
-
41
-
42
-
43
-
44
-
45
-
46
-
47
-
48
-
49
-
50
-
51
-
52
-
53
-
54
-
55
-
56
-
57
-
58
-
59
-
60
-
61
-
62
-
63
-
64
-
65
-
66
-
67
-
68
-
69
-
70
-
71
-
72
-
73
-
74
-
75
-
76
-
77
-
78
-
79
-
80
-
81
-
82
-
83
-
84
-
85
-
86
-
87
-
88
-
89
-
90
-
91
-
92
-
93
-
94
-
 95
95 -
 96
96 -
 97
97 -
 98
98 -
 99
99 -
 100
100 -
 101
101 -
 102
102 -
 103
103 -
 104
104 -
 105
105 -
106
-
107
-
108
-
109
-
110
-
111
-
112
-
113
-
114
-
115
-
116
-
117
-
118
-
119
-
120
-
121
-
122
-
123
-
124
-
125
-
126
-
127
-
128
-
129
-
130
-
131
-
132
-
133
-
134
-
135
-
136
-
137
-
138
-
139
-
140
-
141
-
142
-
143
-
144
-
145
-
146
-
147
-
148
-
149
-
150
-
151
-
152
-
153
-
154
-
155
-
156
-
157
-
158
-
159
-
160
-
161
-
162
-
163
-
164
-
165
-
166
-
167
-
168
-
169
-
170
-
171
-
172
-
173
-
174
-
175
-
176
-
177
-
178
-
179
-
180
-
181
-
182
-
183
-
184
-
185
-
186
-
187
-
188
-
189
-
190
-
191
-
192
-
193
-
194
-
195
-
196
-
197
-
198
-
199
-
200
-
201
-
202
-
203
-
204
-
205
-
206
-
207
-
208
-
209
-
210
-
211
-
212
-
213
-
214
-
215
-
216
-
217
-
218
-
219
-
220
-
221
-
222
-
223
-
224
-
225
-
226
-
227
-
228
-
229
-
230
-
231
-
232
-
233
-
234
-
235
-
236
-
237
-
238
-
239
-
240
-
241
-
242
-
243
-
244
-
245
-
246
-
247
-
248
-
249
-
250
-
251
-
252
-
253
-
254
-
255
-
256
 |
 |
