2000 Lincoln Navigator Owner Guide 1st Printing - Page 216
2000 Lincoln Navigator Manual

Page 216 highlights
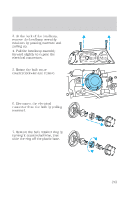
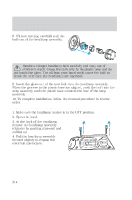
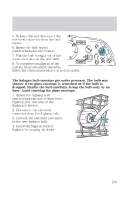
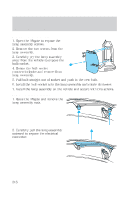
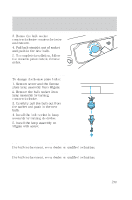
Maintenance and care Replacing tail lamp bulbs 1. Open the liftgate to expose the lamp assembly screws. 2. Remove the two screws from the lamp assembly. 3. Carefully pry the lamp assembly away from the vehicle to expose the bulb socket. 4. Rotate the bulb socket counterclockwise and remove from lamp assembly. 5. Pull bulb straight out of socket and push in the new bulb. 6. Install the bulb socket into the lamp assembly and rotate clockwise. 7. Install the lamp assembly on the vehicle and secure with two screws. Replacing liftgate tail lamp bulb 1. Raise the liftgate and remove the lamp assembly nuts. 2. Carefully pull the lamp assembly outward to expose the electrical connector. 216
-
 1
1 -
2
-
3
-
4
-
5
-
6
-
7
-
8
-
9
-
10
-
11
-
12
-
13
-
14
-
15
-
16
-
17
-
18
-
19
-
20
-
21
-
22
-
23
-
24
-
25
-
26
-
27
-
28
-
29
-
30
-
31
-
32
-
33
-
34
-
35
-
36
-
37
-
38
-
39
-
40
-
41
-
42
-
43
-
44
-
45
-
46
-
47
-
48
-
49
-
50
-
51
-
52
-
53
-
54
-
55
-
56
-
57
-
58
-
59
-
60
-
61
-
62
-
63
-
64
-
65
-
66
-
67
-
68
-
69
-
70
-
71
-
72
-
73
-
74
-
75
-
76
-
77
-
78
-
79
-
80
-
81
-
82
-
83
-
84
-
85
-
86
-
87
-
88
-
89
-
90
-
91
-
92
-
93
-
94
-
95
-
96
-
97
-
98
-
99
-
100
-
101
-
102
-
103
-
104
-
105
-
106
-
107
-
108
-
109
-
110
-
111
-
112
-
113
-
114
-
115
-
116
-
117
-
118
-
119
-
120
-
121
-
122
-
123
-
124
-
125
-
126
-
127
-
128
-
129
-
130
-
131
-
132
-
133
-
134
-
135
-
136
-
137
-
138
-
139
-
140
-
141
-
142
-
143
-
144
-
145
-
146
-
147
-
148
-
149
-
150
-
151
-
152
-
153
-
154
-
155
-
156
-
157
-
158
-
159
-
160
-
161
-
162
-
163
-
164
-
165
-
166
-
167
-
168
-
169
-
170
-
171
-
172
-
173
-
174
-
175
-
176
-
177
-
178
-
179
-
180
-
181
-
182
-
183
-
184
-
185
-
186
-
187
-
188
-
189
-
190
-
191
-
192
-
193
-
194
-
195
-
196
-
197
-
198
-
199
-
200
-
201
-
202
-
203
-
204
-
205
-
206
-
207
-
208
-
209
-
210
-
 211
211 -
 212
212 -
 213
213 -
 214
214 -
 215
215 -
 216
216 -
 217
217 -
 218
218 -
 219
219 -
 220
220 -
 221
221 -
222
-
223
-
224
-
225
-
226
-
227
-
228
-
229
-
230
-
231
-
232
-
233
-
234
-
235
-
236
-
237
-
238
-
239
-
240
-
241
-
242
-
243
-
244
-
245
-
246
-
247
-
248
-
249
-
250
-
251
-
252
-
253
-
254
-
255
-
256
 |
 |

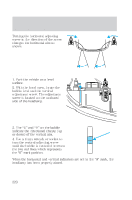
Replacing tail lamp bulbs
1. Open the liftgate to expose the
lamp assembly screws.
2. Remove the two screws from the
lamp assembly.
3. Carefully pry the lamp assembly
away from the vehicle to expose the
bulb socket.
4. Rotate the bulb socket
counterclockwise and remove from
lamp assembly.
5. Pull bulb straight out of socket and push in the new bulb.
6. Install the bulb socket into the lamp assembly and rotate clockwise.
7. Install the lamp assembly on the vehicle and secure with two screws.
Replacing liftgate tail lamp bulb
1. Raise the liftgate and remove the
lamp assembly nuts.
2. Carefully pull the lamp assembly
outward to expose the electrical
connector.
Maintenance and care
216