2000 Lincoln Navigator Owner Guide 1st Printing - Page 220
2000 Lincoln Navigator Manual

Page 220 highlights
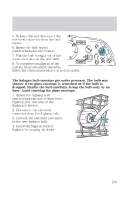
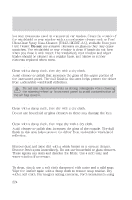
Maintenance and care Turning the horizontal adjusting screw in the direction of the arrow changes the horizontal aim as shown. Vertical aim adjustment 1. Park the vehicle on a level surface. 2. With the hood open, locate the bubble level and the vertical adjustment screw. The adjustment screw is located on the outboard side of the headlamp. D U When the horizontal and vertical indicators are set to the "0" mark, the headlamp has been properly aimed. 220 U D 3. The "U" and "D" on the bubble indicate the directional change (up or down) of the vertical aim. 4. Use a 4 mm wrench or socket to turn the vertical adjusting screw until the bubble is centered between the two red lines which represents the "0" mark position.
-
 1
1 -
2
-
3
-
4
-
5
-
6
-
7
-
8
-
9
-
10
-
11
-
12
-
13
-
14
-
15
-
16
-
17
-
18
-
19
-
20
-
21
-
22
-
23
-
24
-
25
-
26
-
27
-
28
-
29
-
30
-
31
-
32
-
33
-
34
-
35
-
36
-
37
-
38
-
39
-
40
-
41
-
42
-
43
-
44
-
45
-
46
-
47
-
48
-
49
-
50
-
51
-
52
-
53
-
54
-
55
-
56
-
57
-
58
-
59
-
60
-
61
-
62
-
63
-
64
-
65
-
66
-
67
-
68
-
69
-
70
-
71
-
72
-
73
-
74
-
75
-
76
-
77
-
78
-
79
-
80
-
81
-
82
-
83
-
84
-
85
-
86
-
87
-
88
-
89
-
90
-
91
-
92
-
93
-
94
-
95
-
96
-
97
-
98
-
99
-
100
-
101
-
102
-
103
-
104
-
105
-
106
-
107
-
108
-
109
-
110
-
111
-
112
-
113
-
114
-
115
-
116
-
117
-
118
-
119
-
120
-
121
-
122
-
123
-
124
-
125
-
126
-
127
-
128
-
129
-
130
-
131
-
132
-
133
-
134
-
135
-
136
-
137
-
138
-
139
-
140
-
141
-
142
-
143
-
144
-
145
-
146
-
147
-
148
-
149
-
150
-
151
-
152
-
153
-
154
-
155
-
156
-
157
-
158
-
159
-
160
-
161
-
162
-
163
-
164
-
165
-
166
-
167
-
168
-
169
-
170
-
171
-
172
-
173
-
174
-
175
-
176
-
177
-
178
-
179
-
180
-
181
-
182
-
183
-
184
-
185
-
186
-
187
-
188
-
189
-
190
-
191
-
192
-
193
-
194
-
195
-
196
-
197
-
198
-
199
-
200
-
201
-
202
-
203
-
204
-
205
-
206
-
207
-
208
-
209
-
210
-
211
-
212
-
213
-
214
-
 215
215 -
 216
216 -
 217
217 -
 218
218 -
 219
219 -
 220
220 -
 221
221 -
 222
222 -
 223
223 -
 224
224 -
 225
225 -
226
-
227
-
228
-
229
-
230
-
231
-
232
-
233
-
234
-
235
-
236
-
237
-
238
-
239
-
240
-
241
-
242
-
243
-
244
-
245
-
246
-
247
-
248
-
249
-
250
-
251
-
252
-
253
-
254
-
255
-
256
 |
 |

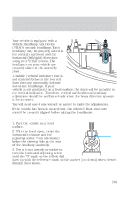
Turning the horizontal adjusting
screw in the direction of the arrow
changes the horizontal aim as
shown.
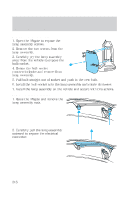
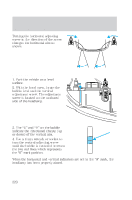
Vertical aim adjustment
1. Park the vehicle on a level
surface.
2. With the hood open, locate the
bubble level and the vertical
adjustment screw. The adjustment
screw is located on the outboard
side of the headlamp.
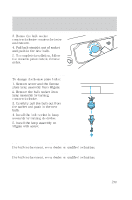
3. The “U” and “D” on the bubble
indicate the directional change (up
or down) of the vertical aim.
4. Use a 4 mm wrench or socket to
turn the vertical adjusting screw
until the bubble is centered between
the two red lines which represents
the “0” mark position.
When the horizontal and vertical indicators are set to the “0” mark, the
headlamp has been properly aimed.
U
D
D
U
Maintenance and care
220