2002 Mazda Protege Owner's Manual - Page 78
2002 Mazda Protege Manual
Page 78 highlights
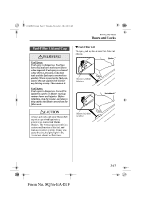
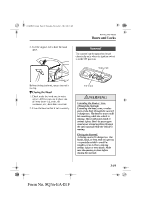
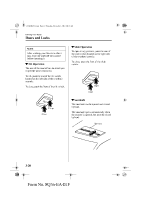
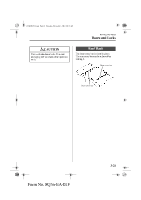
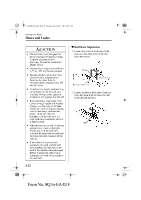
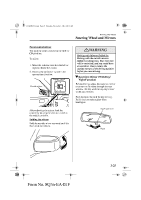
J39L(02MY).book Page 22 Thursday, November 1, 2001 10:49 AM Knowing Your Mazda Doors and Locks M Roof Rack Adjustment 1. Loosen the screw at both ends of the rear cross bar, then remove the rear cross bar covers. CAUTION • The roof rack is not designed for direct placement of objects or loads. A special attachment kit is necessary. Consult an Authorized Mazda Dealer. • The maximum load on the roof rack is 75 kg (165 lb). Do not overload. • Because the bolts and screws may loosen initially, retighten them. Periodically check bolts for looseness approximately every 100 km (62 miles). • Avoid turning sharply and jamming on the brakes while the roof rack installed. Doing so may cause an accident or the luggage may fall off. • Road conditions (especially steep curves or rough roads) and weather changes (strong cross wind, head wind, rain, snow, or fog) can change vehicle operating characteristics greatly when the vehicle is equipped with the roof rack. To cope with these conditions, drive at a slower speed. • When driving in a tunnel or parking garage or any place with height restrictions with the roof rack installed, be aware that the roof rack will raise the total clearance of the vehicle. • If the vehicle is washed in an automatic car wash with the roof rack installed, the roof rack or the roof of the vehicle can be damaged. Before washing the vehicle in an automatic car wash, always remove the roof rack. Screw Rear cross bar Rear cross bar cover 2. Loosen the bolt at both ends of the rear cross bar, then slide the rear cross bar to the desired position. Bolt 3-22 Form No. 8Q36-EA-01F
-
 1
1 -
2
-
3
-
4
-
5
-
6
-
7
-
8
-
9
-
10
-
11
-
12
-
13
-
14
-
15
-
16
-
17
-
18
-
19
-
20
-
21
-
22
-
23
-
24
-
25
-
26
-
27
-
28
-
29
-
30
-
31
-
32
-
33
-
34
-
35
-
36
-
37
-
38
-
39
-
40
-
41
-
42
-
43
-
44
-
45
-
46
-
47
-
48
-
49
-
50
-
51
-
52
-
53
-
54
-
55
-
56
-
57
-
58
-
59
-
60
-
61
-
62
-
63
-
64
-
65
-
66
-
67
-
68
-
69
-
70
-
71
-
72
-
 73
73 -
 74
74 -
 75
75 -
 76
76 -
 77
77 -
 78
78 -
 79
79 -
 80
80 -
 81
81 -
 82
82 -
 83
83 -
84
-
85
-
86
-
87
-
88
-
89
-
90
-
91
-
92
-
93
-
94
-
95
-
96
-
97
-
98
-
99
-
100
-
101
-
102
-
103
-
104
-
105
-
106
-
107
-
108
-
109
-
110
-
111
-
112
-
113
-
114
-
115
-
116
-
117
-
118
-
119
-
120
-
121
-
122
-
123
-
124
-
125
-
126
-
127
-
128
-
129
-
130
-
131
-
132
-
133
-
134
-
135
-
136
-
137
-
138
-
139
-
140
-
141
-
142
-
143
-
144
-
145
-
146
-
147
-
148
-
149
-
150
-
151
-
152
-
153
-
154
-
155
-
156
-
157
-
158
-
159
-
160
-
161
-
162
-
163
-
164
-
165
-
166
-
167
-
168
-
169
-
170
-
171
-
172
-
173
-
174
-
175
-
176
-
177
-
178
-
179
-
180
-
181
-
182
-
183
-
184
-
185
-
186
-
187
-
188
-
189
-
190
-
191
-
192
-
193
-
194
-
195
-
196
-
197
-
198
-
199
-
200
-
201
-
202
-
203
-
204
-
205
-
206
-
207
-
208
-
209
-
210
-
211
-
212
-
213
-
214
-
215
-
216
-
217
-
218
-
219
-
220
-
221
-
222
-
223
-
224
-
225
-
226
-
227
-
228
-
229
-
230
-
231
-
232
-
233
-
234
-
235
-
236
-
237
-
238
-
239
-
240
-
241
-
242
-
243
-
244
-
245
-
246
-
247
-
248
-
249
-
250
-
251
-
252
-
253
-
254
-
255
-
256
-
257
-
258
-
259
-
260
-
261
-
262
-
263
-
264
-
265
-
266
-
267
-
268
-
269
-
270
 |
 |
