2012 Nissan Altima Owner's Manual - Page 221
2012 Nissan Altima Manual

Page 221 highlights
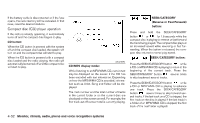
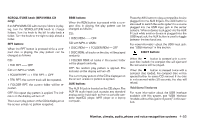
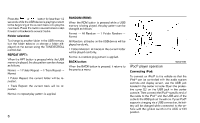
DISP button: The display screen can be turned off by pressing the DISP button. You can listen to music while the display is off. If you want to turn the screen on, either press the DISP button or press the FM·AM, XM or CD·AUX button. Switching the display: Pressing the CD·AUX button switches the displays as follows: CD → iPodா/USB → AUX → CD The last channel played will also come on when the PWR button is pressed to ON. The satellite radio is not available in Alaska, Hawaii and Guam. If another audio source is playing when the radio band select button is pressed, the audio source automatically turns off and the last radio channel played comes on. When the stereo broadcast signal is weak, the radio automatically changes from stereo to monaural reception. TUNE (Tuning): ● For AM and FM radio Turn the radio TUNE dial for manual tuning. ● For XM Satellite Radio Turn the radio TUNE dial to seek channels from all of the categories when any category is not selected. SEEK tuning/CAT (category): ● For AM and FM radio Press the SEEK button or to tune from low to high or high to low frequencies and to stop at the next broadcasting station. ● For XM Satellite Radio Press the SEEK button or to tune to the first channel of the next or previous category. SCAN tuning: Press the SCAN tuning button to tune from low to high frequencies and stop at each broadcasting station/channel for 5 seconds. Pressing the button again during this 5 seconds period will stop SCAN tuning and the radio will remain tuned to that station/channel. If the SCAN tuning button is not pressed within 5 seconds, SCAN tuning moves to the next station/channel. 1 to ᭺ 6 Station memory operations: ᭺ FM-AM-SAT radio operation Radio (FM/AM) band select: Press the radio band select button to change the band as follows: AM → FM1 → FM2 → AM XM radio (SAT) band select: Press the radio band select button to change the band as follows: XM1 → XM2 → XM3 → XM1 When the radio band select button is pressed while the ignition switch is in the ACC or ON position, the radio will come on at the channel last played. 12 stations/channels can be set for the FM band (6 each for FM1 and FM2), 12 for XM radio (6 each for XM1 and XM2) and 6 stations can be set for the AM band. 1. Choose the radio band using the radio band select button. 2. Tune to the desired station/channel using the SEEK·CAT, SCAN button or the radio TUNE dial. 3. Press and hold the desired station preset 1 to ᭺ 6 until the radio beeps. button ᭺ 3
-
 1
1 -
2
-
3
-
4
-
5
-
6
-
7
-
8
-
9
-
10
-
11
-
12
-
13
-
14
-
15
-
16
-
17
-
18
-
19
-
20
-
21
-
22
-
23
-
24
-
25
-
26
-
27
-
28
-
29
-
30
-
31
-
32
-
33
-
34
-
35
-
36
-
37
-
38
-
39
-
40
-
41
-
42
-
43
-
44
-
45
-
46
-
47
-
48
-
49
-
50
-
51
-
52
-
53
-
54
-
55
-
56
-
57
-
58
-
59
-
60
-
61
-
62
-
63
-
64
-
65
-
66
-
67
-
68
-
69
-
70
-
71
-
72
-
73
-
74
-
75
-
76
-
77
-
78
-
79
-
80
-
81
-
82
-
83
-
84
-
85
-
86
-
87
-
88
-
89
-
90
-
91
-
92
-
93
-
94
-
95
-
96
-
97
-
98
-
99
-
100
-
101
-
102
-
103
-
104
-
105
-
106
-
107
-
108
-
109
-
110
-
111
-
112
-
113
-
114
-
115
-
116
-
117
-
118
-
119
-
120
-
121
-
122
-
123
-
124
-
125
-
126
-
127
-
128
-
129
-
130
-
131
-
132
-
133
-
134
-
135
-
136
-
137
-
138
-
139
-
140
-
141
-
142
-
143
-
144
-
145
-
146
-
147
-
148
-
149
-
150
-
151
-
152
-
153
-
154
-
155
-
156
-
157
-
158
-
159
-
160
-
161
-
162
-
163
-
164
-
165
-
166
-
167
-
168
-
169
-
170
-
171
-
172
-
173
-
174
-
175
-
176
-
177
-
178
-
179
-
180
-
181
-
182
-
183
-
184
-
185
-
186
-
187
-
188
-
189
-
190
-
191
-
192
-
193
-
194
-
195
-
196
-
197
-
198
-
199
-
200
-
201
-
202
-
203
-
204
-
205
-
206
-
207
-
208
-
209
-
210
-
211
-
212
-
213
-
214
-
215
-
 216
216 -
 217
217 -
 218
218 -
 219
219 -
 220
220 -
 221
221 -
 222
222 -
 223
223 -
 224
224 -
 225
225 -
 226
226 -
227
-
228
-
229
-
230
-
231
-
232
-
233
-
234
-
235
-
236
-
237
-
238
-
239
-
240
-
241
-
242
-
243
-
244
-
245
-
246
-
247
-
248
-
249
-
250
-
251
-
252
-
253
-
254
-
255
-
256
-
257
-
258
-
259
-
260
-
261
-
262
-
263
-
264
-
265
-
266
-
267
-
268
-
269
-
270
-
271
-
272
-
273
-
274
-
275
-
276
-
277
-
278
-
279
-
280
-
281
-
282
-
283
-
284
-
285
-
286
-
287
-
288
-
289
-
290
-
291
-
292
-
293
-
294
-
295
-
296
-
297
-
298
-
299
-
300
-
301
-
302
-
303
-
304
-
305
-
306
-
307
-
308
-
309
-
310
-
311
-
312
-
313
-
314
-
315
-
316
-
317
-
318
-
319
-
320
-
321
-
322
-
323
-
324
-
325
-
326
-
327
-
328
-
329
-
330
-
331
-
332
-
333
-
334
-
335
-
336
-
337
-
338
-
339
-
340
-
341
-
342
-
343
-
344
-
345
-
346
-
347
-
348
-
349
-
350
-
351
-
352
-
353
-
354
-
355
-
356
-
357
-
358
-
359
-
360
-
361
-
362
-
363
-
364
-
365
-
366
-
367
-
368
-
369
-
370
-
371
-
372
-
373
-
374
-
375
-
376
-
377
-
378
-
379
-
380
-
381
-
382
-
383
-
384
-
385
-
386
-
387
-
388
-
389
-
390
-
391
-
392
-
393
-
394
-
395
-
396
-
397
-
398
-
399
-
400
-
401
-
402
-
403
-
404
-
405
-
406
-
407
-
408
-
409
-
410
-
411
-
412
-
413
-
414
-
415
-
416
-
417
-
418
-
419
-
420
-
421
-
422
-
423
-
424
-
425
-
426
-
427
-
428
-
429
-
430
-
431
-
432
-
433
-
434
-
435
-
436
-
437
-
438
-
439
-
440
-
441
-
442
-
443
-
444
-
445
-
446
-
447
-
448
-
449
-
450
-
451
-
452
-
453
 |
 |
