2006 Suzuki Reno Owner's Manual - Page 106
2006 Suzuki Reno Manual

Page 106 highlights
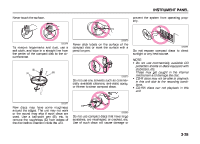
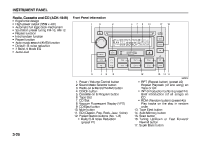
INSTRUMENT PANEL • Even though the audio system is turned off and on, the level you set will not be changed. Fader Control: Fader control is used to adjust the volume of the front and rear speakers. • Select the fader control mode using the sound mode selector button. • When the "FAD" indicator appears on the VFD, rotate the volume control button clockwise to decrease the volume of the rear speakers. The fader level signal will change from "F1" up to "F15". • To decrease the volume of the front speakers, rotate the volume control button counterclockwise. The fader level signal will change from "R1" up to "R15". • When the fader level signal "0" appears on the VFD, the volume of front and rear speakers is the same. • After adjusting, the display will return to the original condition after 5 seconds. • Even though the audio system is turned off and on, the fader setting will not be changed. Balance Control: Balance control is used to adjust the volume of the left and right speakers. • Select the balance control mode using the sound mode selector button. • When the "BAL" indicator appears on the VFD, rotate the volume control button • clockwise to decrease the volume of the left speakers. The balance level signal will change from "R1" up to "R15". To decrease the volume of the right speakers, rotate the volume control button counterclockwise. The balance level signal will change from "L1" up to "L15". When the signal "0" appears on the VFD, the volume of the left and right speakers is the same. After adjusting, the display will return to the original condition after 5 seconds. Even though the audio system is turned off and on, balance setting will not be changed. RADIO OPERATION 1. BAND SELECTION • Press the power button or AM/FM button to turn the audio system on. • Press the "AM/FM" button to select the desired band. The band changes as follows; • • • FM1 FM2 AM 86Z006 • Tune in the desired station using the tuning up/down buttons (for manual or seek tuning), the preset buttons or the preset scan button. • To turn the radio on while a cassette is playing, eject the tape or press the AM/ FM button. The station you receive will be the last station selected. NOTE: The audio system can be operated when the ignition key is in the "ACC" or "ON" position. 3-33
-
 1
1 -
2
-
3
-
4
-
5
-
6
-
7
-
8
-
9
-
10
-
11
-
12
-
13
-
14
-
15
-
16
-
17
-
18
-
19
-
20
-
21
-
22
-
23
-
24
-
25
-
26
-
27
-
28
-
29
-
30
-
31
-
32
-
33
-
34
-
35
-
36
-
37
-
38
-
39
-
40
-
41
-
42
-
43
-
44
-
45
-
46
-
47
-
48
-
49
-
50
-
51
-
52
-
53
-
54
-
55
-
56
-
57
-
58
-
59
-
60
-
61
-
62
-
63
-
64
-
65
-
66
-
67
-
68
-
69
-
70
-
71
-
72
-
73
-
74
-
75
-
76
-
77
-
78
-
79
-
80
-
81
-
82
-
83
-
84
-
85
-
86
-
87
-
88
-
89
-
90
-
91
-
92
-
93
-
94
-
95
-
96
-
97
-
98
-
99
-
100
-
 101
101 -
 102
102 -
 103
103 -
 104
104 -
 105
105 -
 106
106 -
 107
107 -
 108
108 -
 109
109 -
 110
110 -
 111
111 -
112
-
113
-
114
-
115
-
116
-
117
-
118
-
119
-
120
-
121
-
122
-
123
-
124
-
125
-
126
-
127
-
128
-
129
-
130
-
131
-
132
-
133
-
134
-
135
-
136
-
137
-
138
-
139
-
140
-
141
-
142
-
143
-
144
-
145
-
146
-
147
-
148
-
149
-
150
-
151
-
152
-
153
-
154
-
155
-
156
-
157
-
158
-
159
-
160
-
161
-
162
-
163
-
164
-
165
-
166
-
167
-
168
-
169
-
170
-
171
-
172
-
173
-
174
-
175
-
176
-
177
-
178
-
179
-
180
-
181
-
182
-
183
-
184
-
185
-
186
-
187
-
188
-
189
-
190
-
191
-
192
-
193
-
194
-
195
-
196
-
197
-
198
-
199
-
200
-
201
-
202
-
203
-
204
-
205
-
206
-
207
-
208
-
209
-
210
-
211
-
212
-
213
-
214
-
215
-
216
-
217
-
218
-
219
-
220
-
221
-
222
-
223
-
224
-
225
-
226
-
227
-
228
-
229
-
230
-
231
-
232
-
233
-
234
-
235
-
236
-
237
-
238
-
239
-
240
-
241
-
242
-
243
-
244
-
245
-
246
-
247
-
248
-
249
-
250
-
251
-
252
-
253
-
254
-
255
-
256
 |
 |
