3Com 3C16770-US Quick Start Guide - Page 3
Installing The Internet Firewall
 |
View all 3Com 3C16770-US manuals
Add to My Manuals
Save this manual to your list of manuals |
Page 3 highlights
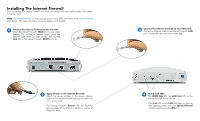
Installing The Internet Firewall Start by placing your Internet Firewall on a hard, flat surface near your cable modem, DSL modem or Internet router. Note: The Internet Firewall 25 front and rear panel views differ from those of the Internet Firewall DMZ below. The same instructions, however, apply to both models. 1 Connect the Internet Firewall to the Internet Attach the Internet Firewall's WAN port to your cable modem, DSL modem or Internet router, using the Ethernet cable. After you apply power, verify that the Link LED on the Internet Firewall's WAN port is lit. 2 Connect the Internet Firewall to Your Network Connect an Ethernet cable to the Internet Firewall's LAN port. Connect the other end to your LAN hub. 3 Apply Power to the Internet Firewall Attach the power adapter to the power adapter socket on the Internet Firewall and plug the other end into a power outlet. The Internet Firewall's Power LED will flash for approximately 90 seconds as it performs a series of diagnostic tests. 4 Check Link LEDs The WAN Link LED, the LAN Link LED on the Internet Firewall should light up. If the Link LED on the LAN port does not light up after applying power, press the Uplink/Normal switch located next to the LAN port.
-
 1
1 -
 2
2 -
 3
3 -
 4
4 -
 5
5 -
 6
6 -
 7
7
 |
 |
