3Com 3C16770-US Quick Start Guide - Page 5
Logging - firmware
 |
View all 3Com 3C16770-US manuals
Add to My Manuals
Save this manual to your list of manuals |
Page 5 highlights
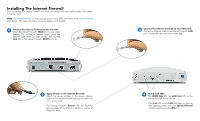
Logging In Now that you have changed your computer's IP address, you will need to log into the Internet Firewall. 7 Configure the Internet Firewall Launch your Web browser. Type http://192.168.1.254 into the Location or Go to field at the top of your browser. ! Please note that you may need IP addressing details provided by your Internet Service Provider (ISP) to complete the Installation Wizard. Contact your ISP if you are missing this information. ! The Web browser software used must support JAVA® and HTTP uploads in order to fully manage the Internet Firewall. Netscape Navigator® 4.0 and above, as well as IE 5.0, are recommended. If you don't have Netscape installed on your computer, you will find it on the OfficeConnect Internet Firewall CD. 8 The Installation Wizard The first time you log into the Internet Firewall, the Installation Wizard is automatically launched. The Installation Wizard will guide you through the initial setup. Note: Certain browser configurations may not invoke the wizard. In this case, you must login with the User Name "admin" and the Password "password" and follow the instructions in the manual to configure the Internet Firewall. ! Please register your OfficeConnect Internet Firewall on 3Com's Web site at http://www.3com.com/internetfirewall/. Registered users can take advantage of automatic firmware update notification and a free 30 day subscription to the Web Site Filter. Note: Once you have completed the Installation Wizard and restarted the Internet Firewall, you will be able to manage the Internet Firewall by typing the URL specified in the Wizard's Congratulations window into a Web browser. You must login with the User Name "admin" and the Password that you defined in the Installation Wizard.
-
 1
1 -
 2
2 -
 3
3 -
 4
4 -
 5
5 -
 6
6 -
 7
7
 |
 |
