3Com 3CR858-91 User Guide - Page 84
RIP Mode - Enable, Auto Summary - Enable
 |
UPC - 662705490946
View all 3Com 3CR858-91 manuals
Add to My Manuals
Save this manual to your list of manuals |
Page 84 highlights
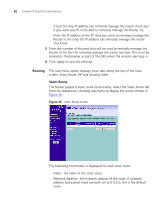
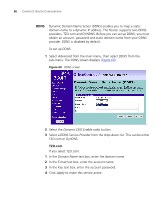
84 CHAPTER 5: ROUTER CONFIGURATION Figure 58 RIP screen To set up RIP and auto summary, and to set up or change information for the LAN interface, the WAN interface or both: 1 Check the RIP Mode - Enable check box to configure RIP on the Router. 2 Check the Auto Summary - Enable check box if you want the Router to send simplified routing data to other RIP devices, instead of full routing data. 3 Select one of Disable, Enable or Silent from the Operation Mode drop-down list. If you select Enable, the Router transmits RIP update information to other RIP enabled devices. If you select Silent, the Router only receives RIP update messages. 4 Select either 1 (for RIPv1) or 2 (for RIPv2) from the Version drop-down list. 3Com recommends that you use RIPv1 if there is any RIP enabled device on your network that does not support RIPv2. In all other case, select RIPv2. 5 Select either Enable or Disable from the Poison Reverse drop-down list. Enabling Poison Reverse on your Router allows it to indicate to other RIP-enabled devices that they both have routes that point to each other, preventing data loops. 6 Select either None or Password from the Authentication Required drop-down list. If you select Password, an unencrypted text password must be set on all RIP-enabled devices. 7 If you selected Password at step 6, enter a password at the Authentication Code prompt.
-
 1
1 -
2
-
3
-
4
-
5
-
6
-
7
-
8
-
9
-
10
-
11
-
12
-
13
-
14
-
15
-
16
-
17
-
18
-
19
-
20
-
21
-
22
-
23
-
24
-
25
-
26
-
27
-
28
-
29
-
30
-
31
-
32
-
33
-
34
-
35
-
36
-
37
-
38
-
39
-
40
-
41
-
42
-
43
-
44
-
45
-
46
-
47
-
48
-
49
-
50
-
51
-
52
-
53
-
54
-
55
-
56
-
57
-
58
-
59
-
60
-
61
-
62
-
63
-
64
-
65
-
66
-
67
-
68
-
69
-
70
-
71
-
72
-
73
-
74
-
75
-
76
-
77
-
78
-
 79
79 -
 80
80 -
 81
81 -
 82
82 -
 83
83 -
 84
84 -
 85
85 -
 86
86 -
 87
87 -
 88
88 -
 89
89 -
90
-
91
-
92
-
93
-
94
-
95
-
96
-
97
-
98
-
99
-
100
-
101
-
102
-
103
-
104
-
105
-
106
-
107
-
108
-
109
-
110
-
111
-
112
-
113
-
114
-
115
-
116
-
117
-
118
-
119
-
120
-
121
-
122
-
123
-
124
-
125
-
126
-
127
-
128
-
129
-
130
 |
 |
