3M MP220 Installation Guide
3M MP220 Manual
 |
View all 3M MP220 manuals
Add to My Manuals
Save this manual to your list of manuals |
3M MP220 manual content summary:
- 3M MP220 | Installation Guide - Page 1
Installation 1. Unpack the meter, power supply, electrode, electrode arm, buffer sachets, Guide Book and calibration certificate. Keep the meter and base the right way up and locate the electrode arm onto the base fixing post. Press down to snap into place. Input and Output Connections MP220 - 3M MP220 | Installation Guide - Page 2
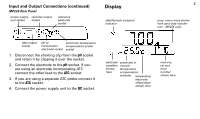
to the pH socket. If you are using an electrode incorporating ATC connect the other lead to the ATC socket. 3. If you are using a separate ATC probe connect it to the ATC socket. 4. Connect the power supply unit to the DC socket. electrode automatic or condition manual shown temperature - 3M MP220 | Installation Guide - Page 3
the meter starts measuring. If you want to use another pH buffer (choice of 3) press Cal again. Press Cal repeatedly to exit the calibration routine. n The decimal point flashes during calibration measurement. When the electrode output has stabilized the stability indicator appears. Manual endpoint - 3M MP220 | Installation Guide - Page 4
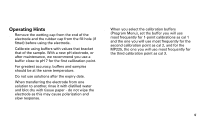
blot and store the electrode. 4 n If you press Mode to select pH or mV mode the meter begins measuring immediately. You will not need to press Read to start appears. Manual endpoint - press Read to endpoint. Auto endpoint - the meter automatically endpoints. n If you have the RS232 cable connected - 3M MP220 | Installation Guide - Page 5
using the electrode. n Calibrate using buffers with values that bracket that of the sample. With a new pH electrode, or after maintenance, we recommend you use a buffer close to pH 7 for the first calibration point. n For greatest accuracy, buffers and samples should be at the same temperature - 3M MP220 | Installation Guide - Page 6
indicator . The display will freeze automatically when a stable endpoint is reached. To manually freeze the display press Read. To turn auto endpoint off press A again. Using the Memory Entering a Reading into Memory The MP220 can store 10 endpointed results and the MP225 can store 20. Press M when - 3M MP220 | Installation Guide - Page 7
Transfer Mode (MP225 only) In continuous data transfer mode readings are sent to the data output approximately every second. If the measurement endpoints (manually, or using auto endpoint) data transfer stops. If you recall memories all stored readings are output, (from the first to the last stored - 3M MP220 | Installation Guide - Page 8
Program Menu allows you to set manual temperature compensation, pH calibration buffers and, for the MP225 move on. Manual Temperature Compensation (MP220 and MP225) You can enter temperature manually between -5.0 and 105.0°C. (An ATC probe will override manual compensation.) The meters have a preset - 3M MP220 | Installation Guide - Page 9
Program Menu (continued) pH Buffer Selection (MP220 and MP225) The buffers are grouped in sets (b = 1, b = 2, b = 3); select your required set first using M and R : set 1 = 7.00, 4.00, 10.01, 1.68 set 2 = 7.00, 4.01, 9.21, 2. - 3M MP220 | Installation Guide - Page 10
printers (GA42), Acquire Data Acquisition software and other RS232 compatible devices via the RS232 cable sent to the Data socket at measurement endpoint (manual or automatic), calibration recall and memory recall. n Outputs pH - Output follows display and provides approximately 60 mV output/pH unit - 3M MP220 | Installation Guide - Page 11
Problem Solving Err 1 - offset value (E ) out of range 0 Check correct buffer is used. Check mV reading for pH 7 buffer is 0 ± 30 mV. If it date entered. Entered temperature value changes to -5.0 or 105.0 - the meter will not accept values outside this range. Dashes displayed instead of buffer - 3M MP220 | Installation Guide - Page 12
your electrode. 12 Spares and Accessories 52000100 52000118 51300164 51302118 51302152 51302125 Cable (MP225 only) RS232 Cable (MP225 only) GA42 Printer (MP225 only) LC - P45 GLP Printer (MP225 only) Guide to pH Measurement pH 4.01 Buffer Sachets, 30/pack pH 7.00 Buffer Sachets, 30/pack pH - 3M MP220 | Installation Guide - Page 13
Buffer Tables The MP220 and MP225 automatically correct pH buffers for temperature using the values shown in the table. 1.68 2.00 4.00 4.01 6.87 7.00 9.18 9.21 10.01 11.00 5°C 1.67 2.02 4.00 4. - 3M MP220 | Installation Guide - Page 14
Specifications Measurement pH Ranges mV Temp. MP220 0.00 to 14.00 ± 1999 mV -5.0 to 105.0°C MP225 -2.00 to 16.00 ± 1999 mV -5.0 to 105.0°C Calibration Points 2 of 3 selectable 3 of 3 selectable Resolution pH 0.01 0.01 mV 1 1 Temp. 0.1 0.1 Relative Accuracy* pH ± 0.01 mV ± 1 mV - 3M MP220 | Installation Guide - Page 15
Specifications (continued) Power Requirements The MP220 and MP225 are supplied with an appropriate power supply unit. USA/Japan 100 - 120V, 50/60Hz, 0.85VA Europe 230V, 50Hz, 1.1VA Output from PSU: 9V DC Meter Power Rating: 0.3VA NOTE: The meters should only be used with the power supply
-
 1
1 -
 2
2 -
 3
3 -
 4
4 -
 5
5 -
 6
6 -
 7
7 -
8
-
9
-
10
-
11
-
12
-
13
-
14
-
15
 |
 |
1
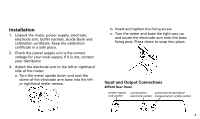
Installation
1.
Unpack the meter, power supply, electrode,
electrode arm, buffer sachets, Guide Book and
calibration certificate. Keep the calibration
certificate in a safe place.
2.
Check the power supply unit is the correct
voltage for your local supply. If it is not, contact
your distributor.
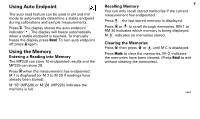
3.
Attach the electrode arm to the left or righthand
side of the meter:
a.
Turn the meter upside down and seat the
dome of the electrode arm base into the left
or righthand meter recess.
b.
Insert and tighten the fixing screw.
c.
Turn the meter and base the right way up
and locate the electrode arm onto the base
fixing post. Press down to snap into place.
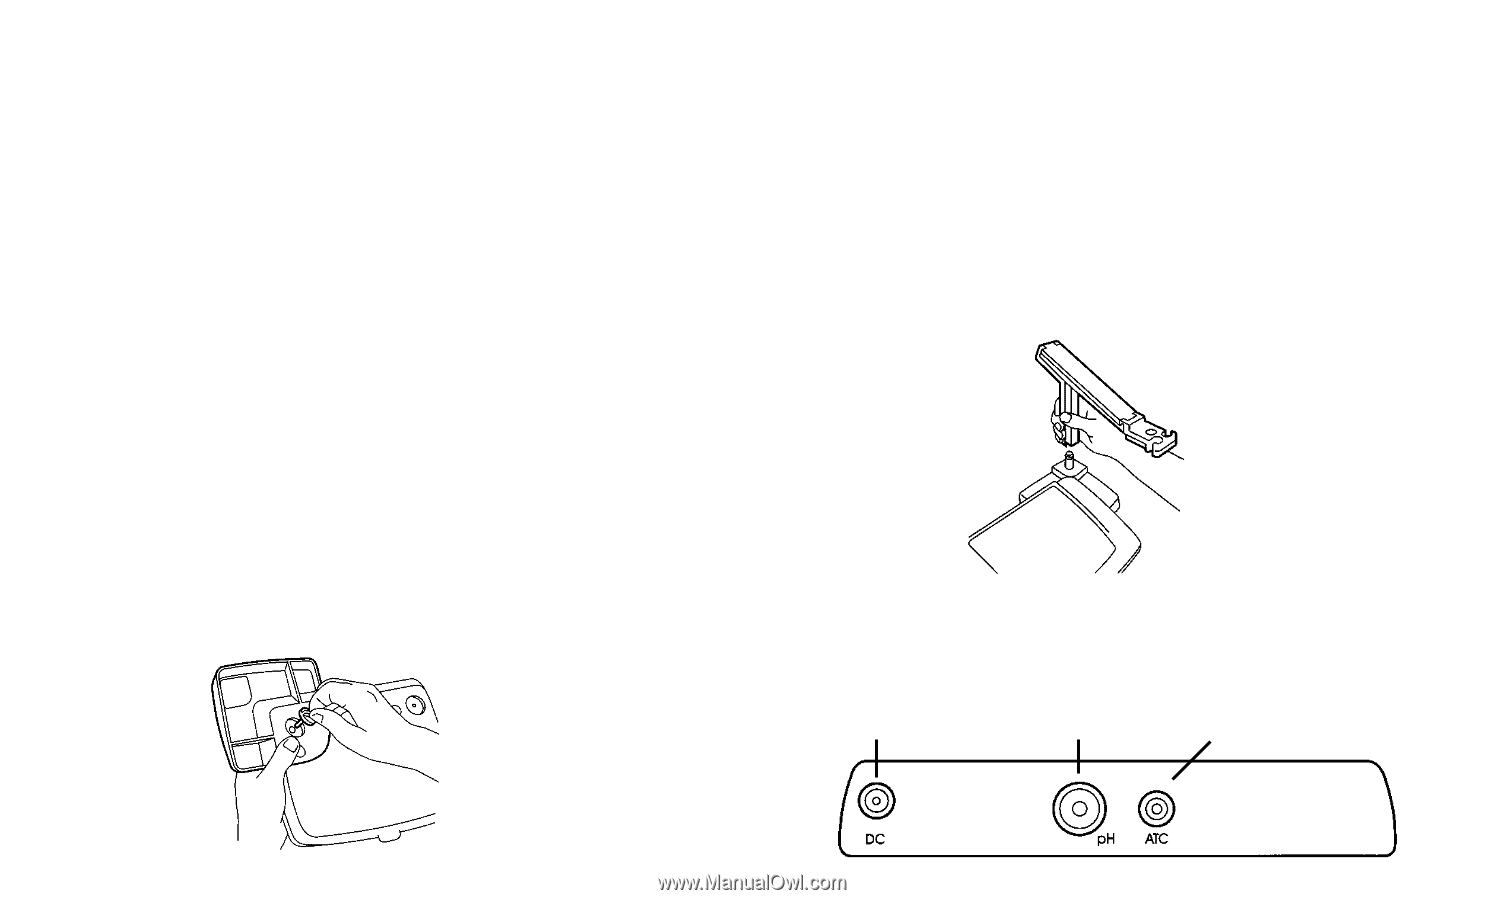
Input and Output Connections
MP220 Rear Panel
power supply
unit socket
combination
electrode socket
automatic temperature
compensation probe socket