3M MP7750 Operation Guide - Page 25
PICTURE 1 Menu, PICTURE 2 Menu
 |
View all 3M MP7750 manuals
Add to My Manuals
Save this manual to your list of manuals |
Page 25 highlights
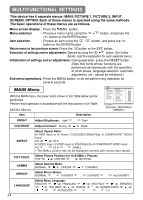
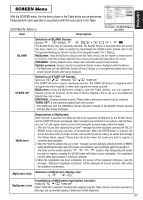
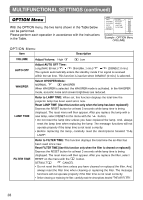
ENGLISH PICTURE 1 Menu With the PICTURE 1 menu, the five items shown in the Table below can be performed. Perform each operation in accordance with the instructions in the Table. PICTURE1 Menu Item Description MENU MAIN PICTURE-1 PICTURE-2 INPUT SCREEN OPTION COLOR BAL R COLOR BAL B SHARPNESS COLOR TINT 12 : SELECT Example : PICTURE1 Menu (COLOR BAL R) COLOR BAL R Adjust Red Color Balance: Dark Light COLOR BAL B Adjust Blue Color Balance: Dark Light SHARPNESS COLOR TINT Adjust Sharpness (for VIDEO/S-VIDEO): Clear Soft Adjust COLOR (for VIDEO/S-VIDEO/COMPONENT VIDEO): Dark Light Adjust Tint (for VIDEO/S-VIDEO): Green Red PICTURE 2 Menu With the PICTURE 2 menu, the five items shown in the Table below can be performed. Perform each operation in accordance with the instructions in the Table. MENU MAIN PICTURE-1 PICTURE-2 INPUT SCREEN OPTION V POSITION H POSITION H PHASE H SIZE OVER SCAN 12 : SELECT Example : PICTURE2 Menu (V POSITION) PICTURE2 Menu Item Description V POSITION Adjust Vertical Position (for RGB): Up Down H POSITION H PHASE Adjust Horizontal Position (for RGB): Left Right Adjust Horizontal Phase (for RGB/COMPONENT VIDEO): Right Left • Adjust to eliminate flicker. H SIZE Adjust Horizontal Size (for RGB): Large Small • If the horizontal size adjustment is excessive, the image may not be displayed correctly. In such a case, initialize H SIZE with the RESET button. OVER SCAN Select Over-scan Ratio (for VIDEO/S-VIDEO/COMPONENT VIDEO): LARGE MIDDLE SMALL • It is recommended to select SMALL to avoid flicker at the lower part of the picture. 25
-
 1
1 -
2
-
3
-
4
-
5
-
6
-
7
-
8
-
9
-
10
-
11
-
12
-
13
-
14
-
15
-
16
-
17
-
18
-
19
-
 20
20 -
 21
21 -
 22
22 -
 23
23 -
 24
24 -
 25
25 -
 26
26 -
 27
27 -
 28
28 -
 29
29 -
 30
30 -
31
-
32
-
33
-
34
-
35
-
36
-
37
-
38
-
39
-
40
 |
 |
