3M MP7750 Operation Guide - Page 37
What To Do When You Think A Machine Defect Has Occurred Continued
 |
View all 3M MP7750 manuals
Add to My Manuals
Save this manual to your list of manuals |
Page 37 highlights
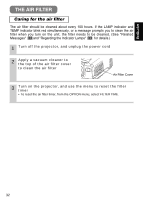
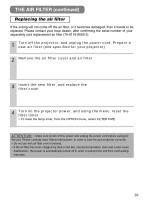
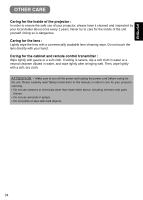
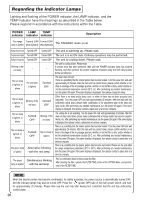
ENGLISH WHAT TO DO WHEN YOU THINK A MACHINE DEFECT HAS OCCURRED (continued) Phenomena That May Easily Be Mistaken for Machine Defects Before requesting repair, check in accordance with the following chart. If the situation cannot be corrected, then contact your dealer. Phenomenon Power does not come ON No sound or pictures are outputted Cases not involving a machine defect The main power source is not ON. The electrical power cord is not plugged in. The main power source has been interrupted during operation, such as by a power outage (blackout), etc. The input changeover settings are mismatched. Items to be confirmed Reference Page(s) Turn on the main power. 3, 14 Correctly connect the power cord. Be sure to press the "O" (power OFF) side of the main power switch, and leave this OFF for approximately 20 minutes. After the unit 14 has sufficiently cooled down, turn ON the power source. Select the input signal, and correct the settings. 15 No signal is being inputted. Correctly connect the connection cord. 10, 11 Pictures are displayed, but no sounds are heard Sounds are heard, but no pictures are displayed The electrical wiring to this unit is not correctly connected. The volume setting has been set at (or adjusted to) an extremely low level. The MUTE mode is the current setting. The electrical wiring to this unit is not correctly connected. The brightness setting has been set at (or adjusted to) an extremely low level. The lens cap has not been removed. Correctly connect the connection cord. 10, 11 Adjust the VOLUME setting to a higher level. 17 Press the MUTE button to release (change) the MUTE mode setting. 17 Correctly connect the connection cord. 10, 11 Adjust the BRIGHT setting to a brighter level. 24 Remove the lens cap. 14 Colors have a fadedout appearance Color tone is poor Pictures appear dark Pictures appear blurry Color depth setting or color tone setting The brightness setting and/or contrast setting has not been properly adjusted. The WHISPER mode is the current setting. Lamp is approaching the end of its product lifetime. Either the FOCUS setting or the H PHASE is not properly adjusted. Perform picture adjustments by changing the COLOR BAL R, the COLOR BAL B, and/or the 25 TINT settings, etc. Perform picture adjustments by changing the BRIGHT and/or CONTRAST settings, etc. 24 Change (by releasing) WHISPER mode. from the 28 Exchange the old lamp with a new lamp. 30, 31 Adjust the FOCUS and H PHASE settings. 15, 25 NOTE Although bright spots or dark spots may appear on the screen, this is a unique characteristic of liquid crystal displays, and such do not constitute or imply a machine defect. 37
-
 1
1 -
2
-
3
-
4
-
5
-
6
-
7
-
8
-
9
-
10
-
11
-
12
-
13
-
14
-
15
-
16
-
17
-
18
-
19
-
20
-
21
-
22
-
23
-
24
-
25
-
26
-
27
-
28
-
29
-
30
-
31
-
 32
32 -
 33
33 -
 34
34 -
 35
35 -
 36
36 -
 37
37 -
 38
38 -
 39
39 -
 40
40
 |
 |
