AIWA HV-FX9000 Operating Instructions - Page 21
To correct the digits while setting
 |
View all AIWA HV-FX9000 manuals
Add to My Manuals
Save this manual to your list of manuals |
Page 21 highlights
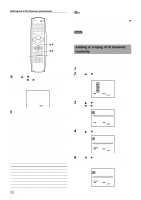
5 Press j or lto set AUTO CLOCK SET to ON. The VCR automatically corrects the clock setting once you set AUTO CLOCK SET to ON. MONTH : JUNE DAY : 17 SAT YEAR : 2000 TIME : 10 : 30 AM AUTO CLOCK SET : ON SELECT ADJUST TO EXIT PRESS MENU 6 Press MENU to start the clock. The normal screen returns. To correct the digits while setting Before pressing MENU in step 6, press i to select the item you want to correct. Reset the digits using the j or l button. Tip When the power supply is interrupted for more than 60 minutes or the AC cord is disconnected from the AC wall outlet, the clock setting is cleared. In this case, you have to set the clock again. Notes • The date can be set from A.D.2000 to A.D.2099. • AUTO CLOCK functions when - the VCR's power is turned off. - the channel of a broadcaster that offers AUTO CLOCK service is preset. Setting the VCR channels Before Auto Channel Memory, this VCR can receive all channels in your area by pressing the CHANNEL i or k button repeatedly. After Auto Channel Memory, you can skip the channels which are not preset with the CHANNEL i or k button. VCR/CATV/ DBS/TV ENTER/ DISPLAY CHANNEL i/k j/l MENU Before starting • Set the VCR/CATV/DBS/TV selector to VCR. • Make sure the VCR channel is not selected "LINE1" or "LINE2". 1 Press MENU. 2 Press i or k to select TUNING, then press ENTER/DISPLAY. CLOCK PROGRAM TUNING SETUP SELECT ENTER ENTER TO EXIT PRESS MENU 3 Press i or k to select SOURCE SELECT, then press j or l to display TUNER. AUTO CHANNEL SET TUNING BAND : TV CH. ADD / DEL : CH.14 ADD SOURCE SELECT : TUNER SELECT ADJUST TO EXIT PRESS MENU CONTINUE ENGLISH 12
-
 1
1 -
2
-
3
-
4
-
5
-
6
-
7
-
8
-
9
-
10
-
11
-
12
-
13
-
14
-
15
-
 16
16 -
 17
17 -
 18
18 -
 19
19 -
 20
20 -
 21
21 -
 22
22 -
 23
23 -
 24
24 -
 25
25 -
 26
26 -
27
-
28
-
29
-
30
-
31
-
32
-
33
-
34
-
35
-
36
-
37
-
38
-
39
-
40
-
41
-
42
-
43
-
44
-
45
-
46
-
47
-
48
-
49
-
50
-
51
-
52
-
53
-
54
-
55
-
56
-
57
-
58
-
59
-
60
-
61
-
62
-
63
-
64
-
65
-
66
-
67
-
68
-
69
-
70
-
71
-
72
-
73
-
74
-
75
-
76
-
77
-
78
-
79
-
80
-
81
-
82
-
83
-
84
-
85
-
86
-
87
-
88
-
89
-
90
-
91
-
92
-
93
-
94
-
95
-
96
-
97
-
98
-
99
-
100
-
101
-
102
-
103
-
104
-
105
-
106
-
107
-
108
-
109
-
110
-
111
-
112
-
113
-
114
-
115
-
116
-
117
-
118
 |
 |
