AIWA HV-FX9000 Operating Instructions - Page 33
Dubbing
 |
View all AIWA HV-FX9000 manuals
Add to My Manuals
Save this manual to your list of manuals |
Page 33 highlights
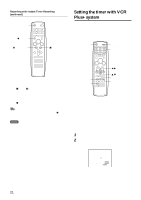
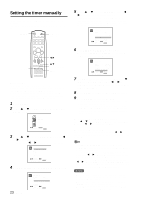
Dubbing Connecting with another VCR (Front) HV-FX9000 (Recorder) VIDEO IN jack LINE 2 AUDIO IN L/R jacks Red (Rear) AERIAL (VHF/UHF) RF OUT LINE 1 AUDIO IN L (MONO)/R jacks VIDEO IN jack Yellow White Yellow or White Red Audio/video cable (not supplied) To audio/video output jacks or To audio/video output jacks Another VCR (Player) Video camera (Player) Important When you record a video signal output from this VCR onto another VCR, turn off the on-screen display. Otherwise, the indicators displayed on the TV screen will be recorded on the tape. Tips • If the other VCR is monaural type, connect one of the audio plugs only to AUDIO IN L (MONO) at the rear. • If you use this VCR for playback, connect the AUDIO/VIDEO OUT jacks on this VCR and the audio/video input jacks on the recording VCR. Note If both units are; turned on, made by AIWA, and located near each other, do not use the remote control. Use the buttons on the VCR instead. Operation wREC/ITR aPAUSE/ STILL 0/INPUT CHANNEL i/k Before starting Select the tape speed. 1 Insert a pre-recorded source cassette into another (playback) VCR. 2 Insert a blank cassette with its erasure prevention tab in place into your HV-FX9000 (recording) VCR. 3 Press 0/INPUT repeatedly to display "LINE1" (rear) or "LINE2" (front) on the TV screen. You can also use the CHANNNEL i or k button. 4 Press w REC/ITR and a PAUSE/STILL on the recording VCR. The recording VCR is in recording pause mode. 5 Set the other VCR to playback. 6 Press w REC/ITR or a PAUSE/STILL on the recording VCR. Dubbing begins. ENGLISH 24
-
 1
1 -
2
-
3
-
4
-
5
-
6
-
7
-
8
-
9
-
10
-
11
-
12
-
13
-
14
-
15
-
16
-
17
-
18
-
19
-
20
-
21
-
22
-
23
-
24
-
25
-
26
-
27
-
 28
28 -
 29
29 -
 30
30 -
 31
31 -
 32
32 -
 33
33 -
 34
34 -
 35
35 -
 36
36 -
 37
37 -
 38
38 -
39
-
40
-
41
-
42
-
43
-
44
-
45
-
46
-
47
-
48
-
49
-
50
-
51
-
52
-
53
-
54
-
55
-
56
-
57
-
58
-
59
-
60
-
61
-
62
-
63
-
64
-
65
-
66
-
67
-
68
-
69
-
70
-
71
-
72
-
73
-
74
-
75
-
76
-
77
-
78
-
79
-
80
-
81
-
82
-
83
-
84
-
85
-
86
-
87
-
88
-
89
-
90
-
91
-
92
-
93
-
94
-
95
-
96
-
97
-
98
-
99
-
100
-
101
-
102
-
103
-
104
-
105
-
106
-
107
-
108
-
109
-
110
-
111
-
112
-
113
-
114
-
115
-
116
-
117
-
118
 |
 |
