AIWA XR-M35 Operating Instructions - Page 5
Connecting, An Outdoor, Antenna, Remote, Control - remote control
 |
View all AIWA XR-M35 manuals
Add to My Manuals
Save this manual to your list of manuals |
Page 5 highlights
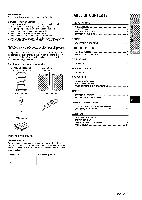
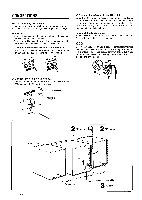
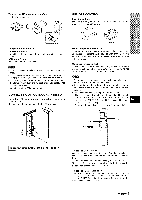
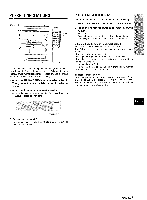
To stand the AM antenna on a surface Fix the claw to the slot. To prxition the antennas FM feeder antenna: Extend this antenna horizontally in a T-shape and fix its ends to the wall. AM loop antenna: PositIon to find the best direction. m~ o Do not connect any speakers to the unit other than the supplied ones. = Do Inot leave objects generating magnetism near the speakers. * Do [not bring the FM antenna near metal objects or curtain rails. * Do not bring the AM antenna near other optional equipment, the stereo system itself, the AC cord or speaker noise will be picked up. * Do not unwind the AM antenna wire. cords, since CONNECTING AN OUTDOOR ANTENNA For [better FM reception, use of an outdoor antenna is recommended. Connect the outdoor antenna to the FM 75 Q terminals. REMOTE CONTROL Inserting batteries Detach the battery cover on the rear of the remote control and insert two R6 (size AA) batteries. P. L) / R6 (AA) When to replace the batteries The maximum operational distance between the remote control and the sensor on the main unit should be atwroximatelv 5 meters (16 feet). When this distance decreases, replace the batteries with new ones. Using the remote control The instructions in this manual refer mainly to the buttons on the main unit. Buttons on the remote control with the same names as those on the main unit can be used as well. q The > button on the remote control has the same function as that of the 4P button on the main unit. q If the unit is not going to be used for an extended period of time, remove the batteries to prevent possible electrolyte leakage, q The remote control may not operate correctly when: - The line of sight between the remote control and the remote sensor on the right bottom of the front panel (see the illustration of "BEFORE OPERATION") is exposed to intense Iiaht, such as direct sunlight. m - O-ther remote controls ar~ used nearby (television, etc.) SHIFT FUNCTION I To connect other optional equipment+ page Ii'. I TCJuse the SHIFT button Buttons (~ have two different functions. One of the functions is indicated on the button, and the other on the plate above the button. To use the function on the button, simply press the button. To use the function on the plate above the button, press the button while pressing the SHIFT button. TCIuse the FUNCTION button The FUNCTION button substitutes for the function buttons (TAPE, TUNER, VIDEO/AUX, CD, MD) on the main unit. Each time the FUNCTION button is pressed while power is on, the next function is selected cyclically. 4 ENGLISH
-
 1
1 -
 2
2 -
 3
3 -
 4
4 -
 5
5 -
 6
6 -
 7
7 -
 8
8 -
 9
9 -
 10
10 -
 11
11 -
12
-
13
-
14
-
15
-
16
-
17
-
18
-
19
-
20
-
21
-
22
-
23
-
24
-
25
-
26
-
27
-
28
-
29
-
30
-
31
-
32
-
33
-
34
-
35
-
36
-
37
-
38
-
39
-
40
-
41
-
42
-
43
-
44
-
45
-
46
-
47
-
48
-
49
-
50
-
51
-
52
-
53
-
54
-
55
-
56
-
57
-
58
-
59
-
60
-
61
-
62
-
63
-
64
 |
 |
