ASRock A75 Extreme6 RAID Installation Guide - Page 13
One Logical Drive
 |
View all ASRock A75 Extreme6 manuals
Add to My Manuals
Save this manual to your list of manuals |
Page 13 highlights
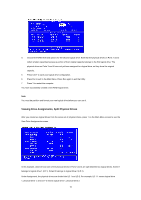
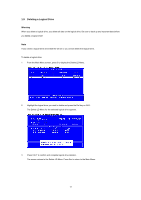
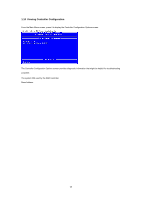
5. Press the arrow keys to move to Disk Assignments. Press the spacebar to toggle between N and Y for each available drive. Y means this physical drive will be assigned to the logical drive. Assign the appropriate number of physical drives to your logical drive. For optimal performance, assign physical drives of the same model and capacity. Your PC's boot drive is not listed under Drive Assignments. 6. Press Ctrl-Y to save your logical drive configuration. The name prompt appears. Do one of the following actions: Press Ctrl-Y to display a name field. Type a name in the field and press Enter. Press any other key to use the default name, such as Logical Drive 1. If you set Fast Initialization, the following message displays: 7. Do one of the following actions: ٛ Press Ctrl-Y to perform the fast initialization. ٛ Press any other key to cancel logical drive creation. You have the option of using all of the physical drive capacity for one logical drive or allocating a portion to a second logical drive. This option is not available for JBOD or RAID Ready logical drives. 8. Choose one of the following actions: ٛ Allocate the full capacity of the physical drives to a single logical drive. Go to "One Logical Drive" below. ٛ Split the capacity of the physical drives between two logical drives. One Logical Drive Continued from Create Logical Drive step 8, above. 13
-
 1
1 -
2
-
3
-
4
-
5
-
6
-
7
-
 8
8 -
 9
9 -
 10
10 -
 11
11 -
 12
12 -
 13
13 -
 14
14 -
 15
15 -
 16
16 -
 17
17 -
 18
18 -
19
-
20
-
21
-
22
-
23
-
24
-
25
-
26
-
27
 |
 |
