ASRock A75 Extreme6 RAID Installation Guide - Page 15
Viewing Drive Assignments, Split Physical Drives
 |
View all ASRock A75 Extreme6 manuals
Add to My Manuals
Save this manual to your list of manuals |
Page 15 highlights
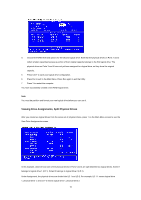
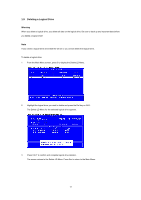
4. Choose the RAID level and options for the second logical drive. Note that the physical drives on Ports 1 and 2 reflect smaller capacities because a portion of their original capacity belongs to the first logical drive. The physical drives on Ports 3 and 4 have not yet been assigned to a logical drive, so they show the original capacity. 5 Press Ctrl-Y to save your logical drive configuration. 6 Press Esc to exit to the Main Menu. Press Esc again to exit the Utility. 7 Press Y to restart the computer. You have successfully created a new RAID logical drive. Note You must be partition and format your new logical drive before you can use it. Viewing Drive Assignments, Split Physical Drives After you create two logical drives from the same set of physical drives, press 1 on the Main Menu screen to see the View Drive Assignments screen. In this example, observe how each of the physical drives in Ports 1and 2 are split between two logical drives. Extent 1 belongs to logical drive 1 (LD 1). Extent 2 belongs to logical drive 2 (LD 2). Under Assignment, the physical drives are divided into LD 1 and LD 2. For example, LD 1-1 means logical drive 1, physical drive 1; and LD 1-2 means logical drive 1, physical drive 2. 15
-
 1
1 -
2
-
3
-
4
-
5
-
6
-
7
-
8
-
9
-
 10
10 -
 11
11 -
 12
12 -
 13
13 -
 14
14 -
 15
15 -
 16
16 -
 17
17 -
 18
18 -
 19
19 -
 20
20 -
21
-
22
-
23
-
24
-
25
-
26
-
27
 |
 |
