ASRock A75 Extreme6 RAID Installation Guide - Page 14
Two Logical Drives
 |
View all ASRock A75 Extreme6 manuals
Add to My Manuals
Save this manual to your list of manuals |
Page 14 highlights
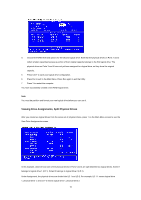
1 Press any key (except for Ctrl-Y) to use the full portion of the logical drive for one logical drive. 2 Press Esc to exit to the Main Menu. Press Esc again to exit the Utility. 3 Press Y to restart the computer. You have successfully created a new RAID logical drive. Note You must be partition and format your new logical drive before you can use it. Two Logical Drives Continued from Create Logical Drive step 8, above. 1 Press Ctrl-Y to allocate a portion of the physical drives to the first logical drive. 2 Enter the desired capacity in GB for the first logical drive and press Enter. The Define LD Menu displays again. 3 Press the up and down arrow keys to select an available logical drive number and press Enter. 14
-
 1
1 -
2
-
3
-
4
-
5
-
6
-
7
-
8
-
 9
9 -
 10
10 -
 11
11 -
 12
12 -
 13
13 -
 14
14 -
 15
15 -
 16
16 -
 17
17 -
 18
18 -
 19
19 -
20
-
21
-
22
-
23
-
24
-
25
-
26
-
27
 |
 |

14
1
Press any key (except for Ctrl-Y) to use the full portion of the logical drive for one logical drive.
2
Press Esc to exit to the Main Menu. Press Esc again to exit the Utility.
3
Press Y to restart the computer.
You have successfully created a new RAID logical drive.
Note
You must be partition and format your new logical drive before you can use it.
Two Logical Drives
Continued from
Create Logical Drive
step 8, above.
1
Press Ctrl-Y to allocate a portion of the physical drives to the first logical drive.
2
Enter the desired capacity in GB for the first logical drive and press Enter. The Define LD Menu displays again.
3
Press the up and down arrow keys to select an available logical drive number and press Enter.