ASRock Fatal1ty X399 Professional Gaming User Manual - Page 49
Installing Three CrossFireXTM-Ready Graphics Cards, Step 3
 |
View all ASRock Fatal1ty X399 Professional Gaming manuals
Add to My Manuals
Save this manual to your list of manuals |
Page 49 highlights
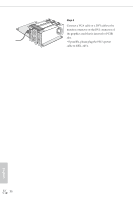
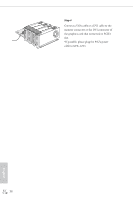
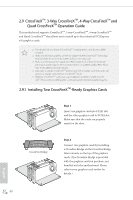
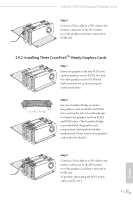
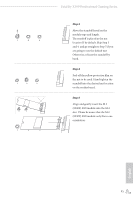
Fatal1ty X399 Professional Gaming Series Step 3 Connect a VGA cable or a DVI cable to the monitor connector or the DVI connector of the graphics card that is inserted to PCIE1 slot. 2.9.2 Installing Three CrossFireXTM-Ready Graphics Cards Step 1 Insert one graphics card into PCIE1 slot, another graphics card to PCIE2 slot, and the other graphics card to PCIE4 slot. Make sure that the cards are properly seated on the slots. CrossFire Bridge Step 2 Use one CrossFire Bridge to connect the graphics cards on PCIE1 and PCIE2 slots, and use the other CrossFire Bridge to connect the graphics cards on PCIE2 and PCIE4 slots. (The CrossFire Bridge is provided with the graphics card you purchase, not bundled with this motherboard. Please refer to your graphics card vendor for details.) Step 3 Connect a VGA cable or a DVI cable to the monitor connector or the DVI connector of the graphics card that is inserted to PCIE1 slot. *If possible, please plug the PSU's power cable to GFX_12V1. 41 English
-
 1
1 -
2
-
3
-
4
-
5
-
6
-
7
-
8
-
9
-
10
-
11
-
12
-
13
-
14
-
15
-
16
-
17
-
18
-
19
-
20
-
21
-
22
-
23
-
24
-
25
-
26
-
27
-
28
-
29
-
30
-
31
-
32
-
33
-
34
-
35
-
36
-
37
-
38
-
39
-
40
-
41
-
42
-
43
-
 44
44 -
 45
45 -
 46
46 -
 47
47 -
 48
48 -
 49
49 -
 50
50 -
 51
51 -
 52
52 -
 53
53 -
 54
54 -
55
-
56
-
57
-
58
-
59
-
60
-
61
-
62
-
63
-
64
-
65
-
66
-
67
-
68
-
69
-
70
-
71
-
72
-
73
-
74
-
75
-
76
-
77
-
78
-
79
-
80
-
81
-
82
-
83
-
84
-
85
-
86
-
87
-
88
-
89
-
90
-
91
-
92
-
93
-
94
-
95
-
96
-
97
-
98
-
99
-
100
-
101
-
102
-
103
-
104
-
105
 |
 |
