Acer easyStore H342 Quick Start Guide - Page 36
Click, Enter the user's name., Select the Enable Remote Access for this user check box if you,
 |
View all Acer easyStore H342 manuals
Add to My Manuals
Save this manual to your list of manuals |
Page 36 highlights
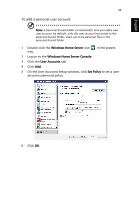
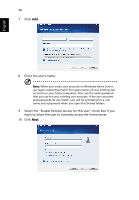
English 34 7 Click Add. 8 Enter the user's name. Note: When you create user accounts on Windows Home Server, use logon names that match the logon names of your existing user accounts on your home computers. Also, use the same password that you use for your existing user accounts. If the user accounts and passwords do not match, you will be prompted for a user name and a password when you open the Shared folders. 9 Select the "Enable Remote Access for this user" check box if you want to allow the user to remotely access the home server. 10 Click Next.
-
 1
1 -
2
-
3
-
4
-
5
-
6
-
7
-
8
-
9
-
10
-
11
-
12
-
13
-
14
-
15
-
16
-
17
-
18
-
19
-
20
-
21
-
22
-
23
-
24
-
25
-
26
-
27
-
28
-
29
-
30
-
 31
31 -
 32
32 -
 33
33 -
 34
34 -
 35
35 -
 36
36 -
 37
37 -
 38
38 -
 39
39 -
 40
40 -
 41
41 -
42
-
43
-
44
-
45
-
46
-
47
-
48
-
49
-
50
-
51
-
52
-
53
-
54
-
55
-
56
-
57
-
58
-
59
 |
 |

34
English
7
Click
Add
.
8
Enter the user’s name.
Note:
When you create user accounts on Windows Home Server,
use logon names that match the logon names of your existing user
accounts on your home computers. Also, use the same password
that you use for your existing user accounts. If the user accounts
and passwords do not match, you will be prompted for a user
name and a password when you open the Shared folders.
9
Select the “Enable Remote Access for this user” check box if you
want to allow the user to remotely access the home server.
10
Click
Next
.