Adaptec 52445 Quick Start Guide - Page 8
Step 3 Set up the Boot Sequence - raid
 |
UPC - 760884155653
View all Adaptec 52445 manuals
Add to My Manuals
Save this manual to your list of manuals |
Page 8 highlights
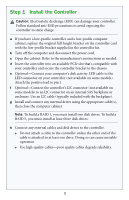
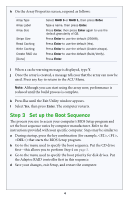
h On the Array Properties screen, respond as follows: Array Type Array Label Array Size Stripe Size Read Caching Write Caching Create RAID via [Done] Select RAID 5 or RAID 1, then press Enter. Type a name, then press Enter. Press Enter, then press Enter again to use the default granularity of GB. Press Enter to use the default (256KB). Press Enter to use the default (Yes). Press Enter to use the default (Enable always). Press Enter to use the default (Build/Verify). Press Enter. i When a cache warning message is displayed, type Y. j Once the array is created, a message tells you that the array can now be used. Press any key to return to the ACU Menu. Note: Although you can start using the array now, performance is reduced until the build process is complete. k Press Esc until the Exit Utility window appears. l Select Yes, then press Enter. The computer restarts. Step 3 Set up the Boot Sequence The process you use to access your computer's BIOS Setup program and set the boot sequence varies by computer manufacturer. Refer to the instructions provided with your specific computer. Steps may be similar to: a During startup, press the key combination (for example, , , ) that starts the BIOS Setup program. b Go to the menu used to specify the boot sequence. Put the CD drive first-this allows you to perform Step 4 on page 5. c Go to the menu used to specify the boot priority for disk drives. Put the Adaptec RAID controller first in this sequence. d Save your changes, exit Setup, and restart the computer. 4
-
 1
1 -
2
-
 3
3 -
 4
4 -
 5
5 -
 6
6 -
 7
7 -
 8
8 -
 9
9 -
 10
10 -
 11
11 -
 12
12 -
 13
13 -
14
-
15
-
16
-
17
-
18
-
19
-
20
-
21
-
22
-
23
-
24
-
25
-
26
-
27
-
28
-
29
-
30
-
31
-
32
-
33
-
34
-
35
-
36
-
37
-
38
-
39
-
40
-
41
-
42
-
43
-
44
-
45
-
46
-
47
-
48
-
49
-
50
-
51
-
52
-
53
-
54
-
55
-
56
-
57
-
58
-
59
-
60
-
61
-
62
-
63
-
64
-
65
-
66
-
67
-
68
-
69
-
70
-
71
-
72
-
73
-
74
-
75
-
76
-
77
-
78
-
79
-
80
-
81
-
82
-
83
-
84
-
85
-
86
 |
 |