Adaptec 5325302036 Quick Installation Guide - Page 5
Installing Your Adaptec Enclosure into a Rack, Select the right length of rails for your rack
 |
UPC - 753253020362
View all Adaptec 5325302036 manuals
Add to My Manuals
Save this manual to your list of manuals |
Page 5 highlights
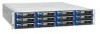
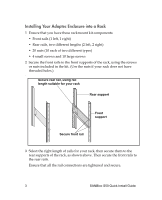
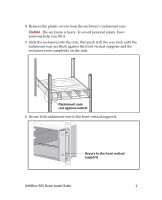
Installing Your Adaptec Enclosure into a Rack 1 Ensure that you have these rackmount kit components: • Front rails (1 left, 1 right) • Rear rails, two different lengths (2 left, 2 right) • 20 nuts (10 each of two different types) • 4 small screws and 10 large screws 2 Secure the front rails to the front supports of the rack, using the screws or nuts included in the kit. (Use the nuts if your rack does not have threaded holes.) ) Secure rear rail, using rail length suitable for your rack Rear support Front support Secure front rail 3 Select the right length of rails for your rack, then secure them to the rear supports of the rack, as shown above. Then secure the front rails to the rear rails. Ensure that all the rail connections are tightened and secure. 3 SANBloc S50 Quick Install Guide
-
 1
1 -
 2
2 -
 3
3 -
 4
4 -
 5
5 -
 6
6 -
 7
7 -
 8
8 -
 9
9 -
 10
10 -
 11
11 -
12
-
13
-
14
-
15
-
16
-
17
-
18
-
19
-
20
 |
 |
