Adaptec 5405 User Guide - Page 69
Setting the Background Consistency Check Period, Increasing the Capacity of a Logical Drive
 |
UPC - 760884155585
View all Adaptec 5405 manuals
Add to My Manuals
Save this manual to your list of manuals |
Page 69 highlights
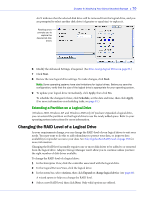
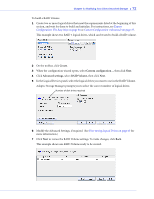
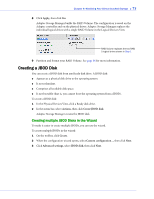
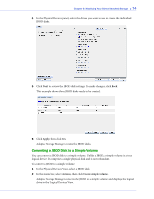
Chapter 6: Modifying Your Direct Attached Storage ● 69 2 In the menu bar, select Actions, then click Enable (Disable) background consistency check. The controller is updated with the new setting. Setting the Background Consistency Check Period You can choose how often Adaptec Storage Manager checks for inconsistent or bad data on your logical drives and hot-spares. To change the background consistency check period: 1 In the Enterprise view, select a controller. 2 Right-click Background Consistency Check, then select Change period. The Change background consistency check period window opens. 3 Adjust the slider control from Very Slow (365 days) to Fast (10 days). Alternatively, in the New Period field, use the arrow keys to increase or decrease the setting. 4 Click OK. Increasing the Capacity of a Logical Drive You can add more disk drive space to a logical drive to increase its capacity (or expand it). Note: The maximum size of a logical drive varies by controller. Refer to your controller's documentation for more information. The expanded logical drive must have a capacity that's greater than or equal to the original logical drive. To increase the capacity of a logical drive: 1 In the Enterprise View, click the controller associated with the logical drive. 2 In the Logical Devices View, click the logical drive. 3 In the menu bar, select Actions, then click Expand or change logical device (shown in the figure in Step 4 on page 67). A wizard opens to help you modify the logical drive. 4 Click Next. 5 Click on the disk drive(s) or disk drive segments you want to add to the logical drive. Note: Adaptec recommends that you not combine SAS and SATA disk drives within the same logical drive. Adaptec Storage Manager generates a warning if you try to create a logical drive using a combination of SAS and SATA disk drives. If you want to remove a specific disk drive or segment and replace it with another one (for instance, replace a smaller disk drive with a larger one), click on the disk drive you want to remove.
-
 1
1 -
2
-
3
-
4
-
5
-
6
-
7
-
8
-
9
-
10
-
11
-
12
-
13
-
14
-
15
-
16
-
17
-
18
-
19
-
20
-
21
-
22
-
23
-
24
-
25
-
26
-
27
-
28
-
29
-
30
-
31
-
32
-
33
-
34
-
35
-
36
-
37
-
38
-
39
-
40
-
41
-
42
-
43
-
44
-
45
-
46
-
47
-
48
-
49
-
50
-
51
-
52
-
53
-
54
-
55
-
56
-
57
-
58
-
59
-
60
-
61
-
62
-
63
-
 64
64 -
 65
65 -
 66
66 -
 67
67 -
 68
68 -
 69
69 -
 70
70 -
 71
71 -
 72
72 -
 73
73 -
 74
74 -
75
-
76
-
77
-
78
-
79
-
80
-
81
-
82
-
83
-
84
-
85
-
86
-
87
-
88
-
89
-
90
-
91
-
92
-
93
-
94
-
95
-
96
-
97
-
98
-
99
-
100
-
101
-
102
-
103
-
104
-
105
-
106
-
107
-
108
-
109
-
110
-
111
-
112
-
113
-
114
-
115
-
116
-
117
-
118
-
119
-
120
-
121
-
122
-
123
-
124
-
125
-
126
-
127
-
128
-
129
-
130
-
131
-
132
-
133
-
134
-
135
-
136
-
137
-
138
-
139
-
140
-
141
-
142
-
143
-
144
-
145
-
146
-
147
-
148
-
149
-
150
-
151
-
152
-
153
-
154
-
155
-
156
-
157
-
158
-
159
-
160
-
161
-
162
-
163
-
164
-
165
-
166
-
167
-
168
-
169
-
170
-
171
-
172
-
173
-
174
-
175
-
176
-
177
-
178
-
179
-
180
-
181
-
182
-
183
-
184
-
185
-
186
-
187
 |
 |