Adaptec FS4500 User Guide - Page 21
Step 2: Installing into a Rack or Tower (optional
 |
UPC - 760884144275
View all Adaptec FS4500 manuals
Add to My Manuals
Save this manual to your list of manuals |
Page 21 highlights
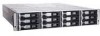
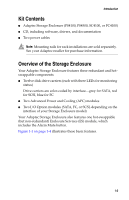
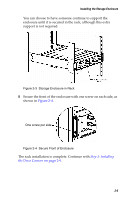
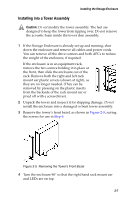
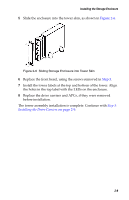
Installing the Storage Enclosure Before you begin the installation, carefully read through this list of tips and safety cautions: ■ Make sure that the mounting hardware and tools are easily accessible before you begin, and plan to have someone assist you during physical installation. ■ Decide on a suitable location for the rack (if you plan to mount your Storage Enclosure into a rack). Choose a clean, dust-free, well-ventilated area close to a grounded power outlet. Leave enough room behind the rack for servicing and to allow for sufficient airflow. ■ Decide on a suitable location for the subsystem in the rack. Warning: Prevent instability due to top-heaviness by installing heavier items into the bottom of the rack. Step 2: Installing into a Rack or Tower (optional) Note: Mounting rails for rack installation are sold separately. To purchase a rail kit, see your Adaptec reseller. Follow the instructions in this section if you are installing your Storage Enclosure into a rack or tower assembly. (A tower assembly is also known as a deskside assembly or pedestal.) If you are not installing your Storage Enclosure into a rack or tower, skip to Step 3: Installing the Drive Carriers on page 2-9. ! Caution: A fully loaded enclosure is heavy. Avoid personal injury by obtaining help to lift the Storage Enclosure, and reduce the weight of the enclosure by removing the drive carriers before installing the enclosure in the rack or tower. (You can also remove the two APCs to further reduce the weight, if required. See page 4-4 for instructions.) ■ To install into an rack, see page 2-4. ■ To install into a tower assembly, see page 2-7. 2-3
-
 1
1 -
2
-
3
-
4
-
5
-
6
-
7
-
8
-
9
-
10
-
11
-
12
-
13
-
14
-
15
-
 16
16 -
 17
17 -
 18
18 -
 19
19 -
 20
20 -
 21
21 -
 22
22 -
 23
23 -
 24
24 -
 25
25 -
 26
26 -
27
-
28
-
29
-
30
-
31
-
32
-
33
-
34
-
35
-
36
-
37
-
38
-
39
-
40
-
41
-
42
-
43
-
44
-
45
-
46
-
47
-
48
-
49
-
50
-
51
-
52
-
53
-
54
-
55
-
56
-
57
-
58
-
59
-
60
-
61
-
62
-
63
-
64
-
65
-
66
-
67
-
68
-
69
-
70
-
71
-
72
-
73
-
74
-
75
-
76
-
77
-
78
-
79
-
80
-
81
-
82
-
83
-
84
-
85
-
86
-
87
-
88
-
89
-
90
-
91
 |
 |