Alesis Core 1 User Guide - Page 5
Audio Setup - usb
 |
View all Alesis Core 1 manuals
Add to My Manuals
Save this manual to your list of manuals |
Page 5 highlights
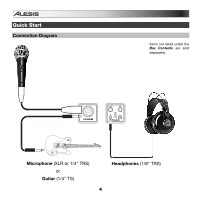
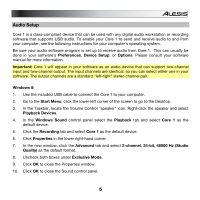
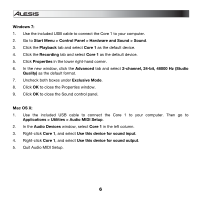
Audio Setup Core 1 is a class-compliant device that can be used with any digital audio workstation or recording software that supports USB audio. To enable your Core 1 to send and receive audio to and from your computer, see the following instructions for your computer's operating system. Be sure your audio software program is set up to receive audio from Core 1. This can usually be done in your software's Preferences, Device Setup, or Options. Please consult your software manual for more information. Important: Core 1 will appear in your software as an audio device that can support two-channel input and two-channel output. The input channels are identical, so you can select either one in your software. The output channels are a standard "left-right" stereo channel pair. Windows 8: 1. Use the included USB cable to connect the Core 1 to your computer. 2. Go to the Start Menu, click the lower-left corner of the screen to go to the Desktop. 3. In the Taskbar, locate the Volume Control "speaker" icon. Right-click the speaker and select Playback Devices. 4. In the Windows Sound control panel select the Playback tab and select Core 1 as the default device. 5. Click the Recording tab and select Core 1 as the default device. 6. Click Properties in the lower right-hand corner. 7. In the new window, click the Advanced tab and select 2-channel, 24-bit, 48000 Hz (Studio Quality) as the default format. 8. Uncheck both boxes under Exclusive Mode. 9. Click OK to close the Properties window. 10. Click OK to close the Sound control panel. 5
-
 1
1 -
 2
2 -
 3
3 -
 4
4 -
 5
5 -
 6
6 -
 7
7 -
 8
8 -
 9
9 -
 10
10 -
 11
11 -
12
-
13
-
14
-
15
-
16
-
17
-
18
-
19
-
20
-
21
-
22
-
23
-
24
-
25
-
26
-
27
-
28
-
29
-
30
-
31
-
32
-
33
-
34
-
35
-
36
 |
 |