Alesis DM10 X Kit Mesh Operation Manual - Page 31
Hi-hat Calibration, Storing Ext. Trig Settings, Exploring Optimal Sensitivity And Threshold Settings
 |
View all Alesis DM10 X Kit Mesh manuals
Add to My Manuals
Save this manual to your list of manuals |
Page 31 highlights
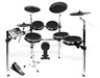
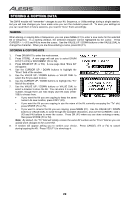
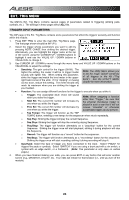
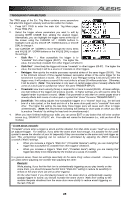
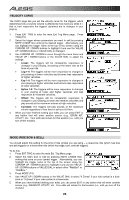
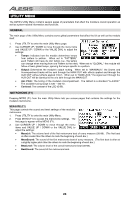
HI-HAT CALIBRATION The first time you connect a hi-hat pedal to the DM10 module, we recommend calibrating it so the module can "read" the pedal's movement optimally. If you use the same hi-hat each session (even if you have disconnected and reconnected it), then you shouldn't need to calibrate each time as long as you store your trigger settings after Note: The module's HI-HAT CONTROL TRIGGER INPUT does not support keyboard-style expression pedals. calibrating (see STORING TRIGGER SETTINGS in the STORING & COPYING chapter for more information). However, anytime you connect a different hi-hat from the previously connected one, you should calibrate it. To calibrate the hi-hat pedal: 1. Connect the hi-hat pedal to the module but do not press it down. 2. On the module, press EXT TRIG. 3. You will see a page with items including "Sensitvty" and "Function." Use the CURSOR UP / DOWN buttons to highlight the "Input" field at the top of the screen then use the VALUE UP / DOWN buttons to select "HiHat." 4. Press CAL (F4). 5. With the hi-hat pedal completely raised ("open"), press CAL OPEN (F1 or F2) and wait for a message saying the process is complete. 6. With the hi-hat pedal completely pressed ("closed"), press CAL CLSED (F3 or F4) and wait for a message saying the process is complete. 7. Press EXIT to exit the calibration page (or press DRUM KIT to return to the main screen). STORING EXT. TRIG SETTINGS Any changes you make to the parameters in the Ext. Trig Menu will remain for the current session but will return to their defaults if you turn off the module. We recommend storing your settings when you change them so you can use them in future sessions. To store Ext. Trig settings: 1. Be sure you are in the Ext. Trig Menu by pressing EXT TRIG. 2. Press STORE. 3. A window will appear asking you to confirm your choice. Press CANCEL (F2 or F3) to cancel storing your Ext. Trig settings. Press YES (F1) to store them. EXPLORING OPTIMAL SENSITIVITY AND THRESHOLD SETTINGS We created the DM10 module's default settings to allow for great playability right out of the box, but we recommend experimenting with different triggers settings - particularly sensitivity and threshold - so you can find the settings that best suit your playing style. Here is one recommended way to explore these settings: 1. Press EXT. TRIG to access the trigger settings. 2. Make sure NOTE CHASE is activated (the LED should be lit). 3. Strike a trigger on your electronic drum kit whose settings you want to adjust. The name of the trigger will be displayed at the top of the module's LCD. 4. On the INP page, adjust the "Sensitvty" setting to an appropriate level as you strike the trigger with moderate force, typical of how you play. The resulting sound should be neither too loud nor too quiet. (Make sure the "Function" setting is set to "TRIGGER.") If the level meter in the upper-right hand corner is "clipping" or maxing out too soon, reduce the sensitivity. 5. On the TRIG page, adjust the "Threshold" setting to an appropriate level as you strike the trigger as lightly as you would while playing. You can use the level meter in the upper right-hand corner of the module's LCD to see whether the module is detecting your hits. 6. After setting the threshold, return to the INP page and readjust the "Sensitvty" setting as you strike the trigger with varying force. 7. Repeat this process for other triggers in your electronic drum kit. 8. Press STORE to save these changes. Note that you can also adjust the velocity curve for each trigger, which can help in the "shaping" of the triggers' volume levels relative to the range of force you use while playing. Also, the Utility Menu allows you to set the rough "global" sensitivity of all triggers in the Kit. ("Trig Sens") See the UTILITY MENU chapter for more information. 27
-
 1
1 -
2
-
3
-
4
-
5
-
6
-
7
-
8
-
9
-
10
-
11
-
12
-
13
-
14
-
15
-
16
-
17
-
18
-
19
-
20
-
21
-
22
-
23
-
24
-
25
-
 26
26 -
 27
27 -
 28
28 -
 29
29 -
 30
30 -
 31
31 -
 32
32 -
 33
33 -
 34
34 -
 35
35 -
 36
36 -
37
-
38
-
39
-
40
-
41
-
42
-
43
-
44
-
45
-
46
-
47
-
48
-
49
-
50
-
51
-
52
 |
 |