Alesis DM7X Kit User Guide - Page 4
Front Panel - advanced
 |
View all Alesis DM7X Kit manuals
Add to My Manuals
Save this manual to your list of manuals |
Page 4 highlights
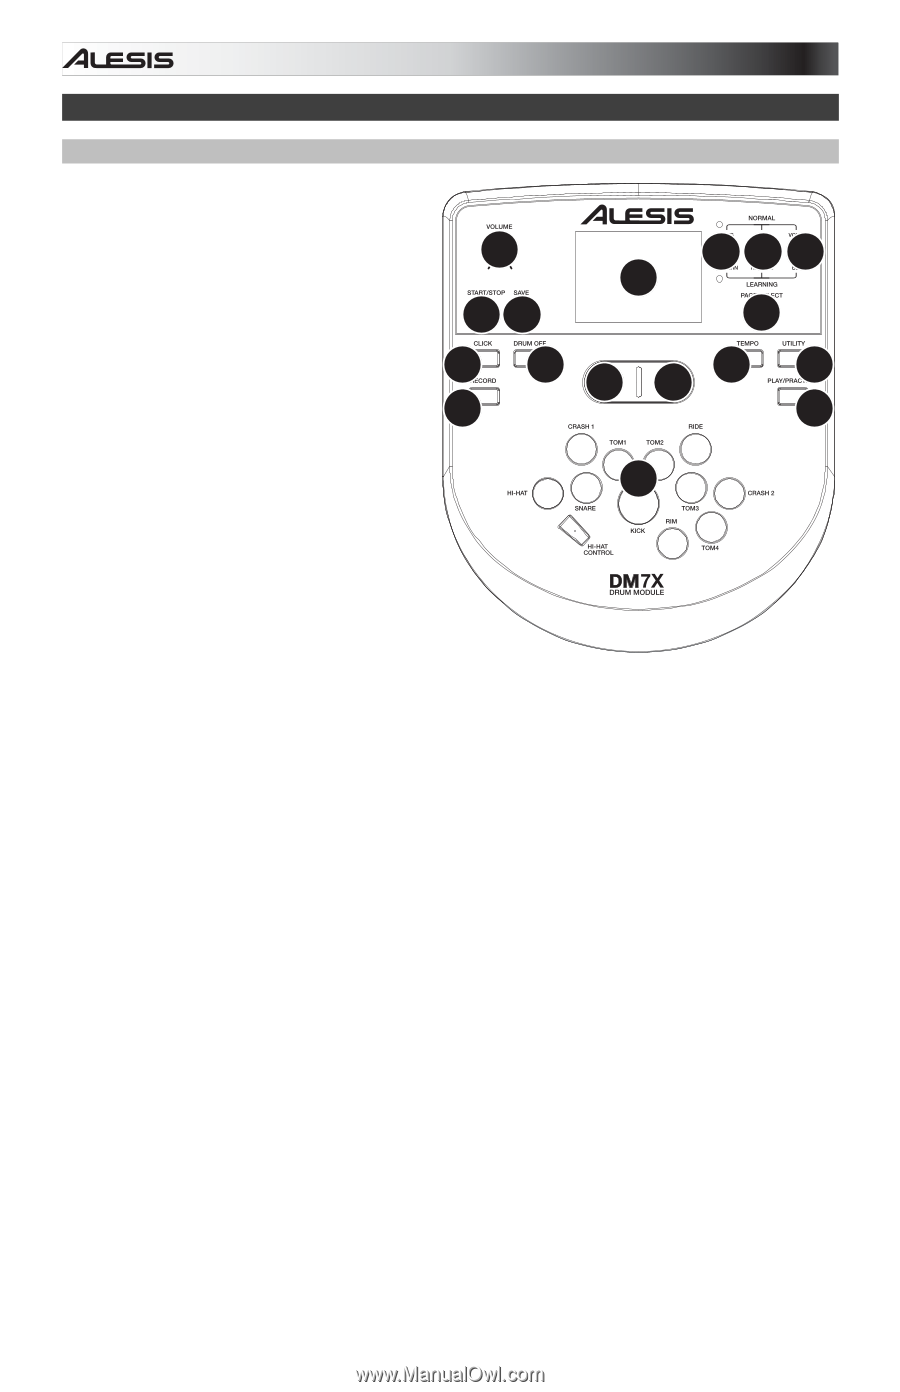
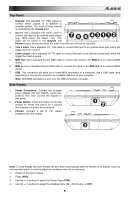
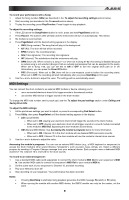
Features Front Panel 1. Display: Shows the module's current settings and functions. 2. Song/Pattern: In Normal Mode, press this button to enter the Song Menu, where you 6 can select a song or adjust song-related settings. In Learning Mode, press this button to enter the Pattern Menu, where you can select a pattern (full kit plus 78 accompaniment) to play along to or adjust pattern-related settings. 10 11 Note: The LEDs above and below this button indicate whether the module is in Normal Mode or Learning Mode, respectively. 12 234 1 5 9 9 13 14 15 3. Kit/Rhythm: In Normal Mode, press this button to enter the Kit Menu, where you can select a kit or adjust kit-related settings. In Learning Mode, press this button to select a rhythm (full kit) to play along to or adjust pattern-related settings. 16 4. Voice/Beat: In Normal Mode, press this button to enter the Voice Menu, where you can select a voice (drum sound) or adjust voice-related settings. In Learning Mode, press this button to select a beat (snare drum only) to play along to or adjust pattern-related settings. 5. Page/Select: Press this button to cycle through the available settings for the current mode/menu. Press and hold this button for one second to switch the three buttons above it between Normal Mode and Learning Mode. 6. Volume: Adjusts the output volume of the Main Out and Phones. 7. Start/Stop: Press this to start/stop playback or recording. 8. Save: Press this to save your current kit settings. 9. < / >: Use these arrow buttons to change the value of the setting shown in the display. (Usually, this adjusts numerical values, such as kit numbers or effects levels.) 10. Click: Press this to turn the metronome ("click track") on/off. See the Adjusting the Metronome section for more information. 11. Drum Off: When this button is on, its LED will be lit and the pre-recorded drum part will be muted so you can hear only your performance and any accompaniment (backing music). Press it again to hear the pre-recorded drum part. (This button will automatically be on while recording.) 12. Record: Press this button once to record-arm the module. Its LED will flash. To start recording, press Start/Stop or hit a pad. When recording, its LED will light solid. (To stop recording, press Start/Stop again.) See the Recording section for more information. 13. Tempo: Press this to show the current tempo in BPM (beats per minute) in the display. Use the < or > buttons to change the tempo. 14. Utility: Press this button to access advanced settings for the pads as well as the module's MIDI settings. See the Adjusting Utility Settings section for more information. 15. Play/Practice: In Normal Mode, press this button to hear a recorded performance. In Learning Mode, press this button to start playing the beat, rhythm, or pattern; you can then play along to it without being scored. Press and hold this button for 2 seconds to hear the playback of your practice (every practice is automatically recorded). Press it again to stop playback. 16. Pad Select Buttons: Press these buttons to preview the voices (drum sounds) used for each part of the kit, represented by the buttons. (After pressing the Snare button or any of the Tom buttons, you can press the Rim button to hear the voice used as the rim sound of that drum.) 4
-
 1
1 -
 2
2 -
 3
3 -
 4
4 -
 5
5 -
 6
6 -
 7
7 -
 8
8 -
 9
9 -
 10
10 -
11
-
12
-
13
-
14
-
15
-
16
-
17
-
18
-
19
-
20
-
21
-
22
-
23
-
24
-
25
-
26
-
27
-
28
-
29
-
30
-
31
-
32
-
33
-
34
-
35
-
36
-
37
-
38
-
39
-
40
 |
 |