Alesis DM7X Kit User Guide - Page 5
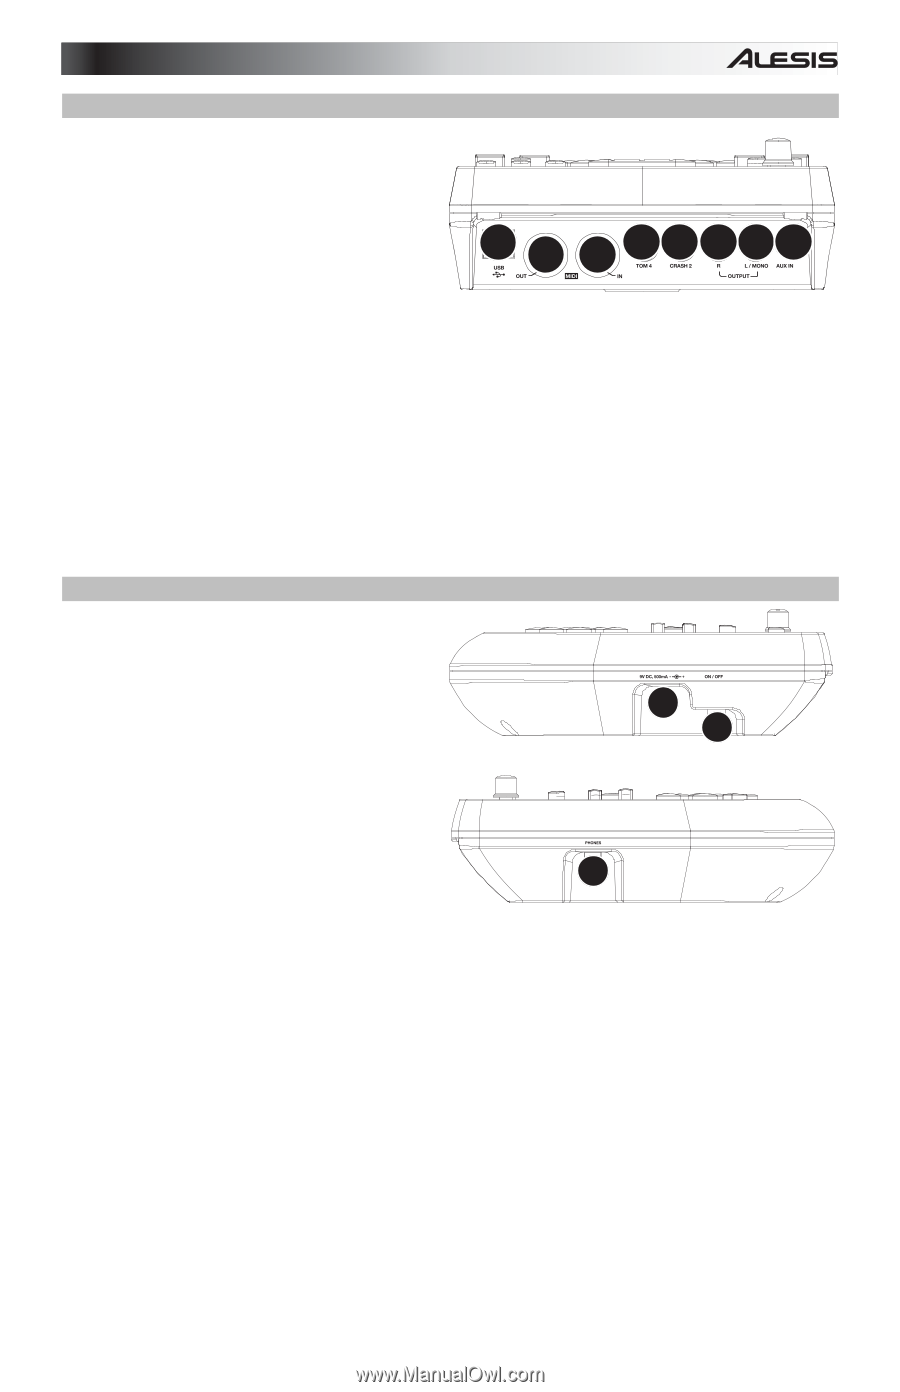
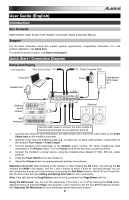
Top Panel, Side Panels - set up
 |
View all Alesis DM7X Kit manuals
Add to My Manuals
Save this manual to your list of manuals |
Page 5 highlights
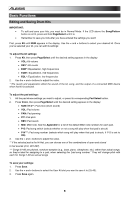
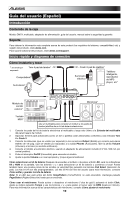
Top Panel 1. Outputs: Use standard 1/4" TRS cables to connect these outputs to a speaker or amplifier system. The level of these outputs is controlled by the Volume knob. 2. Aux In: Use a standard 1/8" stereo cable to connect this input to an optional audio player (e.g,. MP3 player, CD player, etc.). This 7 5 6 43112 audio will be heard in the Outputs and Phones output. During recording, the audio from this input will not be recorded. 3. Tom 4 Input: Use a standard 1/4" TRS cable to connect this input to an optional drum pad, which will trigger the Tom 4 sound. 4. Crash 2 Input: Use a standard 1/4" TS cable to connect this input to an optional cymbal pad, which will trigger the Crash 2 sound. 5. MIDI Out: Use a standard five-pin MIDI cable to connect this output to the MIDI In of an external MIDI device. 6. MIDI In: Use a standard five-pin MIDI cable to connect this input to the MIDI Out of an external MIDI device. 7. USB: This connection will allow you to send MIDI information to a computer. Use a USB cable (sold separately) to connect the module to an available USB port on your computer. Note: Only MIDI information is sent over the USB connection, not audio. Side Panels 1. Power Connection: Connect the included power adapter (9V DC, 500mA, center pinpositive) here, then connect the adapter to wall power. 2. Power Button: Press this button to turn the module on. Press and hold it for a second then release it to power the module off. 3. Phones: Connect a set of 1/8" stereo headphones to this output. 1 2 3 Note: To save energy, the drum module will shut down automatically after 30 minutes of no activity. If you do not need this feature or want to adjust the shutdown time, do the following: 1. Power on the drum module. 2. Press Utility. 3. Use the < / > buttons to select the Power Page (POW). 4. Use the < / > buttons to adjust the shutdown time (30 - 60 minutes, or OFF). 5
-
 1
1 -
 2
2 -
 3
3 -
 4
4 -
 5
5 -
 6
6 -
 7
7 -
 8
8 -
 9
9 -
 10
10 -
 11
11 -
12
-
13
-
14
-
15
-
16
-
17
-
18
-
19
-
20
-
21
-
22
-
23
-
24
-
25
-
26
-
27
-
28
-
29
-
30
-
31
-
32
-
33
-
34
-
35
-
36
-
37
-
38
-
39
-
40
 |
 |