Alesis MultiMix 10 Wireless User Manual - Page 5
Rear Panel - bluetooth mixer
 |
View all Alesis MultiMix 10 Wireless manuals
Add to My Manuals
Save this manual to your list of manuals |
Page 5 highlights
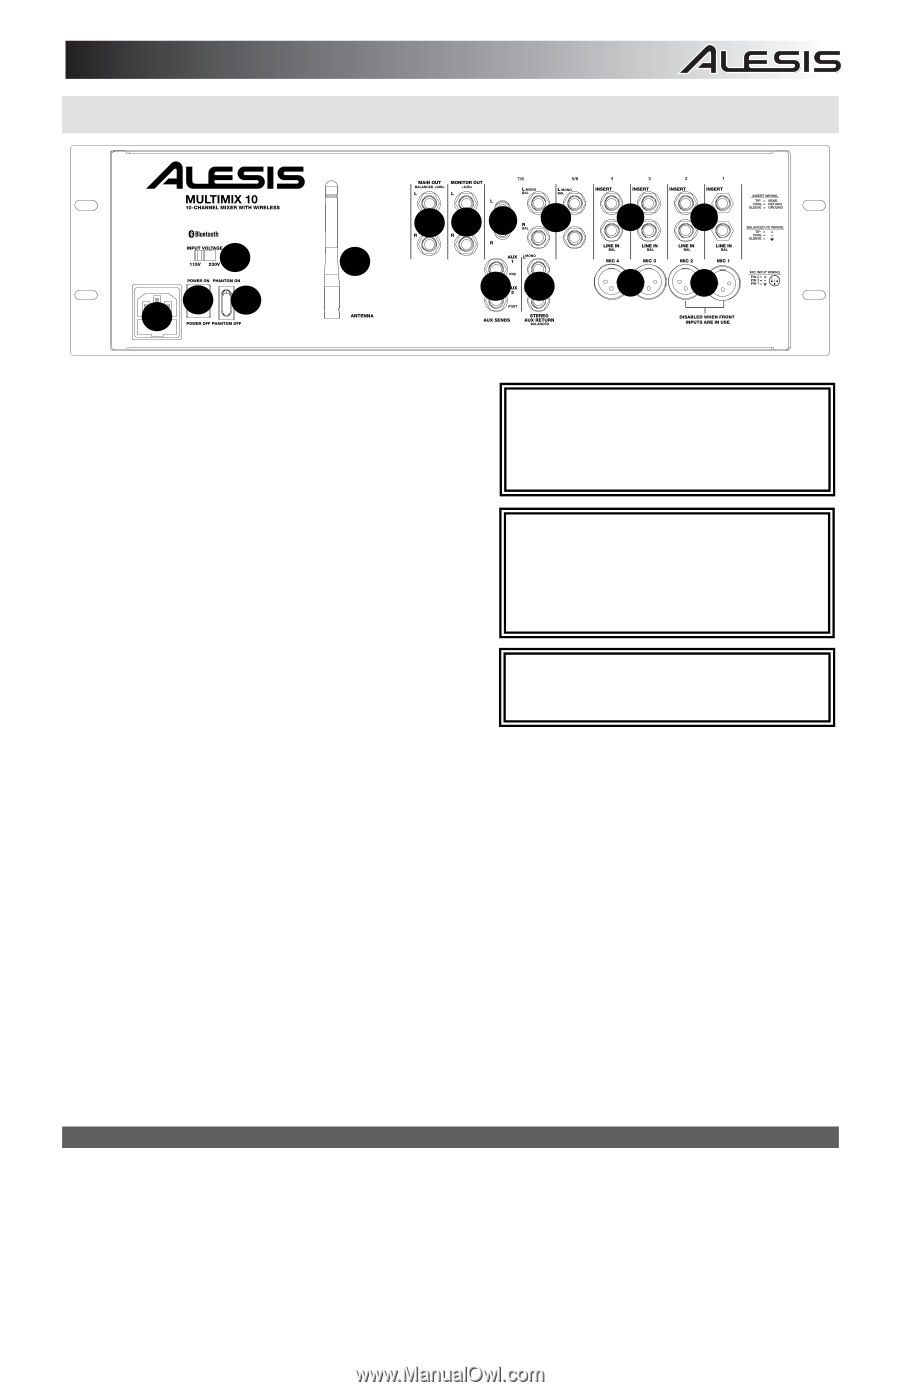
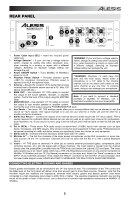
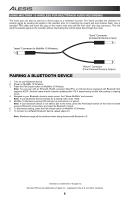
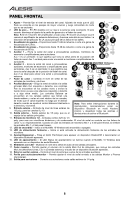
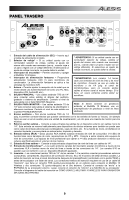
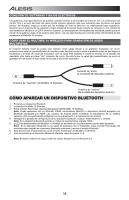
57 7 7 7 11 19 6 11 20 888888 8 REAR PANEL Wireless 2 5 13 4 6 7 10 11 13 13 89 12 12 1. Power Cable Input (IEC) - Insert the included power cable here. *WARNING: If your unit has a voltage selector 2. Voltage Selector* - If your unit has a voltage selector switch, change its setting only when necessary switch, change its setting only when necessary (e.g., (e.g., when traveling to a country or region with when traveling to a country or region with a different a different voltage). Selecting an improper voltage). Selecting an improper voltage setting can voltage setting can damage the unit. damage the unit. 3. Power ON/OFF Switch - Turns MultiMix 10 Wireless's power on or off. 4. Phantom Power Switch - Provides phantom power (+48V) for condenser microphones. Phantom power is applied to the XLR microphone inputs. 5. Antenna - Adjusts the reception of the signal that is being received from a Bluetooth source such as a PC, Mac, iOS device, Android®, etc.). **WARNING: Channels 1-4 each have mic level and line level inputs. Attach either a microphone or a 1/4" cable to the mic/line channel, but do not attach both cables to the same channel at any one time. In extreme cases, doing so can damage your microphone. 6. MAIN OUT - Use standard 1/4" TRS cables to connect this output to the house speaker, recorder, or amplifier system. Control the level of this output using the MASTER fader. 7. MONITOR OUT - Use standard 1/4" TS cables to connect Note: If you want to connect a standard turntable to MultiMix 10 Wireless, use a dedicated turntable-to-line-level preamplifier. this output to your monitor speaker or amplifier system. Control the level of this output using the PHONES/MONITOR knob. 8. Aux Sends - Two mono 1/4" TRS auxiliary sends allow you to connect effects that can be blended in with the source (or "dry") signals. One typical example is to use one aux send for a reverb unit and the other for a monitor mix for the musicians. 9. Stereo Aux Return - Connect the outputs of an external device to these inputs with 1/4" mono cables. This is usually reserved for outboard effects devices but can also be used as an extra input channel for synthesizers, drum machines, etc. If your source is mono, plug it into the left jack and it will be heard on both the left and right sides. 10. Ext In (RCA) - These stereo RCA jacks accept consumer-level (-10dBv) inputs from sources such as tape decks, CD players, and MP3 players. Only connect consumer-level equipment to these jacks. Professional-level equipment operating at +4dBu will distort unless you significantly lower the volume on such equipment. 11. Stereo Line In - Connect line-level devices to these inputs with 1/4" cables. 12. Mic/Line In** - The first four channels of the mixer accept microphones via the XLR connectors or mono line- level sources via the 1/4" connectors. Channels 9/10 can be used with the Ext In or with a paired Bluetooth device. 13. Insert - 1/4" TRS jacks on channels 1-4 allow you to connect external processors (gates, compressors, pitch correction devices, etc.) into the signal path of these channels. The insert signal is brought into the channel directly after the preamplifier (controlled with the TRIM knob) and before the channel's EQ and fader. The insert jacks require use of an "insert" cable, which has a TRS (Tip-Ring-Sleeve) connector on one end for connection to MultiMix 10 Wireless and two TS (Tip-Sleeve) connectors on the other end. Attach the "Send" connector to the INPUT of your external processor. Then, attach the "Return" connector to the OUTPUT of your processor. See the insert cable diagram under USING MULTIMIX 10 WIRELESS FOR MULTITRACK AUDIO RECORDING. CONNECTING ELECTRIC GUITARS AND BASSES Electric guitars and basses can be connected to the 1/4" line inputs as well. The combination of the Trim control and the fader level on the front panel will deliver more than enough gain to drive these sources. However, note that the line-level inputs are relatively low impedance, whereas most electric guitars and basses perform best when connected to a high impedance input closer to 200k Ohm or higher. The resulting impedance mismatch may dull the sound of the guitar or bass. If this occurs, use a direct box to connect high-impedance instruments to MultiMix 10 Wireless. 5
-
 1
1 -
 2
2 -
 3
3 -
 4
4 -
 5
5 -
 6
6 -
 7
7 -
 8
8 -
 9
9 -
 10
10 -
 11
11 -
12
-
13
-
14
-
15
-
16
-
17
-
18
-
19
-
20
-
21
-
22
-
23
-
24
 |
 |