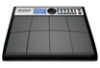
Alesis PerformancePad Pro Quick Start Guide
Alesis PerformancePad Pro Manual
 |
View all Alesis PerformancePad Pro manuals
Add to My Manuals
Save this manual to your list of manuals |
Alesis PerformancePad Pro manual content summary:
- Alesis PerformancePad Pro | Quick Start Guide - Page 1
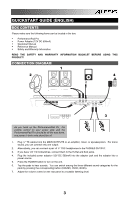
QUICKSTART GUIDE ENGLISH ( 3 - 15 ) MANUAL DE INICIO RÁPIDO ESPAÑOL ( 16 - 28 ) GUIDE D'UTILISATION RAPIDE FRANÇAIS ( 29 - 41 ) GUIDA RAPIDA ITALIANO ( 42 - 54 ) KURZANLEITUNG DEUTSCH ( 55 - 67 ) - Alesis PerformancePad Pro | Quick Start Guide - Page 2
- Alesis PerformancePad Pro | Quick Start Guide - Page 3
QUICKSTART GUIDE (ENGLISH) BOX CONTENTS Please make sure the following items can be located in the box: PerformancePad Pro Power Adapter (12V DC 500mA) Quickstart Manual Reference Manual Safety and Warranty Information READ THE SAFETY AND WARRANTY INFORMATION BOOKLET BEFORE USING THIS PRODUCT! - Alesis PerformancePad Pro | Quick Start Guide - Page 4
: To hear a demo song, hold [PATTERN / SONG] and press [PLAY]. THE 2 TYPES OF PATTERNS The PerformancePad Pro introduces exciting new Song construction techniques. The PerformancePad Pro excels at live performance-something usually not associated with drum machines. The key to using these advanced - Alesis PerformancePad Pro | Quick Start Guide - Page 5
as you use the PerformancePad Pro. 2. PADS - The 8 pads are used to trigger sounds on the PerformancePad Pro. The pads can address 3 different types of sounds: drums, percussion and bass. To select which sounds are controlled by the pads, press one of the three Pad Play buttons (DRUM, PERC, BASS - Alesis PerformancePad Pro | Quick Start Guide - Page 6
press DRUM, PERC or BASS to mute the corresponding instrument layer. To un-mute the layer, press the corresponding button again while MUTE is being held down. NAVIGATION BUTTONS: 12. INC / DEC - These buttons are used to increment and decrement through values and settings on the PerformancePad Pro - Alesis PerformancePad Pro | Quick Start Guide - Page 7
or the INC / DEC buttons. To exit Record Setup, press the Record Setup button again. 22. DRUM SET - This button calls up the Drum Set Mode options, where you can select different drum/percussion sounds, bass sounds, change individual pad sounds and modify parameters such as Volume, Tuning, Panning - Alesis PerformancePad Pro | Quick Start Guide - Page 8
begin playing as soon as the currently-selected Pattern reaches its end. STEP 3 You can call up a different Pattern number while the PerformancePad Pro is playing. Press the INC / DEC buttons or use the VALUE dial to select a Pattern. You may also enter a Pattern number with the number buttons. 8 - Alesis PerformancePad Pro | Quick Start Guide - Page 9
to the alternate pattern (in this example, the A pattern would continue playing). PLAYING PATTERNS WITH THE PADS The PerformancePad Pro allows you to play sequences of Pattern by triggering Patterns with the pads. This mode is called Pattern Play Mode. STEP 1 Press the PTN PLAY button - this will - Alesis PerformancePad Pro | Quick Start Guide - Page 10
Swing, which will affect the way that your patterns are recorded. Alternatively, you may choose to use the default settings in which case you should skip to Step 8. STEP 5 On Page 1 of the Record Setup (page is indicated in lower right corner of screen), you can select the Quantization interval with - Alesis PerformancePad Pro | Quick Start Guide - Page 11
above. MUTING INSTRUMENT LAYERS The PerformancePad Pro allows you to mute any of its three instrument layers (drums, percussion, bass) in real-time. For example, you can mute the drum track by holding down MUTE and then pressing DRUM. To un-mute the drums, press the DRUM button again while - Alesis PerformancePad Pro | Quick Start Guide - Page 12
LOADING AND CREATING DRUM SETS The PerformancePad Pro has 100 Preset and 100 Editable Drum Sets (groups of sounds). After pressing the DRUM SET button, you can use the INC / DEC buttons, the VALUE dial, or the number buttons to select a different set (each set can have its own sounds, tuning, volume - Alesis PerformancePad Pro | Quick Start Guide - Page 13
STEP 7 Note that Drums and Percussion sounds are grouped in each Drum Set. This means that changing the drum sounds to a different set on page 1 of the Drum Set menu will cause the Percussion sounds to change as well (although individual pad sounds may be replaced freely once a Drum Set has been - Alesis PerformancePad Pro | Quick Start Guide - Page 14
's Song Mode creates a complete Song. Begin with the PerformancePad Pro stopped. STEP 1 Select Song Mode by pressing the PATTERN / SONG button so the display says SONG. STEP 2 The display should say EMPTY SONG. If not, press the INC / DEC buttons (or use the VALUE dial) to select an empty song. STEP - Alesis PerformancePad Pro | Quick Start Guide - Page 15
a different pattern for the step, using the INC / DEC buttons, the FACTORY RESET To restore the PerformancePad Pro's factory presets, hold the SAVE / COPY button and ERASE button simultaneously while turning on the PerformancePad Pro. (NOTE: This will erase all user data, including User Drum - Alesis PerformancePad Pro | Quick Start Guide - Page 16
PerformancePad Pro • Adaptador de alimentación (12 V CC 500 mA) • Manual de inicio rápido • Manual POWER para encender la unidad. 6. Dé golpecitos a los pads para escuchar los sonidos. Puede conmutar entre las tres categorías de sonido diferentes de los pads pulsando el botón correspondiente (DRUMS - Alesis PerformancePad Pro | Quick Start Guide - Page 17
de 8, 16 ó 32 beats de longitud, y corresponden a un verso, coro, puente, parte instrumental, introducción, etc. Imagine que los patrones son los bloques de construcción de sus temas musicales. La PerformancePad Pro contiene 100 patrones predeterminados (es decir que no se puede editar) y 100 - Alesis PerformancePad Pro | Quick Start Guide - Page 18
para disparar sonidos en la PerformancePad Pro. Los pads pueden admitir 3 tipos de sonidos diferentes: tambores, percusión y bajo. Para seleccionar los sonidos a controlar con los pads, pulse uno de los tres botones de reproducción de pads (DRUM, PERC, BASS). Además, los pads se pueden usar para - Alesis PerformancePad Pro | Quick Start Guide - Page 19
pad correspondiente al sonido que desea borrar. Todos los eventos asignados al pad se borran desde el momento en que se presiona el pad hasta que se suelta el pad pulsado el botón y pulse DRUM, PERC o BASS para silenciar los valores y ajustes de la PerformancePad Pro. 13. CUADRANTE VALUE - Este - Alesis PerformancePad Pro | Quick Start Guide - Page 20
, use los pads para disparar los patrones en tiempo real. Consulte la sección "Reproducción de patrones con los pads". BOTONES SETUP (DE CONFIGURACIÓN): 20. SYSTEM SETUP Setup nuevamente 22. DRUM MIDI a las voces internas de la PerformancePad Pro y a los dispositivos externos conectados vía MIDI - Alesis PerformancePad Pro | Quick Start Guide - Page 21
en cuanto termine el patrón actualmente seleccionado. PASO 3 Puede activar un número de patrón diferente mientras la PerformancePad Pro está reproduciendo. Pulse los botones INC / DEC o use el cuadrante VALUE para seleccionar un patrón. Puede introducir también un número de patrón con los botones - Alesis PerformancePad Pro | Quick Start Guide - Page 22
MO REPRODUCIR PATRONES CON LOS PADS La PerformancePad Pro le permite reproducir secuencias de patrones disparando patrones con los pads. Este modo se denomina " cambiar el patrón asignado a un pad, pulse el botón PAGE arriba. Pulse el pad que le gustaría modificar. Use ahora el cuadrante VALUE, los - Alesis PerformancePad Pro | Quick Start Guide - Page 23
USER en la esquina superior derecha). PASO 3 Pulse los botones INC / DEC o use el cuadrante VALUE o los botones de números para seleccionar un patrón vacío. Si caso debe saltar al paso 8. PASO 5 En la página 1 de Record Setup (la página se indica en la esquina inferior derecha de la pantalla), puede - Alesis PerformancePad Pro | Quick Start Guide - Page 24
y Bajo) pulsando el botón correspondiente (DRUMS, PERC, BASS) y tocando luego una secuencia en los pads. Si comete algún error durante la grabaci el procedimiento precedente. CÓMO SILENCIAR LAS CAPAS DE INSTRUMENTOS La PerformancePad Pro le permite silenciar o producir un solo de cualquiera de sus - Alesis PerformancePad Pro | Quick Start Guide - Page 25
La PerformancePad Pro cuenta con 100 configuraciones de batería (grupo de sonidos) predeterminados y 100 editables. Después de pulsar el botón DRUM SET nea inferior (252 en este ejemplo). PASO 4 Para conmutar el pad a un sonido diferente, use los botones INC / DEC, el cuadrante VALUE o los botones de - Alesis PerformancePad Pro | Quick Start Guide - Page 26
de pads individuales se pueden reemplazar libremente una vez cargada una configuración de batería). Es posible, sin embargo, elegir un conjunto diferente de sonidos de bajo para la configuración seleccionada. Pulse el botón BASS estando en la página 1 de modo Drum Set (si navegó a otras páginas, use - Alesis PerformancePad Pro | Quick Start Guide - Page 27
tema completo. Comience con la PerformancePad Pro detenida. PASO 1 Seleccione el modo de tema pulsando el botón PATTERN / SONG de modo que la pantalla indique SONG. PASO 2 La pantalla debe indicar EMPTY SONG (Tema vacío). En caso negativo, pulse los botones INC / DEC (o use el cuadrante VALUE) para - Alesis PerformancePad Pro | Quick Start Guide - Page 28
ejemplo) y la línea inferior indicará END (Fin). Para desplazarse entre los pasos, use los botones PAGE hacia arriba y abajo. Cada paso de la secuencia muestra el patrón del PerformancePad Pro, mantenga pulsados los botones SAVE / COPY y ERASE simultáneamente mientras enciende el PerformancePad Pro. - Alesis PerformancePad Pro | Quick Start Guide - Page 29
LA BOÎTE Assurez-vous que tous les articles énumérés ci-dessous se retrouvent dans la boîte : PerformancePad Pro Bloc d'alimentation (12 V CA 500 mA) Guide d'utilisation simplifié Guide de référence Consignes de sécurité et information sur la garantie AVANT D'UTILISER CE PRODUIT, VEUILLEZ LIRE LES - Alesis PerformancePad Pro | Quick Start Guide - Page 30
peut être de 8, 16 ou 32 mesures et correspond à un couplet, un refrain, une transition, instrumental, intro, etc. Utilisez ces enchaînements pour construire vos chansons. Le PerformancePad Pro est doté de 100 enchaînements d'usines modifiables et 100 enchaînements programmables, chacun pouvant être - Alesis PerformancePad Pro | Quick Start Guide - Page 31
clencher les sons du PerformancePad Pro. Les pads peuvent déclencher 3 types de son différents : batterie, percussion et grosse caisse. Pour sélectionner les sons commandés par les pads, appuyez sur l'une des touches correspondantes (DRUMS, PERC, BASS). De plus, les pads peuvent déclencher des encha - Alesis PerformancePad Pro | Quick Start Guide - Page 32
la superposition d'instruments sélectionnée. Pour remettre le son, appuyez sur la touche correspondante à nouveau tout en maintenant la touche MUTE enfoncée. TOUCHES DE NAVIGATION : 12. INC/DEC - Ces touches permettent d'augmenter ou de diminuer les valeurs et les réglages du PerformancePad Pro. 13 - Alesis PerformancePad Pro | Quick Start Guide - Page 33
entre les deux modes différents du PerformancePad Pro. En Pattern Mode, il est possible des Setup. 22. DRUM SET - Cette touche permet d'activer les options du mode Drum Set, d'où il est possible de sélectionner différentes sonorités de batterie/percussion, de grosse caisse, de modifier le son de pad - Alesis PerformancePad Pro | Quick Start Guide - Page 34
înement ou de la chanson. Appuyer rapidement deux fois sur la touche STOP envoie une commande Panique MIDI aux voix internes du PerformancePad Pro et aux appareils externes branchés via la connexion MIDI. Une commande Panique arrête tous les sons en cours de lecture. Cette option s'avère également - Alesis PerformancePad Pro | Quick Start Guide - Page 35
cette façon, la transition à un autre enchaînement est annulée (par exemple, l'enchaînement A continuerait de jouer). FAIRE JOUER DES ENCHAÎNEMENTS À PARTIR DES PADS Le PerformancePad Pro vous permet de faire jouer des séquences d'enchaînements en déclenchant des enchaînements à partir des - Alesis PerformancePad Pro | Quick Start Guide - Page 36
numérotées pour sélectionner un enchaînement qui sera déclenché par le pad. Vous pouvez également spécifier A, B ou FILL pour enchaînement sé éder au menu de configuration d'enregistrement, appuyez sur la touche RECORD SETUP. Ce menu permet de personnaliser les différents paramètres d'enregistrement, - Alesis PerformancePad Pro | Quick Start Guide - Page 37
de configuration d'enregistrement en appuyant de nouveau sur la touche RECORD SETUP. ÉTAPE 8 Vous pouvez maintenant faire l'enregistrement de votre , percussion, grosse caisse) différents en appuyant sur les touches correspondantes (DRUMS, PERC, BASS) puis en jouant une séquence à l'aide des pads. - Alesis PerformancePad Pro | Quick Start Guide - Page 38
Le PerformancePad Pro vous permet de mettre en sourdine ses trois superpositions d'instruments (batterie, percussion, grosse caisse) en temps réel. Par exemple, vous pouvez mettre en sourdine la séquence de batterie en maintenant la touche MUTE enfoncée puis en appuyant sur DRUM. Pour remettre - Alesis PerformancePad Pro | Quick Start Guide - Page 39
é de batterie. Ce qui signifie que modifier les réglages des sons de batterie sur la page 1 du menu Drum Set fera en sorte de modifier les sons de percussion (les sons individuels des pads peuvent être replacés une fois que les ensembles de sonorité de batterie sont chargés). Vous pouvez, cependant - Alesis PerformancePad Pro | Quick Start Guide - Page 40
où vous avez placé des sons de remplissage. L'enregistrement de cette information en mode Song dans le PerformancePad Pro permet de composer une chanson complète. Commencez lorsque le PerformancePad Pro est à l'arrêt. ÉTAPE 1 Sélectionnez le mode Song en appuyant sur la touche PATTERN/SONG afin que - Alesis PerformancePad Pro | Quick Start Guide - Page 41
ée. RÉINITIALISATION DES PARAMÈTRES D'USINE Pour réinitialiser les paramètres d'usine du PerformancePad Pro, maintenez simultanément les touches SAVE/COPY et ERASE enfoncées tout en mettant le PerformancePad Pro sous tension. (REMARQUE : Ceci effacera toutes les données utilisateur, incluant les - Alesis PerformancePad Pro | Quick Start Guide - Page 42
nella confezione: PerformancePad Pro Adattatore di alimentazione (12V CC 500mA) Manuale rapido Manuale di riferimento POWER per accendere l'apparecchio. 6. Battere i pad per udire i suoni. Si può passare tra le tre diverse categorie sonore per i pad premendo il pulsante corrispondente (DRUMS - Alesis PerformancePad Pro | Quick Start Guide - Page 43
: Per ascoltare un demo di canzoni, hold [PATTERN / SONG] e premere [PLAY]. I 2 TIPI DI PATTERN L'PerformancePad Pro introduce nuove eccitanti tecniche di costruzione delle canzoni. L'PerformancePad Pro eccelle nelle esibizioni dal vivo, cosa solitamente non associata alle drum machine. La chiave - Alesis PerformancePad Pro | Quick Start Guide - Page 44
Pro. 2. PAD - I 8 pad servono a produrre suoni sull'PerformancePad Pro. I pad possono indirizzarsi verso 3 tipi diversi di suono: batteria, percussioni e basso. Per selezionare quali suoni sono controllati dai pad, premere uno dei tre pulsanti Pad Play (DRUM, PERC, BASS). Inoltre, i pad - Alesis PerformancePad Pro | Quick Start Guide - Page 45
pad corrispondente al suono che si desidera cancellare. Qualsiasi evento assegnato al pad verrà cancellato dal momento in cui il pad viene premuto fino a quando il pad premuto il tasto e premere DRUM, PERC o BASS per i valori e le impostazioni dell'PerformancePad Pro. 13. ROTELLA VALUE - Questa - Alesis PerformancePad Pro | Quick Start Guide - Page 46
'inizio del pattern o della canzone. Una doppia pressione rapida di STOP invia un messaggio MIDI Panic alle voci interne dell'PerformancePad Pro e ai dispositivi esterni collegati o via MIDI. Un messaggio "panic" interrompe efficacemente qualsiasi suono venga riprodotto. Questa funzione è utile in - Alesis PerformancePad Pro | Quick Start Guide - Page 47
premendo i tasti INC / DEC oppure girando la rotella VALUE. Si può anche battere un nuovo tempo servendosi del tasto TAP TEMPO. L'PerformancePad Pro farà una media degli intervalli intercorsi tra battiti successivi e deriverà un tempo. FASE 6 Premere STOP per fermare il Pattern. RIPRODURRE SEQUENZE - Alesis PerformancePad Pro | Quick Start Guide - Page 48
si desidera modificare. Ora, servirsi della rotella VALUE, di INC / DEC o dei tasti numerici per selezionare il Pattern da attivare con il pad. Si può anche specificare A, B o Fill per il Pattern selezionato. Infine, premere nuovamente PTN PLAY per uscire dalla schermata di modifica e continuare - Alesis PerformancePad Pro | Quick Start Guide - Page 49
, si può scegliere di utilizzare le impostazioni predefinite, nel cui caso bisogna passare direttamente alla Fase 8. FASE 5 A Pagina 1 di Record Setup (la pagina è indicata nell'angolo inferiore destro dello schermo), si può selezionare l'intervallo di Quantizzazione servendosi dei tasti INC / DEC - Alesis PerformancePad Pro | Quick Start Guide - Page 50
Percussioni, Basso) premendo il tasto corrispondente (DRUMS, PERC, BASS) e poi suonando una sequenza sui pad. Se si commette un errore durante la la procedura di cui sopra. METTERE IN SORDINA STRATI STRUMENTALI L'PerformancePad Pro vi permette di mettere in sordina uno qualsiasi dei suoi tre - Alesis PerformancePad Pro | Quick Start Guide - Page 51
DRUM SET L'PerformancePad Pro è dotato di 100 Drum Set predefiniti (Preset) e di 100 Drum Set modificabili (gruppi di suoni). Dopo aver premuto il tasto DRUM sulla linea inferiore (252 in questo esempio). FASE 4 Per far passare il pad ad un suono diverso, servirsi dei tasti INC / DEC, la rotella - Alesis PerformancePad Pro | Quick Start Guide - Page 52
Set farà sì che i suoni delle Percussioni cambieranno a loro volta (nonostante suoni individuali di ogni pad possano essere sostituiti liberamente una volta caricato un Drum Set). Si può tuttavia scegliere indipendentemente un diverso set di suoni di basso per il set selezionato. Quando ci si trova - Alesis PerformancePad Pro | Quick Start Guide - Page 53
selezionate e quando sono stati selezionati fill. La registrazione di queste informazioni nella modalità Song dell'PerformancePad Pro crea una canzone completa. Iniziare con l'PerformancePad Pro fermo. FASE 1 Selezionare la modalità Song premendo il tasto PATTERN / SONG fino a quando a display non - Alesis PerformancePad Pro | Quick Start Guide - Page 54
idea, basterà rilasciare la pressione dal tasto ERASE e la canzone non verrà cancellata. RESET DEI VALORI PREDEFINITI DI FABBRICA Per ripristinare i valori predefiniti di fabbrica dell'PerformancePad Pro, tenere premuto il tasto SAVE / COPY e il tasto ERASE simultaneamente al momento dell'accensione - Alesis PerformancePad Pro | Quick Start Guide - Page 55
Bestandteile in der Verpackung enthalten sind: PerformancePad Pro Netzteil (12V DC 500mA) Kurzanleitung POWER Taste ein. 6. Schlagen Sie die Pads an, um die Sounds zu hören. Zur Umschaltung zwischen den drei verschiedenen Soundkategorien für die Pads verwenden Sie die dazugehörigen Tasten (DRUMS - Alesis PerformancePad Pro | Quick Start Guide - Page 56
PerformancePad Pro Willkommen zur PerformancePad Pro Professional Drum Machine. Die PerformancePad Pro ermöglicht es Ihnen, auf einfache Weise Drum-, Percussion- und Bass-Sounds PerformancePad Pro Ihre Performance merkt. DIE 2 PATTERN-ARTEN Die PerformancePad Pro Hinweis: Um eine Demo-Songs hören, - Alesis PerformancePad Pro | Quick Start Guide - Page 57
Systemparameter und Einstellungen der PerformancePad Pro an. 2. PADS - 8 Pads werden bei der PerformancePad Pro zum Triggern von Sounds verwendet. Die Pads können 3 verschiedene Soundarten ansprechen: Drums, Percussion und Bass. Um einen Sound auszuwählen, der mit den Pads gespielt werden soll, dr - Alesis PerformancePad Pro | Quick Start Guide - Page 58
das entsprechende Instrument abzustellen. Um das Instrument wieder anzustellen drückt man die entsprechende Taste während die Taste MUTE gedrückt gehalten wird. NAVIGATIONSTASTEN 12. INC / DEC - Mit diesen Tasten gehen Sie schrittweise durch Einstellungen und Werte bei der PerformancePad Pro. 13 - Alesis PerformancePad Pro | Quick Start Guide - Page 59
Tasten ändern. Zum Verlassen des Record Setup Modus drücken Sie die Record Setup Taste noch einmal. 22. DRUM SET - Diese Taste öffnet die Optionen des Drum Set Modus. Hier können Sie verschiedene Drum/Percussion Sounds und Bass Sounds wählen, einzelne Pad Sounds ändern und Parameter, wie Lautstärke - Alesis PerformancePad Pro | Quick Start Guide - Page 60
die INC / DEC Tasten drücken oder das VALUE Rad drehen. Sie können auch ein neues Tempo mit der TAP TEMPO Taste eindrücken. Die PerformancePad Pro analysiert Ihre Taps auf die Taste und errechnet daraus ein neues Tempo. SCHRITT 6 Drücken Sie die STOP Taste, um das Pattern zu stoppen. PATTERN - Alesis PerformancePad Pro | Quick Start Guide - Page 61
Sie hören nun ein Drum Fill, welches dann PADS ABSPIELEN Die PerformancePad Pro ermöglicht die Wiedergabe von Pattern Sequenzen durch Triggern der Patterns mit den Pads Pad. Das Pattern, welches mit dem Pad Pad. Nun beginnt das Pattern, welches diesem Pad Pad getriggert werden soll. Sie können dem Pad - Alesis PerformancePad Pro | Quick Start Guide - Page 62
leeren Pattern auszuwählen. Ein leeres Pattern wird im Display mit EMPTY PATT angezeigt. SCHRITT 4 Drücken Sie die RECORD SETUP Taste zur Auswahl des to Record Setup Menüs. Dieses Menü ermöglicht die Anpassung der Aufnahmeeinstellungen, wie Quantisierung und Swing, welche die Art und Wiese, wie Ihr - Alesis PerformancePad Pro | Quick Start Guide - Page 63
Sounds aus allen drei Kategorien (Drums, Percussion, Bass) einspielen. Dazu drücken Sie die jeweiligen Tasten (DRUMS, PERC, BASS) und spielen dann Ihre Performance auf den Pads VON INSTRUMENTEN Der PerformancePad Pro erlaubt es Ihnen, eines oder mehrere der drei Instrumente (Schlagzeug, Perkussion, - Alesis PerformancePad Pro | Quick Start Guide - Page 64
2 Wählen Sie mit den INC / DEC Tasten, dem VALUE Rad oder dem Ziffernblock ein gewünschtes Drum Set (00-99) aus. SCHRITT 3 Schlagen Sie die Pads an, um die Sounds des Kits zu hören. Zur Änderung eines bestimmten Pad Sounds drücken Sie die PAGE AUF Taste (Sie gelangen auf Seite 2). Drücken Sie ein - Alesis PerformancePad Pro | Quick Start Guide - Page 65
Sie dass Drums und Percussion Sounds in jedem Drum Set zusammengefasst sind. Das bedeutet, dass bei der Änderung der Drum Sounds zu einem anderen Set auf Seite 1 des Drum Set Menüs sich auch die Percussion Sounds ändern (auch wenn sich einzelne Pad Sounds nach dem Laden eines Drum Sets austauschen - Alesis PerformancePad Pro | Quick Start Guide - Page 66
ausgewählten Patterns, der gewählten Variationen und die gewählten Fills zu merken. Die Aufnahme dieser Informationen im Song Modus der PerformancePad Pro erzeugt einen kompletten Song. Beginnen wir bei gestoppter Wiedergabe. SCHRITT 1 Wechseln Sie mit der PATTERN / SONG Taste in den Song Modus. Im - Alesis PerformancePad Pro | Quick Start Guide - Page 67
AUF DIE WERKEINSTELLUNG Um die Werkseinstellungen der PerformancePad Pro wiederherzustellen, halten Sie die Tasten SAVE / COPY und ERASE beim Einschalten der PerformancePad Pro gedrückt. (HINWEIS: Dabei werden auch alle Anwenderdaten, wie User Drum Sets, Patterns, Songs, usw. gelöscht.) 67 - Alesis PerformancePad Pro | Quick Start Guide - Page 68
Outputs Pads Sample/DAC Bit Resolution Sounds Sounds Accessible via Pads Sounds Accessible via MIDI Polyphony Panning Velocity Response Timing Resolution Time Signature Range Tempo Range Notes/Patterns/Songs Kits MIDI Prog Change Response Sync Footswitch Jacks/Functions Other Features Power: Weight
-
 1
1 -
 2
2 -
 3
3 -
 4
4 -
 5
5 -
 6
6 -
 7
7 -
8
-
9
-
10
-
11
-
12
-
13
-
14
-
15
-
16
-
17
-
18
-
19
-
20
-
21
-
22
-
23
-
24
-
25
-
26
-
27
-
28
-
29
-
30
-
31
-
32
-
33
-
34
-
35
-
36
-
37
-
38
-
39
-
40
-
41
-
42
-
43
-
44
-
45
-
46
-
47
-
48
-
49
-
50
-
51
-
52
-
53
-
54
-
55
-
56
-
57
-
58
-
59
-
60
-
61
-
62
-
63
-
64
-
65
-
66
-
67
-
68
 |
 |

QUICKSTART GUIDE
ENGLISH ( 3 – 15 )
MANUAL DE INICIO RÁPIDO
ESPAÑOL ( 16 – 28 )
GUIDE D'UTILISATION RAPIDE
FRANÇAIS ( 29 – 41 )
GUIDA RAPIDA
ITALIANO ( 42 – 54 )
KURZANLEITUNG
DEUTSCH ( 55 – 67 )