Alesis PerformancePad Pro Quick Start Guide - Page 5
Overview Of The Controls - drum pad
 |
View all Alesis PerformancePad Pro manuals
Add to My Manuals
Save this manual to your list of manuals |
Page 5 highlights
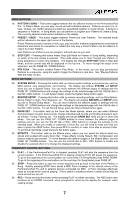
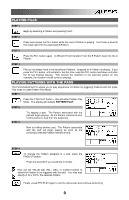
OVERVIEW OF THE CONTROLS Now that we have introduced you to the infrastructure of the PerformancePad Pro, let's dive in and take a closer look at some of the controls. 5 16 17 18 22 21 20 10 9 23 14 14 14 14 14 12 15 1 13 3 3 3 19 12 6 26 24 25 7 7 8 11 4 2 2 2 2 2 2 2 2 GENERAL CONTROLS: 1. LCD - The display helps you keep track of system parameters and settings as you use the PerformancePad Pro. 2. PADS - The 8 pads are used to trigger sounds on the PerformancePad Pro. The pads can address 3 different types of sounds: drums, percussion and bass. To select which sounds are controlled by the pads, press one of the three Pad Play buttons (DRUM, PERC, BASS). In addition, the pads can be used to trigger entire Patterns while in Pattern Play Mode. 3. PAD PLAY BUTTONS - These 3 buttons select which sounds are triggered when you hit the pads. Press the corresponding button to control the following sounds with the pads: BASS - Selects the Bass sounds associated with the current Drum Set. In addition, you can hold down this button and use the INC / DEC buttons or the VALUE dial to transpose the bass sounds up or down an octave. DRUMS - Selects the Drum sounds associated with the current Drum Set. PERC - Selects the Percussion sounds associated with the current Drum Set. 4. TAP TEMPO - You can use this button to tap in a tempo. The PerformancePad Pro will average the time between successive taps and will derive a tempo. You can also change the tempo by holding down the TAP TEMPO button and using the VALUE dial, the INC / DEC buttons or entering a value with the numeric keypad. 5. TEMPO LED - This LED will blink at a rate equal to the tempo displayed on the screen's bottom right corner. 6. REC LED - This LED will light when the PerformancePad Pro is recording. It will blink when you are required to confirm or cancel an action. 5
-
 1
1 -
 2
2 -
 3
3 -
 4
4 -
 5
5 -
 6
6 -
 7
7 -
 8
8 -
 9
9 -
 10
10 -
 11
11 -
12
-
13
-
14
-
15
-
16
-
17
-
18
-
19
-
20
-
21
-
22
-
23
-
24
-
25
-
26
-
27
-
28
-
29
-
30
-
31
-
32
-
33
-
34
-
35
-
36
-
37
-
38
-
39
-
40
-
41
-
42
-
43
-
44
-
45
-
46
-
47
-
48
-
49
-
50
-
51
-
52
-
53
-
54
-
55
-
56
-
57
-
58
-
59
-
60
-
61
-
62
-
63
-
64
-
65
-
66
-
67
-
68
 |
 |
