Alesis PerformancePad Pro Quick Start Guide - Page 10
Recording Your Own Patterns
 |
View all Alesis PerformancePad Pro manuals
Add to My Manuals
Save this manual to your list of manuals |
Page 10 highlights
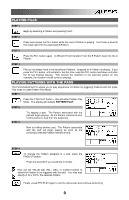
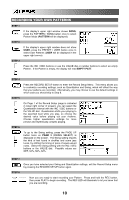
RECORDING YOUR OWN PATTERNS STEP 1 If the display's upper right window shows SONG, press the PATTERN / SONG button once to select Pattern Mode (PATTERN will be displayed). STEP 2 If the display's upper right window does not show USER, press the PRESET / USER button once to select User Patterns (USER will be displayed in the upper right corner). STEP 3 Press the INC / DEC buttons or use the VALUE dial or number buttons to select an empty Pattern. If the Pattern is empty, the display will read EMPTY PATT. STEP 4 Press the RECORD SETUP button to enter the Record Setup Menu. This menu allows you to customize recording settings, such as Quantization and Swing, which will affect the way that your patterns are recorded. Alternatively, you may choose to use the default settings in which case you should skip to Step 8. STEP 5 On Page 1 of the Record Setup (page is indicated in lower right corner of screen), you can select the Quantization interval with the INC / DEC buttons or the VALUE dial. Quantization shifts your playing to the specified beat while you play, so choose the desired value before playing out your rhythms. Choose higher quantization settings for more precise and rhythmically complex playing. STEP 6 To go to the Swing setting, press the PAGE UP button twice so PAGE 3 (SWING SELECT) is displayed on the screen. The Swing setting imparts the kind of feel found in shuffles and some jazz tunes, by shifting the timing of pairs of equal-valued notes. Select the Swing setting with the INC / DEC buttons or the VALUE dial. Possible values are OFF, 54%, 58%, 62%. STEP 7 Once you have selected your Swing and Quantization settings, exit the Record Setup menu by pressing the RECORD SETUP button again. STEP 8 Now you are ready to start recording your Pattern. Press and hold the REC button, then press PLAY to begin recording. The REC LED will illuminate to let you know that you are recording. 10
-
 1
1 -
2
-
3
-
4
-
 5
5 -
 6
6 -
 7
7 -
 8
8 -
 9
9 -
 10
10 -
 11
11 -
 12
12 -
 13
13 -
 14
14 -
 15
15 -
16
-
17
-
18
-
19
-
20
-
21
-
22
-
23
-
24
-
25
-
26
-
27
-
28
-
29
-
30
-
31
-
32
-
33
-
34
-
35
-
36
-
37
-
38
-
39
-
40
-
41
-
42
-
43
-
44
-
45
-
46
-
47
-
48
-
49
-
50
-
51
-
52
-
53
-
54
-
55
-
56
-
57
-
58
-
59
-
60
-
61
-
62
-
63
-
64
-
65
-
66
-
67
-
68
 |
 |
