Alesis PerformancePad Pro Quick Start Guide - Page 15
Factory Reset
 |
View all Alesis PerformancePad Pro manuals
Add to My Manuals
Save this manual to your list of manuals |
Page 15 highlights
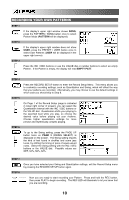
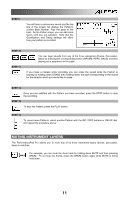
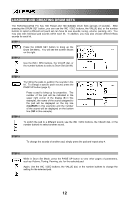
STEP 7 Once you have finished creating the sequence of Patterns for your Song, press the STOP button to stop the recording. STEP 8 You will see the screen displayed on the right. The top line will indicate the last step of the Song (STEP 48 in this example) and the bottom line will say END. To move between the steps, use the PAGE UP / DOWN buttons. Each step of the sequence will show the Pattern associated with it. If you have made any errors, you can correct them by selecting a different pattern for the step, using the INC / DEC buttons, the VALUE dial, or the number buttons. STEP 9 To hear the sequence from the beginning (step 00), press the PLAY button. To audition the sequence from the start of the currently selected step (indicated on the top line), press the PAGE DOWN button. To audition the sequence from the start of the next song step, press the PAGE UP button. STEP 10 If you are satisfied with the Song, great! Now you will need to save it so you can access it later. If you are in Step Edit Mode, press the STEP EDIT button once so the song name is displayed on the top line (it should display NO NAME unless the song has already been given a title). To save the Song, press and hold the SAVE / COPY button. You will see SAVE TO SONG displayed on the screen and you will notice that the REC LED will begin to blink. To confirm that you want to save the Song, press the REC button while holding down SAVE / COPY. However, if you are not satisfied with the Song and wish to erase it, simply press and hold the ERASE button while in Song Mode. You will see SONG ERASE? displayed on the screen and the REC LED will begin to blink, indicating that user action is required. Press REC to erase the Song. If you change your mind, simply release the ERASE button and your Song will not be erased. FACTORY RESET To restore the PerformancePad Pro's factory presets, hold the SAVE / COPY button and ERASE button simultaneously while turning on the PerformancePad Pro. (NOTE: This will erase all user data, including User Drum Sets, Patterns, Songs, etc.) 15
-
 1
1 -
2
-
3
-
4
-
5
-
6
-
7
-
8
-
9
-
 10
10 -
 11
11 -
 12
12 -
 13
13 -
 14
14 -
 15
15 -
 16
16 -
 17
17 -
 18
18 -
 19
19 -
 20
20 -
21
-
22
-
23
-
24
-
25
-
26
-
27
-
28
-
29
-
30
-
31
-
32
-
33
-
34
-
35
-
36
-
37
-
38
-
39
-
40
-
41
-
42
-
43
-
44
-
45
-
46
-
47
-
48
-
49
-
50
-
51
-
52
-
53
-
54
-
55
-
56
-
57
-
58
-
59
-
60
-
61
-
62
-
63
-
64
-
65
-
66
-
67
-
68
 |
 |
